Wednesday 29 September 2010

BLOG 24

The fabric has been selected for the border of the ‘9 in the Cabin’ and ‘9 in the Rail Fence’ quilts. I took one of the quilt tops to a machine embroidery workshop I was attending at a shop called Castle Court Quilter in Shropshire. The workshop facility is huge and we have access to hundreds of bolts of fabric. I made a couple of potential choices for the border and draped them either side of my quilt top at one end of the workshop. Whenever I looked up to assess the fabrics, the choice became immediately obvious. I just need a bit of time and space now to cut and sew the borders to the quilts.

Space is available in my studio (2/3rds of a double garage) but time is difficult. Currently we have 2 brown Labradors in residence whilst my daughter and husband enjoy a sunshine break. The cats aren’t impressed and have gone to live up the corridor. The dogs have boundless energy and this is dissipated in and around our large garden and paddock. They are enthusiastic gardeners but not very good at it! They had their own visitors yesterday! What do you call a collection of Labradors? A tumble, a lick, a blur, no I like a frolick of Labradors.

I have made significant progress too on the Gresford sampler and quilted the following blocks:

Dresden Plate

Inner City

Tumbling Block

You may have noticed that I don’t work on one project at a time; I’m not wired to do that. I need variety and a sense of panic to function properly. So as well as all the other stuff going on I have one of my painterly wall hangings in progress. I am very influenced by what is going on around me in the garden and, although I have no hollyhocks in my own, I have friends who do.

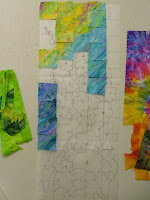
Hollyhocks: Start with a Master Pattern. This is loosely drawn on a sheet of baking parchment, divided in a staggered vertical grid.

Hollyhocks pattern

Fabrics are selected from my stash to make the wall hanging and prepared with Bondaweb. I use a fluted rotary cutter to divide the bonded fabrics into strips.

Hollyhocks fabrics

Squares are prepared on a separate sheet of baking parchment and pinned onto the Master Pattern. I have a good idea when I start of what I want to achieve and I particularly like using the strips on the diagonal.

Placing the squares

Auditioning fabrics

As I work on the background squares, I continue to audition potential fabrics by pinning them along side the Master Pattern. As this is a visual and intuitive process, I need to continually assess my progress from a distance. To do this, I stand with my back to my work and look over my shoulder through a mirror. This doubles the distance in my studio and allows me to see where the problems are.

Friday 17 September 2010

BLOG 23

Over the past few days, I have completed the construction of 9 in the Rail Fence and here you can see a picture of it on the bed. I really like the effect and it is just right for the room. There are 2 different blocks: One 9-patch centre with 5 light and 4 dark squares and one with 5 dark and 4 light squares. The rail fence squares surround the centres, with the dark strips going horizontal and the light strips going vertical.

9 in the Rail Fence: 2 blocks

9 in the Rail Fence

Here is a reminder of the first quilt centre that I constructed and I’m sure you’ll agree that they go well together

9 in the Cabin

All that is needed now is a decision on borders for both these quilts. I have many 5” strips left over from the Rail Fence squares and some 9-patch blocks. My initial feeling is that the quilts need a relatively plain teal inner border to frame and contain the centres, with perhaps a second border made from the leftovers and a outer border of teal again. Watch this space.

Out of interest, the colour palette for these quilts came from the following cross-stitched picture. My sister Gwyneth made it for me many years ago and I have always treasured it and loved the colours.

Colour inspiration

Thursday 16 September 2010

BLOG 22


QUILTING 2010

9 in the Rail Fence

Following the making of the ‘9 on the Cabin’ quilt top (borders pending), I decided to embark on a quilt for the second bed before the idea outfaced me! It needs to be made with the same fabrics to co-ordinate with the first, but in a different design to satisfy my dislike of repeating quilts. That way it’ll get done!

So what to make? The individual blocks must be the same size (14 ½”) and the 9-patch centre needs to be consistent and the 2” strips left over from the first quilt need to be used. After much scribbling on paper to try out ideas, I came us with ‘9 in the Rail Fence’. Rail Fence is a traditional design, like Log Cabin, and somehow together they evoke thoughts of the early pioneers settling in America. This is what I have sewn for the individual blocks:

9 in the Rail Fence block

Four blocks together look like this:

9 in the Rail Fence 4 blocks

I am happy now with the design and will spend the next few days, between other on-going projects, constructing the quilt top. Another considerations for both quilts are the borders that need to be added. These again will be based on 2” strips.

The other project that has been progressing quietly is the Gresford Sampler. Many of us had a break from our usual Tuesday morning session and have now returned for the autumn meetings, enlivened and raring to go. All the blocks have been completed for the quilt top and most of us are at the quilting stage. There are several options: joining the quilt together and quilting it, joining rows together and quilting them before constructing the top or quilting the individual squares before joining them together. Quilting can be done by hand or machine, depending on preferences. I have opted to quilt the individual squares ands strips before construction, known as quilt-as-you-go. These smaller units will be easier to handle under the machine.

Joining strip

I am quilting with a multi-coloured thread and a pronounced stitch. Notice the extra batting and backing along the top and bottom sides

Quilting detail

The blocks themselves are quilted with a decorative stitch in matching threads, with a crosshatched background grid.

I have joined 3 squares together so far and they look like this:

Gresford Sampler: construction

Detail of stitches 1

Detail of stitches 2

BLOG 21

9 in the Cabin (part 2)

Time goes by apace, with many distractions in between the last blog and this one.

My elderly mother (94) has been staying for the past 3 weeks. We have to be very attentive because of her poor mobility, but that is far outweighed by her extremely sharp mind and excellent recall. (I am relying on the genes!)

Her visit is the main reason behind my present quilt making activities. Of an evening, all we do is hand over the TV controls from 7 onwards so that she can watch her mindless soaps whilst we disappear up the corridor, Rog to his computer and me to my studio and sewing machine. It works well.

I have now finished my 24 blocks to make the quilt top and now I need to sample different the layouts to see which I prefer.

Layout 1 shows all the dark sides together to form secondary squares

Layout 2 shows 2 dark sides together to form triangles

Layout 3 shows dark sides together to form lines across the quilt.

Layout 3 is the one I prefer and this is how I will construct the quilt top.

I need a second quilt for the same room and intend to use the same scrap fabrics but a different design.

Here is an image of the constructed centre of the quilt on the bed. I love it!

You will see that it just covers the duvet and really needs borders around all edges to make it sit better on the bed. Willow obviously approves!

BLOG 20

QUILTING 2010

This time of the year is quiet on the quilting front as many of the groups I belong to have a welcome break. I think it’s a good thing too as I know I will enjoy the space and return in the autumn refreshed and enthusiastic again. So what to do to fill in my free time? Make a quilt of course!

I redecorated our guest room recently in a soft turquoise shade and installed twin beds instead of a large double bed. This means now that I have to make a couple of quilts to cover the beds and add interest to the room, because to me, a bed is not finished unless there is a quilt on it. I say that ‘I have to make a couple of quilts’, but in fact I have loads of them about the place and I just WANT to make them to specifically coordinate with the room. I have chosen a traditional block for the first quilt, which I am calling ‘9 in the Cabin’ and here’s how to do it.

9 in the Cabin

PREPARATION

The block:

Log cabin with a 9-patch centre

The fabrics:

Dark values


Light values

Select lots of busy scrap fabrics in light and dark values. Discard any fabrics that look plain from a distance and any that are of medium value. Cut the chosen fabrics into 2” strips and keep them in separate piles. (To give you more choice of fabrics, consider using the reverse sides of medium fabrics.) Cut some 2” squares from all the fabrics and keep them separate.

All my fabrics have turquoise in them, to go with the room, along side pinks, purples and blues. Reds, oranges, yellows and browns were avoided.

2” squares

Work station:

Machine, strips and squares at the ready

Set the sewing machine to sew a regular stitch, with a neutral thread and ¼” foot. Arrange the fabrics in separate piles around your work area and set up an ironing area close by. (My ironing surface is deliberately positioned a few steps away from my machine so I have to get up and move about on a regular basis; a form of exercise!)

METHOD - Sewing the 9 Patch

1 Place 5 dark and 4 light squares by the machine to make a 9-patch, making sure there are no repeated fabrics. Using an accurate ¼” throughout, join 3 squares together to make a row and press the seams from light to dark on the wrong side.

Rows for 9-patch

2 Join the rows together, butting up the seams, to create the 9-patch.

9-patch

3 Press the seams on the wrong side to complete the 9-patch centre of the log cabin block. (The fabric for the middle square on the right hand side has been used in reverse to give a light value.)

Press

Sewing the sides (logs)

4 Add side 1 by placing a dark strip along the top of the 9-patch block, with right sides together. Sew with a ¼” seam and press the strip open. Trim to the edges of the 9-patch.

Add side 1

Add another dark strip, for side 2, along the right hand side of the 9-patch, press and trim.

Add side 2

Add a light strip, for side 3, along the bottom edge of the 9-patch, press and trim.

Add side 3

Add another light strip, for side 4, along the left hand side of the 9-patch, press and trim. This completes the square again with 2 dark strips on one side and two light strips on the other.

Add side 4

5 Continue in the same way to add a second row of strips. Always start along the top edge and add 2 dark strips and 2 light strips in sequence.

Add a second row

6 Continue in the same way to add a third row of strips. Always start along the top edge and add 2 dark strips and 2 light strips in sequence. This completes the block.

Add a third row to complete

The reverse side

In the next blog, I will be experimenting with the design possibilities of the block.