Question: What do
you do with a pile of light and dark of scraps, a cutting board, iron and
paper?
Answer: You make
a quilt!

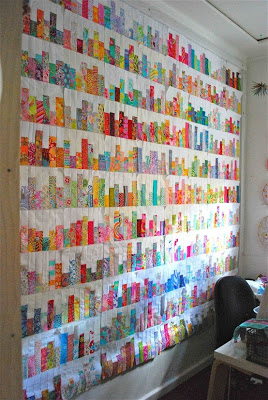
Potential quilt

Old quilt
Now, is decorating an excuse to make another quilt or is making another quilt an excuse to decorate? In my case, making another quilt is an excuse to use up the bits of fabric overflowing from my storage baskets. I don’t want to buy any new fabrics; I only want to shift some of my existing stock. And there is a load of stock I can tell you!

Storage baskets

Scraps
IN PREPARATION: I
have set up my loft room for a concentrated sewing session. It will be left
like this for the duration as no-one else needs this space and the door can be
closed after me. I won’t have to clear up at all, just sew. I can spend an hour
in there or fifteen minutes whilst the potatoes boil. Here’s the set-up.

Set-up
1 An iron and pad: positioned away from my machine so I have
to get up from my chair each time I need to use it (stops me from sitting in one position all the time and makes me move
every few minutes)
2 Cutting board, ruler and cutter: new blade so I don’t get
frustrated when cutting.
3 Pad of A4 lined paper: the cheaper the better as the paper
tears more easily after sewing.
4 Sewing machine: threaded with neutral cotton thread, stitch
size reduced to 1.1 on my setting. (I
tried with several qualities of paper and noticed that the better quality ones
needed an even smaller stitch.)
5 Bags of strips hanging on the drawer: Light strips in the
green bag and dark in the red bag. (They
will be easy to swap over when I change from light to dark fabrics.)
6 Bag on the floor for discarded ends of strips that weren’t
long enough to go across the page. (Need
to offload them onto someone who uses smaller strips.)
7 Rubbish bin placed to the right of the machine.
ALSO IN PREPARATION:
I have cut lots of strips from Hoffman-like fabrics (i.e. rich looking fabric with
gold or silver in them. I have lots left over from box making days.) I spent an
afternoon ironing fabrics first and cutting what I could from them. My thought
was to cut strips of varying widths if I could get them from the left-overs of
the fabrics: 2”, 1 ¾”, 1 ½” and 1 ¼”
and I needed lots of variety to get started.
More next week.
BTW: All the strips for my granddaughter’s quilt
have been joined and now I need space to ponder on how I am going to proceed
around the borders with what remains of the light fabric. More on this quilt in
a couple of weeks.