Monday, 31 October 2011

BLOG 74


I am slightly later than usual in posting my blog as I have been at the Autumn Quilt Festival in Malvern. I had a lovely time with everything going like clockwork. Unusually, the motorways ran freely and I was able to remember the route to the show ground from last year. I stayed in a clean but functional Travel Lodge in the centre Worcester, shopped for food at Marks and Spencer and spent my evenings reading, drawing and watching tv .. I believe it’s called chilling out.

Here are some of the quilts that formed part of my display.

Landscapes

Wallhangings

Archway quilts

Prancing horse

Still life on the tiles

Cat and Balusters

The quilts were not hung to their advantage because of the hanging systems that are used but I was proud to see them there and delighted with the public response to them. I was berated often for not having written a book about the method yet … perhaps I feel another book coming on!

Sunday, 23 October 2011

BLOG 73


The method of sewing log cabin squares for the bag project has been demonstrated at Gresford craft group this week. I showed the strip piecing method and Jennifer demonstrated the foundation method. (I DIGRESS: When quilters told me that their preferred method of sewing was ‘The Foundation Method’, I always thought that it sounded a bit like a contraceptive. As it is a fail safe method, you can justifiable claim that you practice safe patchwork with it!)

Anyway, after all the preparation, I am happy to say that there is a lot of interest. Having seen the original bag (Blog 73) with the added corners, some wanted to give that a try. It requires a bit of extra preparation but it is a simple procedure.
For each block, cut 6 squares at 2 ½” from the fabric used for the centre. Iron them in half to create a triangle.


Corner squares

Add the first round of logs to the centre square and then pin the corners in place. Use 1/8” seam along the raw edge to baste them in place before adding the second round of logs.


Round 1 + corners


Round 2


Pin and baste the next corners in place.


Round 2 + corners

Add the third round of logs and baste the corners in place to complete the block.


Round 3 + corners

For the bag, you will need 10 identical blocks.

In preparation for constructing the bag, you will need to make a cardboard template like the one below. It is 7 ½” wide (the size of the block) and divided into 2 squares and a triangle. Along the long side, the first square measures 7 ¼” The block less one seam allowance), the second 7” (the block less 2 seam allowances) and the third 7 ½”.


Cardboard template

My blog may be late next weekend as I will be at the Malvern Autumn Quilt Festival, where there will be a selection of my painterly quilts. I will be demonstrating my Dual Image method, selling my Christmas patterns and books, and running a daily mini workshop. Come and say hello if you are there.

Sunday, 16 October 2011

BLOG 72

I have managed to frame my four pictures and I am really pleased with the results. They are ready for putting into the exhibition at the end of the month and it will be the first time I have ever exhibited paintings and offered them for sale.

Small paintings

Large paintings

I will not see them hanging, as I will be at the Autumn Quilt Festival at the Three Counties Showground in Malvern. Running from Friday 28th to Sunday 30th October, this event promises to be inspirational. There will be many different exhibits within the show and I will be showing, for the first time, a body of work called The Fabric Palette. I will be there to run a mini-workshop daily, to sit behind my stall and demonstrate and to sell my latest book and my collection of Christmas patterns. Come and say hello to me!

Next Tuesday, at the Gresford craft group, a friend and I are starting another project for those in the group who want to join us. This time, our theme is based on the traditional block of log cabin. I am going to start with a simpler version of the bag shown below and I have started to prepare my demonstration if you are interested to have a go.

Log cabin bag

The pattern, for reference, is based on a 7” square and you can draw it easily on a sheet of graph paper as shown below. Mark a 1” square for the centre and 1” logs around the outer edge. Number the sewing sequence and shade the dark side.

Log cabin pattern

The centre is a 1 ½” square and the fabric strips are cut at 1 ½”. Set up your machine with a neutral thread and attach a ¼” foot. This is the basic block. It starts with a centre square (black). Row 1: 2 gold strips and 3 red strips are sewn in sequence (I worked clockwise) round the centre block to complete the square again. Row 2: repeat the sequence. Row 3: repeat. Now what’s complex about that? Accurate cutting and sewing is essential and I recommend the use of an iron throughout the process. More next time.

Log cabin sequence

Sunday, 9 October 2011

BLOG 71

I have had a lovely creative time this week but in a totally different direction. I was asked recently if I wanted to exhibit some work in a local village art exhibition at the end of this month. The message has got around locally that I am a ‘bit artistic’ so would I like to be included? I think when my husband passed on the message, it was a bit tongue-in-cheek, but I surprised him by accepting the challenge. So this week, I needed to prove to myself that I could actually come up with the goods.

I have been going to art class for a few years now but we have never done any of what you might call ‘normal painting’. It has largely been experimental but I have learned the principles of drawing, the mechanics of the colour wheel, tonal studies, painting with acrylics, watercolours, pastilles, bleach, chalks, charcoal ….. you name it, and I have probably done it. But can I actually paint a picture?

Yes I can and here’s the evidence!

Pansies

Anemones

Roses

Lilies

They can only be described as mixed media. I started with a rough sketch and then used the same palette of acrylic colours for all four paintings: alizarin crimson, ultramarine and cadmium yellow. I began by mixing the acrylics with a lot of water to do an under wash across the whole canvas, rather like using watercolour. Then I used thicker acrylic paint to build up the colour and add more detail. After that, I thought the paintings appeared a bit flat, so I used inks to intensify the colours and felt tip pens to add intricate detail. I then decided that the completed paintings looked too controlled and structured, so I used pastilles to smudge the colours.

I still don’t know what I’m really doing but I like the results and that to me is the basis of art. These will be framed and entered into the local art show and if they don’t sell, I have 4 Christmas presents in stock!!!!!

I want to continue to play with my embellishing (felting) machine and so decided to reproduce one of my paintings as a textile. I chose the Pansies and, after drawing a rough sketch onto felt, I began adding fibres, ribbons, cord and threads. I’m not sure what I am doing but I am pleased with what has happened so far. I look forward to continuing with this next week.

Stage 1

Stage 2

Stage 3

Sunday, 2 October 2011

BLOG 70


I have completed the cot quilt and sent it off to Laurence Stanley Osmotherley (poor little blighter!) with a sigh of relief. So now I am able to concentrate on my still life study, with flower vases. My method of preparing the background and a sample vase has been demonstrated in previous blogs. I have made several more vases of differing shapes and now I need to arrange them on the background, on a design wall. This is when the camera comes into its own. I have placed four possible arrangements of the vases side-by-side so I can easy judge which I prefer.

1

2

3

4

My musings: I like the position of the vase on the right, as it seems to be basking in the full impact of the light source.

I also like the dark blue vase directly behind it.

In #1 I don’t like the fact that the 3 vases on the left hand side are placed in a line.

I don’t particularly like the position of the tall purple vase on the left hand side in #3 and #4. I prefer it slightly off centre, as in #2

My preference seems to be leaning towards #2 as long as the large vase on the left hand side is moved forward.

Here is the adapted arrangement I have selected.

Selected arrangement

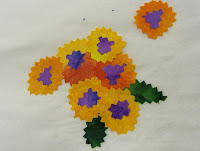
And now for the flowers: I rarely do what is called ‘fussy cutting’ because it is so wasteful on fabric, but I did cut out individual flowers and leaves from this small piece of stamped batik fabric to make an arrangement for one of the vases.

Fussy cutting

I use pinking shears to cut them out and work with an iron on a sheet of baking parchment. I place the intended vase on the parchment and arrange the flowers to see what they looked like. They over-lap slightly, so once I am satisfied, I use the iron to stick them all together. Once they have cooled down, it is easy to peel them off the parchment and pin them back in place on the design wall. Nothing is stuck in place at this stage so there is still flexibility as the picture develops.

Flower arrangement

Placement

There are many ways to make simple flowers; here are a couple more ideas. I make a daisy with a semi-circular centre and curved petals. A primula can be a circle with a small contrasting shape inside. It’s good to play with ideas and I am now in a position to steam ahead with this project over the coming week.

Daisy

Primula

I can make these independently, and then audition them in situ on my design wall.

Progress