Sunday, 29 July 2012

BLOG 109

My husband has been away on the family farm in the Forest of Dean, helping out with TB testing. So you would have thought that having the place to myself from Monday to Friday would have generated a great body of work, or at least given me the time to think up and start a new project. Well it didn’t, but I have to say that the garden is looking a lot better now. The weather was so lovely that it was too good an opportunity to miss, to be out there fighting the constant battle with the weeds.

But that’s just the thing about creativity; you don’t know when it is going to strike or what sets it off. And I won’t beat myself up over this lost opportunity and just bide my time until my creative juices are ready to flow again. Fortunately, in my chaotic world, there is always something hanging around to be finished and that is what I will concentrate on until I am certain where I want to go with my fabric endeavours.

Proddy Rug

There has been a little progress on this project. I’m not sure whether this is my thing really but I will persevere with it in the spirit of ‘I’ve started so I will finish’ and, because it has been designed for a specific place, it is a means to an end. I won’t be doing a stair carpet however!! The border is turned onto the front so that the first strands go through all the layers and give a neat finished edge. Ignore the green design on the pics below; this was printed on the original sack and isn’t part of my design.


                             Outline and border


                                      More detail


                            Infill


Memorabilia box

The other project that I am keen to finish is my very own memorabilia box. I need to complete the decorative top so how do I go about it?

Firstly I sort through my supplies and pull out anything that could possibly be of use, from fabrics to threads to sheers to yarns. I place them alongside the box, so I can see straight away if they are right or not. 


                      Palette for decorative top


I don’t know about you but I have lots of narrow pieces of batting which I hang onto so I can use them to make wider pieces and therefore cut down on waste. I want to place batting behind the stitchery so I need to join 2 strips together.

To do this, I over-lap the edges of 2 long pieces of batting and cut through the 2 layers using a rotary cutter and ruler. This produces 2 perfectly straight edges which I then butt up together. I use the widest zigzag stitch on my machine to sew and hold the edges together securely.


                             Zigzagged edges


The sewing sequence for my decorative lid

 1 I placed a painted silk background onto medium vylene and batting. With a water-erasable marker, I defined the size of the rectangle I want to fill.


                                      Background


2 I sewed a few random rows of free-motion stitches to hold the layers together.


                                  Random lines

 3 I added pieces of sheer fabrics to start building up a richness of colour.


                                         Sheers

  4 I sewed straight lines of decorative stitches across the layers to define a grid.


                                Decorative grid

 5 I used different free-motion stitches and threads to fill in the spaces.


                                   Infill stitches

 6 I added borders.


                                    Borders

 6 I stuck the lid in place and I now have my own memorabilia box!


                                        My box

Sunday, 22 July 2012

BLOG 108


The best laid plans …. and all that! I was fairly sure what I was going to develop and achieve in my studio this week but, on the spur of the moment, I decided to go and visit my mother in the Southern Lake District for a few nights. Every year she finds the anniversary of my Dad’s death hard to cope with, so it was a good time to go. She is very well in herself, with notable improvements in her condition of several months ago. Although reliant on Oxygen and Zimmer frame, she is as well as I have seen her for a long while.  (And I have nothing but praise for Furness General Hospital - so maligned in the press of late - and for her elderly care package.)


So that’s my excuses out of the way, but just what I have done in the short time I have been in my room this week?


My Dual Image Jacobean wall hangings will have to be posted tomorrow for the Festival of Quilts competition at the NEC in Birmingham next month. Typically of me, I decided at the 11th hour to add some detailed stitchery to the joining strips, to make them less obvious. To go about this, I went to my box of resource material and looked at my books, pamphlets and pattern packs for inspiration.


                                      Inspiration

 From these, I selected and doodled some ideas on a pad.


                                     Doodles


The strips I will be sewing across are long and narrow, no more than 1” in width so what I needed was a flowing pattern that required no stopping and starting. I tried several different lines.


                               Flowing pattern


I drew width lines onto a fabric sandwich and then tried some ideas with thread.


                                Thread practice

 Once I was happy with shape and flow, I took a deep breath and just ‘went for it’ as the popular saying goes. As soon as I had done about 6”, I reviewed my progress, knowing that, once committed, I had 3 horizontal and 2 vertical strips to do, not just on one quilt but on two. This was going to be quite a commitment so I had to be sure that it was right for the piece. It was and I have done it now!


                                             Detail

 Looking at the close-up above reminds me that I must remove all the cat hairs, fibres and fluff from the surface of the quilt!!

PRODDY RUG

The hand project that I took to do at my mother’s was something totally different for me. I wanted to try my hand at rug making, specifically to make a small rug for a bathroom to go at the foot of the wash basin. The things you get involved in eh!! I have chosen to make it with some of my stash of batik fabrics but I realise that this may cause problems for me to solve as I am going along.


                                              Fabrics

Requirements include hessian (I am using part of an old sack), ½” x 2” strips of fabric and a spring-loaded tool.


                                   Fabric and tool

 I have drawn a simple design on the right side and used the darkest of my fabrics to define it. I have also turned the raw edge over onto the RS and held it down with a row of fabric stitches close to the edge. This can be more clearly seen on the WS. I’m not sure that I am enjoying it but as a means to an end, it may grab my attention. So perhaps more of this in later blogs if I don’t lose the will to live in the mean time! Have a good week.


                            Simple design WS


Sunday, 15 July 2012

BLOG 107


This week I have continued to work my way through ‘unfinished’ projects so I can advance their status towards ‘finished’ projects. I only do this if I want to finish something. If I don’t want to finish it, I put it down to experience and I reclaim what material I can without feeling guilty. It’s a case of ‘Cancel and Continue’.


I came across a Memorabilia box that I had started for myself ages ago. It has rather a lovely Batik fabric on the outside so I have covered the lining pieces of card with a suitable complementary fabric.

The Memorabilia box method was featured weekly from Blog 96 onwards.


                            Memorabilia Box

The lining pieces have been stuck inside, the inner and middle lids are in place and the tassel is ready for attaching. Next week I will hopefully have done a decorative top to finish it off.


                               Box and tassel

Also this week, I have spent time on the Signature quilt that I am making for my friend’s 60th Birthday. The joy of collecting signatures at a party is that you get to talk to everyone there. Then of course there is no pressure to get it finished for the said birthday because it has been and gone! So I can take my time on this project and do a bit when I feel like it.

Here is a reminder of the block:


                            Signature block


The block with the joining strip:


                        Joining strip

Two prepared rows:


                   Two Rows

 And two rows with joining strip:


                Joining strip for rows

 Here is a quirky patch; it was signed by family friends after the party, and no-one seems to have noticed that it was on the wrong side. I am keeping it in the quilt because it speaks volumes about the family involved!!


                             Quirky signature


Sunday, 8 July 2012

BLOG 106


The first Linus quilt top was completed on Sunday night. I find that working for a couple of hours in an evening rather suits me. I’m not a habitual TV watcher, especially early evening, so from 7-9 I am usually in my studio enjoying myself and getting on with things. Rog records any programmes that I might be interested in and we sit down later to view the programmes, without the intrusion of those wretched adverts.


We have had the painters in this week to do the vaulted ceilings and walls of the lounge and kitchen. The thought of it had out-faced us for the last couple of years and it was a mammoth job that desperately needed doing. They arrived on Tuesday for 3 days and that gave me another excuse to disappear into my room. As soon as the scaffolding went up, we were satisfied that this was not a DIY job. The music, loud enough to make your ears bleed, went on as soon as they arrived and was turned off as they left. I have to admit that I had never heard of Magic Radio before but I knew many of the songs from the 60s and 70s and I could even sing along!!


LINUS QUILTS: Most of the Linus quilts tops are based on 2 ½” and 6 ½” cut squares and 2 ½” strips. It is basic rotary cutting and accurate ¼” seam allowances. An iron is an essential part of the construction process, for smoothing the fabric prior to cutting, for settling the stitches after sewing and establishing the direction of the seam allowances. As soon as my sewing machine is switched on, the iron goes on too; it is like a stimulus/response mechanism.


The first 3 quilts are made from fabric given to me by Chester Ps & Qs.


                              Linus 1


                              Linus 2


                              Linus 3


These next 2 quilts are constructed from a jelly roll, with larger squares added from fabric in stock.


                                Linus 4


                                  Linus 5


I don’t know about you but I still have UFOs in my cupboard from years ago, when I was teaching full time. The next 2 quilts have been made using teaching samples. They must be early quilts as the piecing is none too special but they don’t look too bad ….. from a distance!


                                    Linus 6


                            Linus 7

 So I have achieved this week what I mentally started out to do, to make a daily quilt top for the Linus Project. Rather than burn myself out with the effort, I am quite energised by the experience. It reminds me of the ground I used to cover when I was working at my busiest, with 7 classes of 12 ladies every week and travelling lectures and workshops at the weekends. Just how did I do it?

Sunday, 1 July 2012

BLOG 105


I am at a bit of a cross roads at the moment. The Jacobean quilt is out of my system and was well received at the Gresford show. I just need to tidy it up for the in-depth scrutiny of the see-all, know-all judges at the Festival of Quilts.

 So what do you do when you need to think about the next project? ….. You tidy up your workroom, clean out, sort out and throw out! On one hand, I would have been ashamed to show you the mountains of dust, fluff and stuff that were hauled out from inside, around and under the units. On the other hand, having left the cleaning for so long, it was really worth doing and produced satisfying results! So, here is the tidied room; enjoy it because it won’t be like that for much long!


Fabric baskets, bookcase and empty design wall


     Light box, pin board and storage units


              Sewing table and scrap jars


              Threads and storage


            My doorway to heaven!


       Storage, shelves and fabric baskets


Whilst I am deciding what to do as my next project, there is some work-in-progress that I can get on with. Perhaps you may be wondering why these works-in-progress aren’t classed as my next project? I suppose I have always distinguished between my every day quilting, (projects that I can pick up and put down, slice with the cutter and slam under my machine) and my own creative work (patterns that need designing, problems that need solving and fabrics that require manipulating). The first is what I have to do, using my sewing skills for the benefit of others; the second is what I compulsively need to do, developing my sewing/creative skills for my own benefit. I have this creative urge within me that just keeps me moving forward. I can’t describe it; it is just part of me!


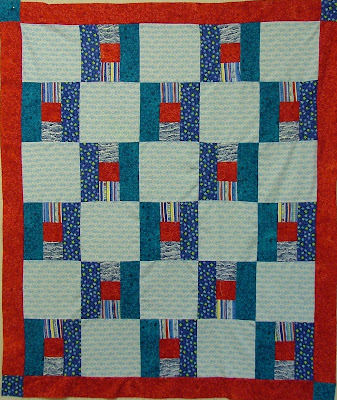
Work in progress: As part of the Chester Ps & Qs, we take part in the Linus Project, making quilts for traumatised or disadvantaged children. At the last meeting I attended we started to prepare 6 ½” blocks for a quilt top and I brought it home to finish. So this is the first project on my list to get me back at my sewing machine. From a pile of fabric strips, it doesn’t take long for blocks to be joined, rows to appear and then a quilt top. All it needs now is the border. I will make others in this style to use up the fabrics given to me, and return them so that others can quilt them.


                                9-Patch blocks


                     Making rows


                    Auditioning borders