Sunday, 28 February 2016

BLOG 289


BLOG 289
WHIRLIGIG QUILT continued

The building blocks for the quilt need to be cut as a set of strips as follows: 4 at 2 ½” x 6 ½” and 4 at 2 ½” x 4 ½” from one fabric. From a fabric  cut from the bolt, you should get 2 sets from a long quarter metre which is what I was aiming for. Iron the fabric first so that the selveages are lined up and then straighten the long edge which is at right angles to the selveage. Remove the scantest of strips from the selveage. Cut two 2 ½” strips from the long edge. Cut along these strips to give 2 sets. (Remember that the fabric is doubled and you should be able to do 2 x 6 ½” cuts the 2 x 4 ½” cuts.)

            Cut along the strips

              2 Sets

 Here is the block with the light whirligig of colour that I demonstrated last week.

               Last week’s block


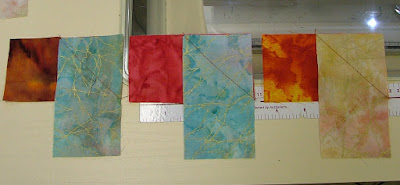
It has now been incorporated into the quilt-in-progress and extended. Nothing has been joined together yet; they are stuck in sequence on my design wall.

             Block in sequence


The best thing to do is to prepare many sets of fabric. Mine are divided into light or bright/dark whirligigs. What you always have to remember with this quilt is that there are 4 different fabrics at the corner of each whirligig. I am joining my sets together 2 or 3 at a time and placing them back onto the design wall.

           3 Blocks at a time

              
                Quilt in progress


In order to develop the quilt it helps to have some idea of what fabrics are going to be used where so to that end I am pinning sets where I hope to sew them. 

               Developing the quilt

What could help with fabric placement is a printout of the pattern so you can understand the colour sequence. I  am just feeling my way through this quilt.

             Printout

Looking at what I have done so far, I think I need to add another row to the right hand side, to complete the prominent red, gold and blue shapes. I love what I have done to date; it’s very jolly and colourful which suits me fine!

Aside: I have set up my Husqvarna machine in my studio to sew this quilt and I have found that the foot pedal is light and it annoyingly slips on the floor tiles. To solve this problem I have placed a non-slip mat underneath the foot pedal and it has stabilised the pedal.

             Non-slip mat

Sunday, 21 February 2016

BLOG 288


BLOG 288

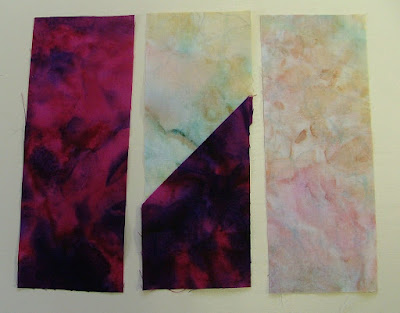
2016 started as my colourful year and I would like to continue with that theme. So for the tesselated quilt, I have chosen to work with batiks and balis because I have a vast collection of them and also because I can drool over the colours as I am using them.  It doesn’t take much to make this gal happy! Now, a tessellation is a repeating pattern of the same shape without any gaps or overlaps and this is the building block that will be repeated throughout the quit.


              Building block

I mentioned that it was similar in construcion to the Picket fence block seen below, but in fact it is simpler to constuct as there is only 1 of the 3 rows that is made up of 2 fabrics.

                Picket fence block


I am making blocks which are either light or dark/bright so that there will be a contrast throughout the quilt. For the 4 repeated building blocks you will need to cut a set of strips as follows: 4 at 2 ½” x 6 ½” and 4 at 2 ½” x 4 ½”. Place a set of rectangles beside your sewing machine as shown (a long and short light and a long and short dark).

             Rectangles

 Place the two short fabrics RS together and sew across the corner marked here in pencil. (Always sew this join in the same way each time.)

              RS together

               Sew and trim

 Trim and press both seams in the same direction and place the strip back in sequence.

              In sequence

Sew the long seams and press.

              Wrong side

               Right side


Place the remainder of the light set of fabrics in pattern formation and place a different dark at each of the remaining 3 corners.

                4 placed blocks


String-piece each of the short strips to make a row, and place them back in sequence.

               String piecing

             In situ


Join the strips together to make 4 building blocks and put them back in sequence.

              4 sewn blocks


I am not joining these 4 blocks together yet but I am pinning them on my design wall. At each corner I am pinning the rest of the bright strips that make up the set.

            Development


More next time so have a good week!


Sunday, 14 February 2016

BLOG 287


Blog 287


Royal International Pavilion,
Abbey Road, Llangollen
 LL20 8SW

The Nineties Collection. .........
........and More
Exhibition of quilts commissioned from  Quilters' Guild Members working during the nineteen nineties

Wednesday 10th - Sunday 21st February 2016
Open Daily 10am - 4pm
Free entry and free parking
 Museum and Art Gallery, Parade Street, Llangollen LL20 8PW

Wrexham Quilting Circle

Showcase

Tuesday 2nd February - Tuesday 1st March
2016

Open Daily 10am - 4pm
Free entry
Royal International Pavilion,
Abbey Road, Llangollen
 LL20 8PW

Trading Day

Sunday 14th February
2016
Open  10am - 4pm
Admission £3 - light refreshments available

Click here to see invited Traders

 
Quilt Fest is now being held in the Royal Pavilion in Llangollen. I was there on Wednesday doing my demonstration and talking to the trickle of visitors who came to look at the quilts. There are many lovely quilts on display, each one being 24” square, and they cover a vast range of styles and techniques. The quilters who made the original quilts for the ‘Nineties Collection’ were asked to make a second one so I was particularly interested to see both quilts by the same maker, to see if they had progressed and how they’d progressed. Here are just some of the quilts on display and there are plenty more to see including those in the Museum exhibition. Come and see them!

               Llangollen 1

            Llangollen 2

            Llangollen 3

              Llangollen 4

             Llangollen 5


Here are my two quilts on the right alongside those of Gwenfai Rees-Griffiths; I am in very good company!

              Llangollen 6


I can see from my black and white quilt that I was in a transition period with my work. I was at the tail end of my interest in Jacobean-style quilts and beginning to look at grilles and grids which would eventually lead me to the Garden gate series for which I was well known. This quilt was fastidiously hand applique and hand quilted but just look at the difference in my work now. I am sticking ready-bonded fabrics in place and machine texturing them to hold them down and add detail.  It took a while longer for me to realise that it is colour that excites me most!

Talking of colour, there is something else brewing in my studio. I seem to be going through a phase of ‘I always wanted to have a go at that’ and decided to do just that for this tessellated pattern. It flows quite nicely from my Picket Fence quilt because it uses similar techniques.

                  Tessellated pattern

               I feel a quilt coming on!

The tonal blocks which I showed last week are mounting up slowly. Every time I sit at my machine I do two of each value and will continue doing this over the long term until the bits are used up. Only then will I decide what I am going to do with them and how I am going use them.

               Tonal blocks

And a rather smug PS! When I used to live in Sychdyn, and teach in my workshop at home, I used to host an annual Theatre Clwyd night, which was much enjoyed by the many people who attended. I once asked the ‘powers that be’ at the theatre if I could put on an exhibition there. Their response was no because my work wasn’t art. That hurt a lot! So it is with great pleasure that I have had a piece accepted to hang there from next week and here it is! Perhaps I can believe I am an artist now.

                Sunflowers


Sunday, 7 February 2016

BLOG 286


BLOG 286

Another marathon ironing and cutting session produced an empty basket and fuller bags of strips, graded according to value. I just can’t explain how therapeutic this process was. These scraps have been accumulating in the drawer for years and to have made them into something useable now is like getting something for nothing! (In a small way, this may have been akin to how the early quilters felt, making a quilt from left over scraps!) But I jump the gun; the scraps have yet to be made into a quilt so there is more hard work ahead!

                 Empty basket

            Discarded bits


I settled at the sewing machine with a bag on my lap and a pile of 7” squares of wadding. I string-pieced the strips straight onto the wadding using a sew-and-flip method.

                     
             String piecing

 
On the cutting board, I reduced the squares to 6 ½”.

            The squares

 
I wasn’t fussy about the strips being at right angles to the edge, I wanted them to look haphazard. All I needed was one straight edge per strip; the next strip sewn on tidied up the other edge.

             Building block


I sewed two squares of each value at a time so I had the full range of values to play with. The first decision was to place one square at right angles to the next for the ease of construction.

              Rotated squares


Apart from that I know not where I am going with this project.  On the design wall, I started to play around with placement.

             Darks to light

             Dark to light, light to dark

On Wednesday this week, I will be the Artist in Residence at the Royal Pavilion in Llangollen, 10am to 4pm. I will be demonstrating my free-form method of applique ….. And that reminds me that some preparation needs to be done! …… I look forward perhaps to seeing you there.