Sunday, 25 August 2013

BLOG 163


TISSUE BOX continued: Constructing the base of the box


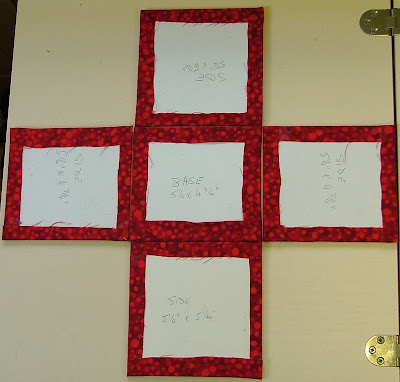
Place the covered pieces of the box base on a flat surface to make sure that you are familiar with the sewing sequence. The sides should fit corner to corner around the base.

 
                               Layout

 Place one of the sides, RS together, onto the base and secure it in place with a strip of masking tape.

                                 RS together


Use a strong thread (I use quilting thread) to match the lining fabric and whip stitch closely and firmly from corner to corner (this line of stitching will not be visible on the completed box).

                            Whip stitch

Secure the corner and then fold the sewn side away from the base to position the next side and hold it with masking tape.

                    Position the next side


Continue sewing around the base to attach the 4 sides. Then sew the vertical sides of the base (again these stitches will not be visible). I always start at the top edge with several tight stitches to make sure that the corners are level.

                            Lined base

 This week I have been doing some ‘up-cycling’ (to use an up-to-the-minute expression!) on some tired bedroom furniture. It used to belong to Rog’s parents and is good quality G Plan. But I thought it was looking a bit tatty and was all set to replace it. The thing is that it was extremely ‘fit for purpose’ (more modern jargon) and matched the skirting boards and beams in the bedrooms. I couldn’t find anything new that I preferred so with fear and trepidation I sanded and painted. I can’t believe how successful this was as a project and how well good it looks in its space. Kirsty Alsop, move over! Thought you might be interested in the before and after pictures!!


                                          Before

                                      After


The tops are a bit scratched so they may need sanding and re-varnishing … or I could make a quilted runner to cover them? … Do I need the excuse to make one?

 Ella’s drawings are progressing into a small wall hanging and I will teach this in an up and coming blog. These are the 2 fabrics I am using to frame the blocks, bright and colourful. Ideal!

                                     Frame

And these are some of her drawings. I’m sure you can recognise Paddington Bear, robot, jellyfish, chicken, hand, giraffe and butterfly, ladybird and rainbow!!  I love the naivety of them.

                                   Drawings

Sunday, 18 August 2013

BLOG 162


TISSUE BOX part 2

Preparing the batting and lining fabric.

These are the fabrics I have chosen, red for the lining (fat quarter) and mushroom/red (1/2 yd.) for the outside of the box. They are compatible with the other fabrics I have used in the bedroom.

             Outer and lining fabrics


1 Use the push-out cardboard shapes from the top of the box to mark the hole in the lid shape. Find the centre of the lid and the centre of the shape, position and mark. (Aside: I had already thrown mine out so I made the shape by tracing round the hole onto paper!)

                          Prepare the lid

2 Use a cutter or craft knife to cut out the hole. (Aside: mine looks as though it has been chewed by my teeth but it will be covered so it matters little!)

                       Cut out hole


3 Remove the selvedge if necessary and cut a fabric shape out for each piece of cardboard. Allow 1” of extra fabric all around the edges for these larger shapes. Place them onto the WS of the fabric, making sure there is enough space in between, and cut with a rotary cutter.

                       Prepare the lining


4 Keep each piece of card with its piece of fabric. Prepare low loft batting for these large shapes. Cut them slightly larger than the card.

                      Prepare the batting


5 Place the lid sides onto fabric and cut out with 1.2” extra fabric all the way round. Keep the fabrics with the card.

                   Prepare the lid sides


METHOD (for base and base sides only)

1 Stick the batting to the card for the sides and base. Use a glue stick to apply glue to the centre and corners of the card.

                                 Apply glue

 2. Trim so that no batting can be seen beyond the edges of the card from the other side.

                 Trim away the excess batting


3 For each fabric shape, apply glue to the WS of the fabric, across the corners only. Place the fabric RS down onto a flat surface and centre the card, batting-side-down, on top. Apply glue around the outside edge of the card to the same width as the extra fabric.

                     Apply glue to WS


4 Fold the sides in first, firmly but not too taut. Apply extra glue to the fabric corners and fold in the top and bottom edges.

                            Extra glue


From the RS side, there should be no looseness and the corners should be neat.

                           Completed shape


These shapes make up the base of the box.

                 Base and sides

More next time.

Sunday, 11 August 2013

BLOG 161


As it has been Festival of Quilts at the NEC this week, I am honour-bound to let you see some of the pictures I took at the show.  As a group, we had a wonderful couple of days there, staying in the Hilton Hotel and enjoying the camaraderie that has developed over the years of slaving away over a hot group quilt! We didn’t get anywhere this year with our quilt, perhaps because we decided to do something different for a change. We chose to do a repeat block, learned how to dye our background fabric with transfer papers (I certainly won’t be using Avalon again in a quilt-making context!), created the flowers to our own taste, added background quilting, joined accurately, beaded … you name it, we did it! But, disappointingly, the quilt didn’t hang well or show to its best advantage. Back to the drawing board!


                  ‘Petal mania’ by the Elderflowers


Here’s the winner of the Amateur Quilt, Traditional Quilt and Best in Show.


       Best in show (Hand applique, reverse applique and quilting)

There was the usual mix of quilts (traditional, contemporary, art, group, 2-person, three-dimensional) with an estimated 1000 quilts on show if you include the internal exhibitions. It has always amazed me how quilting has developed from the humble utilitarian bed quilts into dynamic wall art. Perhaps it is because we have purpose-made sewing machines, long arm quilting machines, and computer technology at hand to help us. Here are some quilts to illustrate the variety.

 Pictorial David Tennant (computer generated and machine pieced)


                    Miniature (free-machine drawing)

          Contemporary (machine pi eced and machine quilted)


Contemporary log cabin (dimensional wall hanging)

                          Detail: Individual shapes

 Miniature whole cloth (superbly and minutely machine quilted)

 Coracle with quilted sides ( Aside: Beautifully done and definitely different but what makes someone wake up in the morning and say to themselves, ‘I think I’ll start to make a quilted coracle today’ … and how do you store it?)

                                        Detail of sides

 Winner of group quilts, right side (Dimensional wall hanging, very clever)

     Winner of group quilts, left sides

 String piecing (Aside: After my traditional string-pieced efforts in previous blogs, it was lovely to see one done with such wonderful colour, free-style embellishment, raw edges and machine embroidery)

                                     Detail string piecing


                 3 dimensional pebbles (felting and stitch)

             Graffitti (painted surface and machine quilting)

            Decorative hanging (sheers and threads)

 Daily blog (Aside: Takes some stamina and imagination to keep this going as a daily diary.)

 Emails of a failed love affair (Aside: a very personal and raw dialogue laid bare for all to see. A great way to get it out of your system)

                    Fabric fabrics in different fonts (Detail)

 Traditional Liberty stars Detail (Aside: I could have taken this one home!)


I have barely scratched the surface of the show but it was fabulous and if you haven’t been already you need to go!!!

And what did I buy? Two pieces of fabric dyed by Heidi Stoll-Webber, and good enough to eat!!

                             Rainbow fabric

PS to Gill. I didn’t pick up your comment from 5 blogs ago until this week, sorry about that. Thanks for the encouragement and good to know you are looking in regularly. I remember doing the stained glass clematis and it just reminds me of the work I have covered during my 30 years teaching. Regards to the Gleneagles P&Qs, I know many of the members there. Dilys
Sunday, 4 August 2013

BLOG 160


TISSUE BOX

PREPARATION

The first thing to do is to measure and write down the dimensions of the box as they vary in size from one brand to another. My box is a bog-standard Boots.

Actual measurements:- Base: 4 ¾” x 4 ¼””, Height: 4 ¾”

Base cardboard: Base: 5 ¼” x 4 ¾”,  Sides: 2 at 5 ¼” x 5 ¼” and 2 at 5 ¼” x 4 ¾” (add ½” to actual measurements)

Lid cardboard: 5 ½” x 5”, Sides: 2 at 5 ½” x 1” and 2 at 5” x 1” (add ¼” to base measurements)

 
                                            Dimensions
 

Then you need to get hold of some mounting card. I sometimes buy it as a full sheet but this is getting more expensive nowadays. So if you know a friendly framer, ask him what he does with his off-cuts (he usually has to cut away large centres to make the frames). Sometimes you get them for free but eventually the framers cotton onto the fact that they could be saleable and they start to charge! I bought the bundle below for £4:00.

                                           Card off-cuts

Cut each individual cardboard shape. Measure accurately to make sure that they fit snuggly together and then label each piece.

                                    Measure and label

Cut out accurately with a rotary cutter and suitable ruler. I score the card first against the ruler to create a ditch and then I cut more strenuously.

                                         Cut accurately

 The card for the sides of the box should fit around the base and the same around the lid top.

TIP: Do not throw away the push-out piece of card from the top of the tissue box. This will be used to create the hole in the lid.


                                    Box base

                                        Box lid


The next step is to choose your fabrics, one for the lining and one for the outside. Although the outer fabric is the one on view, make sure that both are compatible ……. And this is where I come to a standstill as I haven’t got enough of the right coloured fabric for the project. I will be going to the Festival of Quilts this week so we’ll choose some there. You will need ¼ metre for the lining and ½ metre for the outside.

ASIDE: Trying to find suitable fabric, I found myself sorting out the storage drawers and what a job!! The problem is that many of the fabrics are in strips or scraps and they are difficult to tidy. These are the coloured drawers so far!.


                       Tidy drawers

 Today is our granddaughter’s birthday, 4 going on 20! Her parents did a wonderful barbeque lunch which we just managed to eat in the sunshine. Here’s Ella blowing out her candles.

                                     4 today


And what do you do with a pile of her drawings on fabric? … you make a wall hanging.

                                          Ella’s drawings

 Drop in again next week and see what I plan to do.