Blog 520
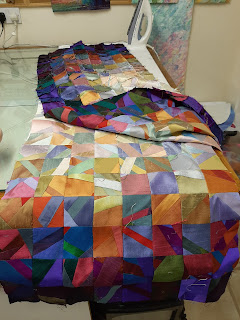
It was construction time for the silk wall hanging this week.
My first task was to decide if I wanted to match the seams or stagger them. In
the past, whenever I have made garden backgrounds with squares for my wrought
iron gates, I always chose to stagger the seams. The reason behind this was to
minimise the movement between individual squares and to give a more harmonious background.
The only way to answer this question was to pin the strips onto my design wall
and look at them from a distance.
I preferred the orderliness of the matching seams so that
was how I chose to proceed. I worked systematically pinning, sewing and
pressing 2 adjacent rows at a time. Then I sewed 2 seamed sections into 4 seamed
sections etc.
I eventually got it together and pinned it on my design wall
to enjoy the final effect. I could see straight away that there was a darker strip
just right of centre; I must have reversed a set of 4 strips during the final
construction! Damn!!
So with a bit of reverse sewing and a final double check I
got there in the end!
The silk frayed terribly whenever I touched it and the back
of the quilt and my floor mat bore witness to that fact. My clothes were always
covered with threads whenever I sewed which drove me mad until I remembered all
the effort that went into making just one silk thread. We visited a silk
factory in China last year where I learned that a moth laid 500+ eggs and when
they hatched, the worms were fed mulberry leaves for 1 month. These worms then
spun cocoons which were eventually steamed to kill the worms and then rinsed in
hot water to loosen the threads. Individual threads were then joined together
into larger bundles to be woven into fabric. It’s an amazing procedure and I
now have a greater respect for this particular wall hanging. It just needs
quilting now!!
And I decided that I quite liked it once it was all together
but I started to think what I could do to make it more pleasing to me, as
suggested by my husband last week! … What if I cut out small circles and
placed them on the surface, reversing the shading so that they were dark in the
centre and moved to light round the outside edge! The only way to find out was
to try it and after doing that I decided it was a step to far and the quilt
became much too busy. The quilt was fine enough as it was!
As I was playing one early afternoon, I was amazed to see
fairy lights shining at my window! Well that’s the way I chose to look at them.
The setting sun was shining through a partition hedge to create that effect. It
made me happy!


No comments:
Post a Comment