Sunday, 1 September 2019

BLOG 459

Blog 459
 I’m sure you know Edvard Munch’s painting ‘The Scream’; well that’s just how I feel this week! Not because I am depressed or bothered or at the end of my tether, but simply because my studio is being revamped. I feel displaced and upheaved … if there is such a word!
 

         The Scream


            Studio 1
 

              Studio 2


I need to throw out a filing cabinet that is all but empty and taking up space. I have a small cutting table which is a bit on the high side so that needs to go too. I am sorting through my vast library of quilting books and discarding the ones I don’t need any more.  There are quilting supplies that I haven’t used for years and fabric that I am never going to use. Everything really needs sorting out and it is a job to know where to start!  Instead of piling all my fabric baskets high, they will be in a long line and Himself is going to build a two-tier storage/working surface over the top. Watch this space as they say.
Last week we were staying in Easingwold in Yorkshire with my daughter and husband. We had a lovely time exploring the area; it’s such a lovely county with big skies, rolling moors and plenty of space. In Thirsk we were delighted to see knitted characters mounted on bollards around the town square. These are such fun and make people laugh and smile as they are going about their business. What’s not to like eh? You will see Red Ted on some of the pictures. He is beloved by my Granddaughters and he goes off on adventures and reports back to them.
            Peter Rabbit
 

         Wallace 


          Rapunzel
 

           Stickman
 

          Princess and the Pea
 

On Friday I attended the Great Northern Quilt Show. It must be 14 years since I have been there and I really enjoyed the experience. I went because I had entered quilts, again for the first time in 14 years and I was glad that I did! I won Best Sampler quilt for ‘Logs in the Sampler’ and Best Art quilt and a Judge’s merit for ‘Cat with Flower Pots’ and I am delighted. My Dolphins caused a lot of interest as well which is always good to see. The Group Quilt also won a Judge’s Merit and there was a lot of laughter from the ladies surrounding it; a quilt making fun of the menopause always has a captive audience at a quilt show!!
 
            A Sampler in the Cabin


          Cat with Flower pots


             Dolphins


Here are some other quilts from the show for your interest. The serviette box will start next week.
 
             13 Elaborate hexagons


          14 Bargello


              15 Double wedding ring plus
 

                16 Tessellations
 

                17 Sampler quilt
 

               18 Painted surface
 

             19 Log Cabin


           20 Fabric collage


             21 A year in houses
 

              22 Dynamic Flying Geese
 

              23 Painted surface
 

             24 Kaffe Fassett fabrics


              25 Clarice Cliff inspired


         26 Christmas Sampler


           27 Optical illusions
 

               28 Child’s quilt
 

            29 Hexagons
 

             30 Machine quilting
 

Sunday, 25 August 2019

BLOG 458

Blog 458
 
COASTER BOX CONTINUED.
8 Cut the outer fabric as follows: For the base: a strip 22” x 3” and a 5 ½” square. For the lid: a strip 22” x 2” and a 5 ½” square
(NB If you want to try your own design for the box lid, prepare a 5 ½” square as above but make sure that your design doesn’t extend beyond the 4 3/8” x 4 3/8” size.)
               Outer fabric
 

9 Cover the base (and lid) as follows: Place the base centrally onto the WS of the square. Add Pritt across the corners of the fabric and all around of the lower edge of the box. Stick the fabric to the sides of the box, working opposite sides together. Pinch the excess fabric at the corners and tidy it to one side with masking tape.
           Stick the square


            Pinch the corners


                Tidy the corners


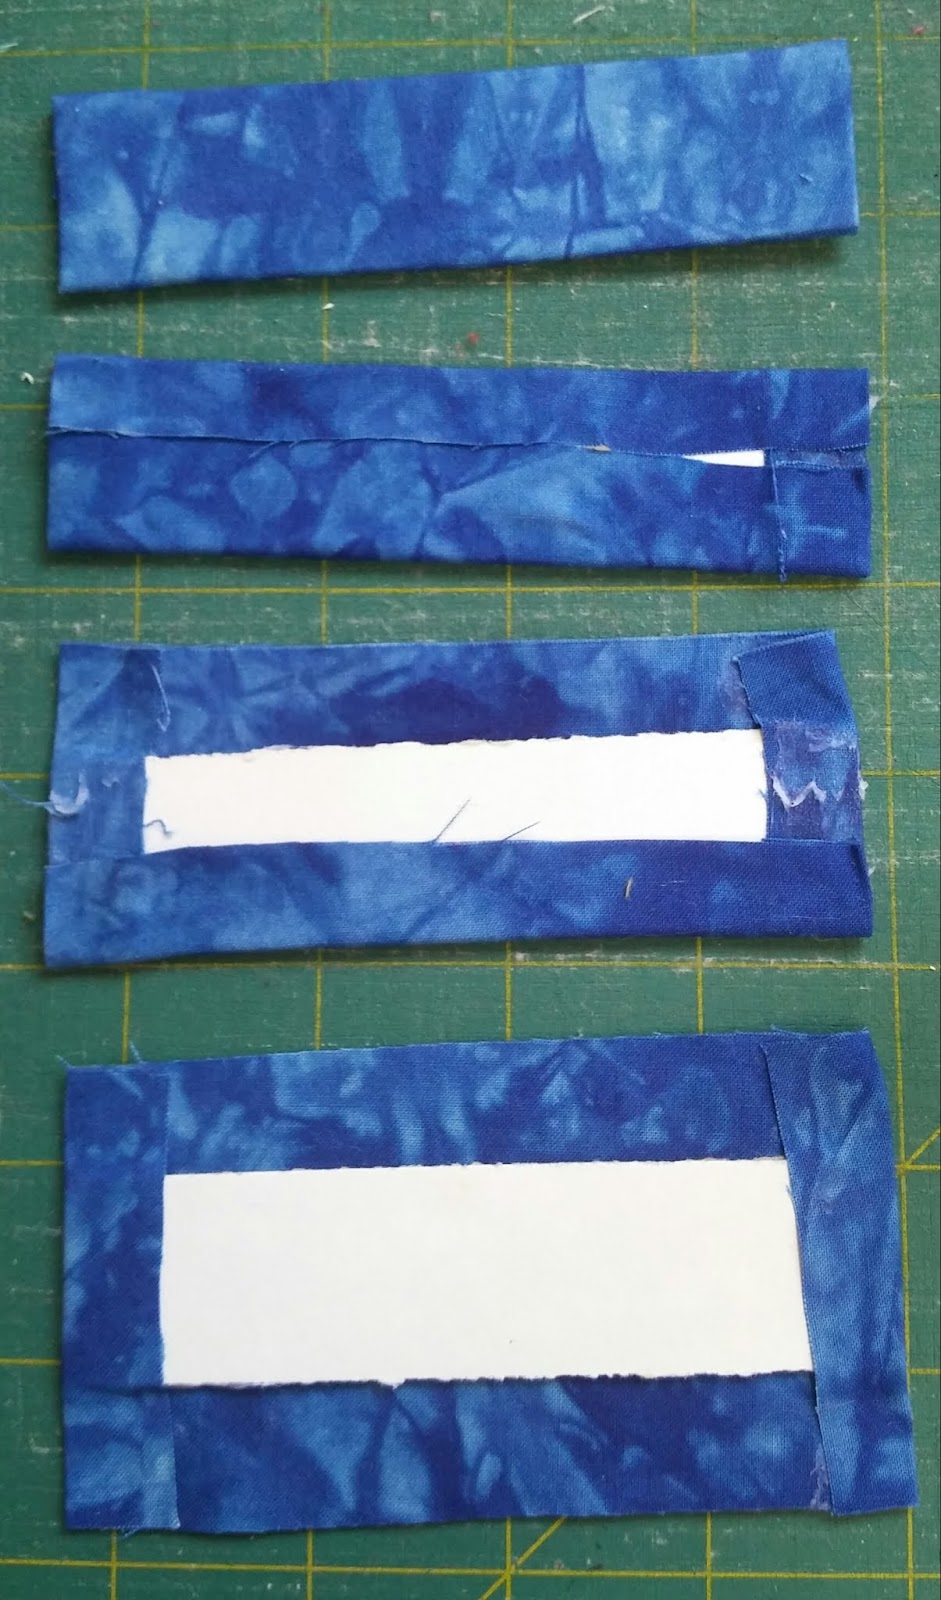
10 Iron under a ½” seam allowance along one long edge of both the strips. Work the base of the box first and place the ironed edge of the 3” strip around the base of the box. Remember to over-lap a corner by 1” and hold the strip in place with masking tape as you sew. Use a thread that blends into your fabric and a concealed stitch to sew around the four sides and attach the folded edge to the fabric on the base of the box.
                Add the strip
 

           Sew around the top edge
 
11 Turn under a small seam allowance as you approach the corner and trim away the excess fabric. Sew along the corner and finger-press under a small seam allowance along the other long edge of the strip so that it is level with the edge of the box. Sew along this edge to complete the base of the box. Repeat this procedure for the top of the box.
 

              Sew around the other edge
 
 
               Base and lid
 
 
              Gift


And that’s all there is to it! Next week I will go through the same method to make a serviette box, one of my Christmas gifts.


Sunday, 18 August 2019

BLOG 457

Blog 457
 
If you get pleasure out of making gifts for Christmas, here’s a little idea for you that will run over 2 blogs. Coasters are useful and can be bought or personalised for the recipient and you can make a little decorative box to keep them in. You could use fabrics to match a décor or a favourite colour or perhaps you could use Christmas fabric for seasonal coasters. Just use your imagination!
 
THE COASTER BOX
Cardboard requirements: Cut the following accurately from strong card (e.g. mount card from art shops or ask a picture framer if he has off-cuts)
Base: 4” x 4”
4 Base sides: 4” X 2”
Top: 4 3/8” x 4 3/8”
4 Top sides: 4 3/8” x 1”
 
            Card


Other requirements: fat ¼ metre of lining fabric and long ¼ metre of outer fabric, small amount of wadding, Pritt stick, masking tape and threads to match the fabrics.
          Fabric
 
 
1 For each piece of cardboard, cut out a piece of lining fabric which measures ½” extra all the way round.


            Cut-outs


2 Cut one piece of wadding to the exact size of the base square. Cut 2 pieces of wadding the exact size of the lid square.
           Wadding
 

3 Stick the wadding onto the base square and stick one piece onto the lid square. Trim away any excess.
           Wadding onto square
 

4 Place the lid square, wadding side down, onto the WS of the prepared fabric. Add Pritt all around the edge of the card (1/2” wide) and across the corners as shown.
           Fabric onto square
 

Fold over the opposite sides. Add more glue to the corners and fold in the two remaining sides.
           Glue
 

           Completed square
 

5 Repeat the sticking method for each of the side shapes, folding in the short ends first. This completes the lining.
          Sequence for sides


         Completed sections
 

6 Construct the box as follows: Place a side piece onto the lid square with RS together and corners matching and secure with pegs. Using a strong thread that matches the fabric, whip stitch the edges firmly together. Sew all around the square to attach the four sides. Then stand up two adjacent sides and sew the vertical corners. Repeat for each corner to construct the lid. Repeat the process to construct the base.
           Position and sew
 

          Sides sewn
 

            Verticals sewn
 

            Top and base
 

7 Stick the extra square of wadding to the box lid.
             Wadding on box lid