Saturday, 8 June 2019

BLOG 447

Blog 447

I am happy to say that I got down to quilting ‘Sampler in the Cabin’ this week. I started by sewing a stretch stitch on the ¼” borders around each 6” square to stabilise them. I have opted to do non-decorative stitching and just use the quilting process as a means of holding the three layers together. I don’t want the quilting to distract from the intricacy of the patchwork.


Borders

After preparing a miniature cable stencil for the quilting motif in the lattices, I abandoned that idea straight away and decided just to sew a line of stitches ¼” from all the edges. This was quick and just the lift I needed to start quilting the squares. (Sometimes, I think you can be too cerebral about how to tackle the quilting and that was what was stopping me from making progress. I need to enjoy what I am doing or there is no point at all in doing it as in ‘Love what you do and do what you love’)


Lattices
 
Once the lattices were sewn, I added the binding and sewed a line that was ¼” away from it before hand-sewing the binding on the back.


Line parallel to the binding
 And then I started to tackle the blocks themselves with in-the-ditch quilting. This necessitated leaving all the starting and finishing threads free so I could weave them in later.  


Finished 9-patch


Threads on Clipper ship
 
Weaving the ends of the threads can be a bit of a chore but I have learned over the years to leave a long enough end to do it comfortably! Then a friend loaned me one of her easy-thread needles and my life was transformed! You can see from the picture below that this needle has a double eye. The top eye has a split in it and all you have to do is to pull the thread down vertically over the top of the needle and it slips into the eye. Brilliant! For short ends, you can push the needle into the fabric first and then do this simple manoeuvre.


Needles
 
I have decided to put my labels on display at the Gresford exhibition as I have a good and varied selection to date. I have been cutting up some of the sewing samples that I sometimes make before embarking on a larger project; it’s good to be using them with a purpose. I have also been threading the ones I have finished with different coloured baby ribbon. They look good and I can very much see this project developing in finesse and quantity over the years!


Labels
My latest label is in progress. I bought a sewing case at the Festival of Quilts a couple of years ago. It was for sale on the stall for the silk guild and it was exquisitely sewn and very cheap! A lot of the lines are sewn using a single thread and the detail is extraordinary. I decided to have a go as this is just the right sort of project to take to my local sewing group, where talking is probably more important than the craft! My repertoire of 4 stitches pales into insignificance beside the original but at least I can say that I had a go!


Hand embroidery


Sunday, 2 June 2019

BLOG 446

Blog 446

 
I am still embarrassed to be showing the ‘Sampler in the Cabin’ quilt as I have still managed to avoid doing anything to it apart from move it when it gets in my way. Still, it is at the front of my mind now and I will crack it sometime soon (but don’t hold your breath)!! And just a reminder, it is a miniature quilt with the individual blocks measuring 6”.

         Sampler in the cabin
 
I have added a lot of textured stitching to the painterly background that I made last week. I love the colours I have used and the way they move throughout the piece. I decided to add subtle flowers, in this case free-cut primroses, over the top so as not to detract from the background. I made it into a cushion for my Gresford display.


            Textured background


          Detail


            Completed cushion


             Flower detail


While I was on a roll making cushions, I found 2 panels that I had made for workshops way back when. These translated well into art cushions.


        Clematis art cushion


              Cushion collection


               Panel


              Anemone art cushion


Yesterday I took part in the charity run ‘Gung-Ho 5km’ which took place on the Chester race course. It involved a course covering 5km (obviously!), interspersed with huge, slippery inflatable obstacles. I was with Tess, Richard and granddaughter Ella (9) and taking part was great fun. But at 70 I’m not as fit as I used to be so I largely went round on my own as the many others in our group disappeared in a blur into the distance. I adopted a ‘trot for 50 and walk for 50’ system (I’m not built to run!) and managed to get round …. Eventually!! Richard finished promptly and then came back and did the last 1/3 of the course again with me.  I was very touched. He helped me get over a fiendishly difficult climbing wall where someone was lying at the base awaiting an ambulance! The last obstacle included wading through a bubble bath but I slipped on the grass and ended up totally submerged and thoroughly disorientated with my glasses covered in foam; thankfully Ella came in to find me. So I survived but it took the rest of the day to recover. All in a good cause though.


Gung-Ho 5k Chester
 

Sunday, 26 May 2019

BLOG 445


Blog 445

 There has been NO progress on ‘Sampler in the Cabin’ and I am just including it in my blog to shame myself into doing something about it!


          Sampler in the cabin


 I found time to a haberdashery jigsaw, one of the most complex I have done for some time!


         Jigsaw


 And then it dawned on me that the Gresford show is less than 3 weeks away! I have visited the church to see what space I have for my exhibition and I have the quilts to fill it in my loft. I needed some smaller stuff however to dot around the chapel and cushions seemed like a good place to start. I like colourful backgrounds (perhaps you have noticed!) and have made them in various ways. The silhouette below was placed on a background of fused random squares; the individual shapes are difficult to pick out because the colours blend so well. This was quick and easy to do!


             Random background


             Detail


 Another method I have used for constructing a background is the English paper piecing method. In the sample shown below, I have used a lozenge shape and it took ages! (Note to self: remove the cat hairs before putting it on show!!)


            Lozenge background


           Lozenge detail 

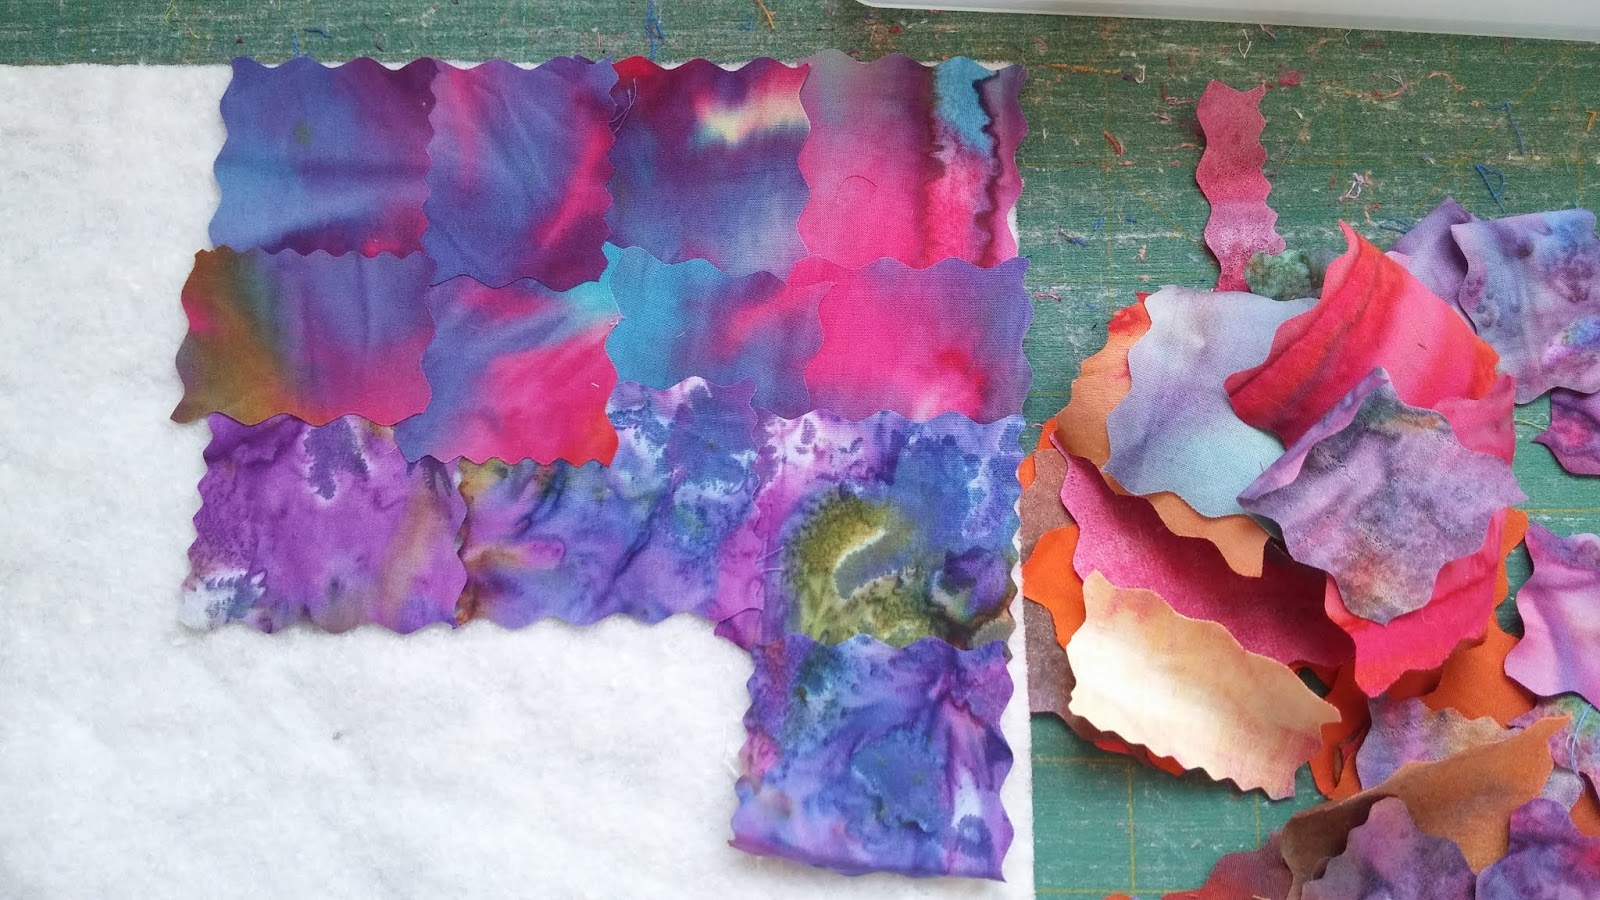
So for speed it was obvious which method I was going to use to make another cushion. I started to cut more squares of ready-fused batiks with a fluted blade. (NB I always change to my really old cutting mat when using a fluted blade because it can chew up the surface of the mat!) 


          Palette


 I worked with a piece of wadding beside me and started to randomly over-lap the squares with the aim of making the colours move smoothly one into another. I used the toe of a small iron to catch them in place when I was happy with the lay-out


           Placing onto wadding 


            In progress


              Colourful background


 And there you have it! But after photographing it I realised that I wanted more light in the centre so I tweaked it by adding some extra squares.


           Tweaked!


Sunday, 19 May 2019

BLOG 444

Blog 444
Back home again and isn’t that just the best part of being away! We had a marvellous time in China and made some lovely friends. Three days in an extremely busy Hong Kong was followed by a two week tour courtesy of Wendy Wu. It is the only way to get the most out of China and this is what we did:
 
*Flight to Shanghai and stayed in a hotel which had been built as a football stadium for the Olympics, and in one day we visited an ancient garden, a silk museum, travelled at 268mph on the Maglev train, went up the tallest building, ate 2 Chinese banquets and did a river cruise to see the city lights!

*Flight to Wuhan to join our boat ‘Victoria Katarina’ for a 4-day cruise along the Yangtze which included exploring smaller gorges, the Three Gorges Dam project and The Jade Emperor. On board there was different entertainment, a demonstration of the game Mahjong, painting the inside of small bottles etc.
*Coach to Chengdu via a street market at Ciqikou famous for its porcelain, a visit to a tea room followed by a performance of ancient theatre acts (loved the Sichuan mask changing!), the Panda Conservation Research Base, a Tang Dynasty dancing show, the Terracotta Warriors and the ancient city walls.
*Flight to Beijing to visit the Wild Goose Pagoda, the Muslim quarter market, Tiananmen Square, The Forbidden City, a Chinese acrobat show, the Temple of Heaven, the Great Wall of China, Jade factory and Summer Palace.
We ate 2 Chinese banquets daily using chop sticks; this was very sociable, and a slow and healthy way of eating. (I thought I was going to starve at first because I couldn’t pick anything up but once I got the hang of it, it was fine!) It was everything we anticipated and then some, an amazing cultural experience of a world so very different from our own. I loved it and feel enriched by it!
          Terracotta Warriors


            Panda


           The Great Wall (and it was that steep in places)


              Emperor and Empress
 
Now I am home, I have hit the ground running! I have zigzagged around the black shapes and completed the second silhouetted wall hanging.


             Wall hanging
 
 
have layered and quilted the shaded Liberty quilt. I chose the easiest option and sewed a straight line through the middle of the squares in both directions, using a walking foot. This gives the appearance of fragmented squares and it just needs binding now.


            Liberty quilt


              Quilting lines


I have also layered the miniature log cabin quilt but I still don’t know how I am going to quilt it! There is so much intricate work in this quilt that I don’t want to spoil it with unsympathetic texturing/stitch. I will think about it during the coming week!


Saturday, 27 April 2019

BLOG 443

Blog 443
 
This is just a quick blog today because tomorrow we will be on our way to China! We will be away for 2 ½ weeks, experiencing all the sights, sounds, smells and delights of the Far East. I have wanted to see the Terracotta Army for years and finally, my opportunity has arrived. I just want to be over-whelmed by the scale of the site, by the vast numbers of warriors, and by their intricate detail. We will also see the Great Wall, Tiananmen Square, Giant Pandas and Beijing and we will cruise the Yangtze River for 3 days. I am so excited!
On the sewing front, I managed to complete the negative image this week and I have made it into a small wall hanging. I used a zigzag stitch around the perimeter black shapes to discourage fraying. Then I added interesting detail with free-motion stitching and black thread.
            Before free-machining


             After free-machining


            Detail


         Reverse
 
 
When I put the black backing fabric on, I cut it so that it as 2 ½” longer than the front. This allowed me to just fold the fabric over at the top to create a sleeve. I had to cut about 1” into the fold so that I could tidy the edges of the sleeve with a small seam allowance. The fold was trapped into the binding and I hand sewed the lower edge to finish it off.


          Hanging sleeve


          Folded side edge
 
I bound it with a double-folded binding, cut at 1 ¾” and sewn with a very neat ¼” seam allowance. As usual I mitred the corners by making a tuck in the binding which was level with the raw edges. I used a grip to hold the tuck flat when I resumed sewing.


           Corner tuck


           Holding the tuck


            Mitred corner


            Sleeve and rod


Finished, done and dusted! Now I am off for a rejuvenating break for a couple of blogs. See you soon!