quilting. Guess what I will be doing when the frantic part of Christmas is behind me.

All I wish for you at Christmas time is the warmth of family,
the joy of friends and the message of the Christmas season.
This week I have been up to the Southern Lake district again, to Barrow-in-Furness, to take Christmas presents and seasonal cheer to my mother, my sister Gwyneth, my brother Owen and my school friend Janet. I do enjoy returning to where I was born and brought up because of the memories of the happy childhood I had there and because I enjoy the sense of familiarity and belonging. The road to Barrow has been described as a 40-mile cul-de-sac; once you turn off the M6 and reach Barrow there is nowhere else to go! My mother is doing very well now and as my friend said’ ‘You can’t knock her down with a stick!’ I travelled home through blizzards and wintery showers and was glad when I walked back into our patchwork-clad home. Even the cat has a quilt on her rocking chair!

Rocking chair
There are only 6 pockets left to open on my heart advent calendar (24) and 7 more sleeps before it is Christmas day! I get so excited even though we do much the same thing each year. But I do wonder sometimes what all the media fuss is about. A Christmas dinner is really just an elaborate roast dinner and I cook what I have traditionally cooked since having our first home, despite strenuous efforts from the plethora of celebrity chefs. If I omit anything or make things differently, there are usually mutterings! Sprouts are a must, just so our daughter Tessa can have a token one on her plate (it’s written in family folklore!). I don’t like mince pies, Christmas cake or Christmas pudding but we’ve got to have them all the same (t’is writ!). It takes Roger ages to plough his way through them in January.

Advent calendar
Here’s the sideboard with its runner, wreath and decorations. This piece of furniture is an important focus of family life where special photos are displayed so I like to dress it along with the rest of the room.

Sideboard
I have decided to make a small 9-block lap quilt, using a Christmas cracker pattern that I designed years ago when I was teaching. I know that it is the ‘eleventh hour’ but if I can get it constructed and layered up ready for quilting, I will be able to drape it somewhere for visual pleasure and quilt it when I am relaxing. Here’s the block and this is how it is constructed. It finishes as a 12” block, but it is 12 ½” at this stage.

Christmas Cracker
You will need a cracker fabric and a background fabric.
From the back ground cut the following shapes:
2 squares at 6 ½”
4 rectangles at 2” x 3 ½”
2 squares at 2 3/8”
1 square at 3 7/8”
From the cracker fabric cut the following shapes:
2 squares at 3 ½”
4 squares at 2”
2 squares at 2 3/8”
1 square at 3 7/8”
2 squares at 3 3/8”
Method:
1 To construct a square made up of 2 triangles, place a background square on top of a cracker square. Mark across the diagonal and sew an accurate ¼” both sides of the marked diagonal. Cut on the diagonal and press. Do this with both the 2 3/8” squares and the 3 7/8” square.

Triangles
2 Lay the pieces out for half the block as shown below. Join the smaller pieces together to make 3 ½” squares.

3 Join the 3 ½” squares together to make 6 ½” squares.

4 Place the 3 3/8” cracker square on the corner of the 6 ½” background square, RS together. Sew across the diagonal and press the RS over to create a triangle (trimming optional).

5 Place the squares back in sequence and join them together to complete the cracker block.

I’m not sure how I am going to set them at this stage but intend to make 9 blocks. We’ll see what happens!
I can hear my husband dragging stuff across the floor of the loft over head and soon I will be summoned to help him get the Christmas boxes down the loft ladder. It’s time to start dressing the house in its seasonal livery and this can take us a while over the next few days, mainly because I don’t like to rush the process and want to savour the experience. Christmas will always be red and green to me so all the quilts and quilted items I have made over the years are always going to be part of our Christmas. Everything was methodically labelled and carefully packed away last January so that we would know where to find everything when the time came … and it’s here.

Preparation
Rog has passed the hoovering course with an A star and he starts by removing the cobwebs and dust from the rafters and fireplace. The boxes are down from the loft and, although I know what to expect when I open them, there is always an air of excited anticipation; I’m still a kid at heart really!

Storage boxes
We started with the lounge tree and waited for our grand daughter to arrive and help us dress it. She was fascinated with sorting out and handing me the individual decorations for about 20 minutes and then started to toss them rather too energetically at me! We got there in the end and she was asked to perform the official ceremony of switching on the lights, which she did with real panache!

Lounge tree
My fabric fairy, clutching several tiny rolls of fabric, goes at the top of the tree but below is a picture of my wicked fairy, made by a chum. She smiles manically, has a squeaky middle and sports a thong amongst other things! It makes me laugh every Christmas.


Fairy’nuff
A Weaver Fever quilt graces the kitchen table.

Table quilt
A circular cloth adorns the coffee table.

Circular quilt
And Turkey Lurkey oversees the whole of Christmas season from a high window sill!

Turkey Lurkey
I love Christmas and really enjoy every tinselly-bit of the preparation. Cards and electronic greetings go out during the first week in December and present ideas are requested from family members. 3 years ago, we started to limit our costs to £25:00 each, at our daughters’ suggestion, when they both moved house in the same year and increased their mortgages accordingly. It makes you much more imaginative about what you buy and where you buy it, and it helps to foster the real spirit of a family Christmas, one that’s measured in fun and togetherness rather than financial outlay.
We looked after our granddaughter for the day yesterday whilst her parents started their shopping so it seemed a good idea to get her to start the proceedings by dressing my patchwork tree. We survived!! Christmas will always be red and green to us so the same decorations come out each year.

Patchwork decorations
She enjoyed getting each decoration out of the box, studying it and then placing it on the tree. At 2, she could only reach the lower branches so Grammy ‘was allowed’ to help her reach the higher branches and to place the fairy at the top of the tree. No lights yet, I think it is a bit early for that. All the decorations are steeped in memories for me: teaching samples, techniques demonstrated, gifts from special people (‘I saw this and thought of you’) and reminders of places visited. By dressing the house gradually, I hope to establish our family patchwork traditions happily in Ella’s early memories. I know her Mum is making decorations with her and starting their own special festive traditions as a family, with of course the regular reminders of being good for Father Christmas .. (And I can remember what she was like as a child!!)


I was shown recently how to make a new folded patchwork decoration at the Nercwys Craft Group and this is what I am going to demonstrate this time. I can’t acknowledge the originator as it’s one of these demonstrations that has been passed down the patchwork line. I have made it in paper in advance of doing it with fabric.
Demonstration of a Folded Christmas Decoration
1 Draw a circle with a 4” radius. Use the same compass setting to divide the circle’s edge into 6 equal portions. Draw in the hexagon and the lines across the centre.
2 Fold each straight edge, in turn, to the centre line and crease with your nail (I have marked them with a broken line.


Stage 1 Stage 2
3 Fold in 2 adjacent edges so that they make a point.
4 Press down on the point to flatten it centrally over the 2 adjacent sides. Crease well. Repeat 6 times around the shape.


Stage 3 Stage 4
5 Fold all the sides towards the centre so that they from a 6 pointed star.
6 Fold the over-lapping edge underneath to form each shape into a diamond.


Stage 5 Stage 6
7 And this is what it should look like! If you haven’t lost the will to live, try it in Christmas fabric. I would suggest that you starch your fabric first so that it is easier to fold and crease. Enjoy!

Stage 7
Log cabin bag
The next stage is to quilt the 4 separate sections of the bag. Last week I showed a single strip but actually there are two different, repeated sections, which can be seen below.

Bag sections
The black corners add apparent complexity and detail to the log cabin design. Because
they are loose, they can be manipulated and this can be done before or after quilting.
The diagonal fold of the black fabric is on the bias of the fabric so this can be rolled
back to give the appearance of a curve.

Corners: before and after
Roll the fabric back along the fold to produce a curve andcatch it down with
a small stitch, in matching thread.
Place the sections onto batting (no backing) and pin ready for quilting.

Quilted section
I used walking foot and a stretch stitch (herring bone) to quilt around the squares and along the joining seams. Because the stitch swings from side to side, it is balanced equally over the seam. Quilt all the 4 sections in this way ready for construction next week.
Sometime soon our Meerkat quilt will be returned and then I will be able to write an article about it for a magazine, as well as post some detailed pictures on my blog. We did it for fun and it was such a surprise when it won the group section and Visitors’ Choice. It has been touring and on display at other shows and we look forward to seeing it again! This is the only picture I have of my meerkat as a work in progress.

Meerkat
In Blogs 72 and 73, I demonstrated how to make a traditional log cabin block and I have to say that I personally prefer impact of the block with the added corners, known as ‘Geese in the Cabin’. So I have made all ten blocks like this. Press the blocks well and check that each one is the same size before continuing with the method.

Geese in the cabin
And here is the template needed for construction. It consists of 2 complete blocks and one half block. You will need one of these for preparing the batting pieces.

Template
There are 4 individually quilted sections to the bag and this is what the construction will look like eventually, showing the position of the complete blocks and half blocks.

Construction
In preparation for construction, 2 squares need to be divided across the centre like so.

Preparation
I have been trying out different layouts on a design wall, and this is the one I have chosen where the gold side of one square goes against the red side of another. All the geese fly away from the centre.

Layout
Having decided on the layout of the blocks, the next step is to join and quilt each of the 4 single units. And that’s what I will be doing this coming week.

Single unit
My husband, who posts my blog each week, always claims that he reads it with interest. This is to test to see if he does! We have been happily married for nearly 40 years and humour has been such an important part of our marriage. And when you look at this picture, you’ll see what I mean. Aw bless!

This week I had a sobering experience and I interpret it as a wake-up call. The daughter of a quilting friend who died 3 years ago contacted me. Audrey used to come to my home-based classes in the early days and was with me for many years. She was a great and enthusiastic fan of my work and was a capable and prolific needlewoman. She attempted most of the techniques that I demonstrated and went on to share them with her own quilting groups. She also helped with samples for some of my early books. Now that her husband is in a nursing home, the time has come for the family to clear out the house prior to selling it, and this is why I was contacted. The family have kept what was to be used and treasured and below is the ‘stuff’ that remains, after I have sorted and bagged it! I have agreed to try and sell it at the groups I attend to raise money for the Quilters’ Guild of the BI in Audrey’s memory.
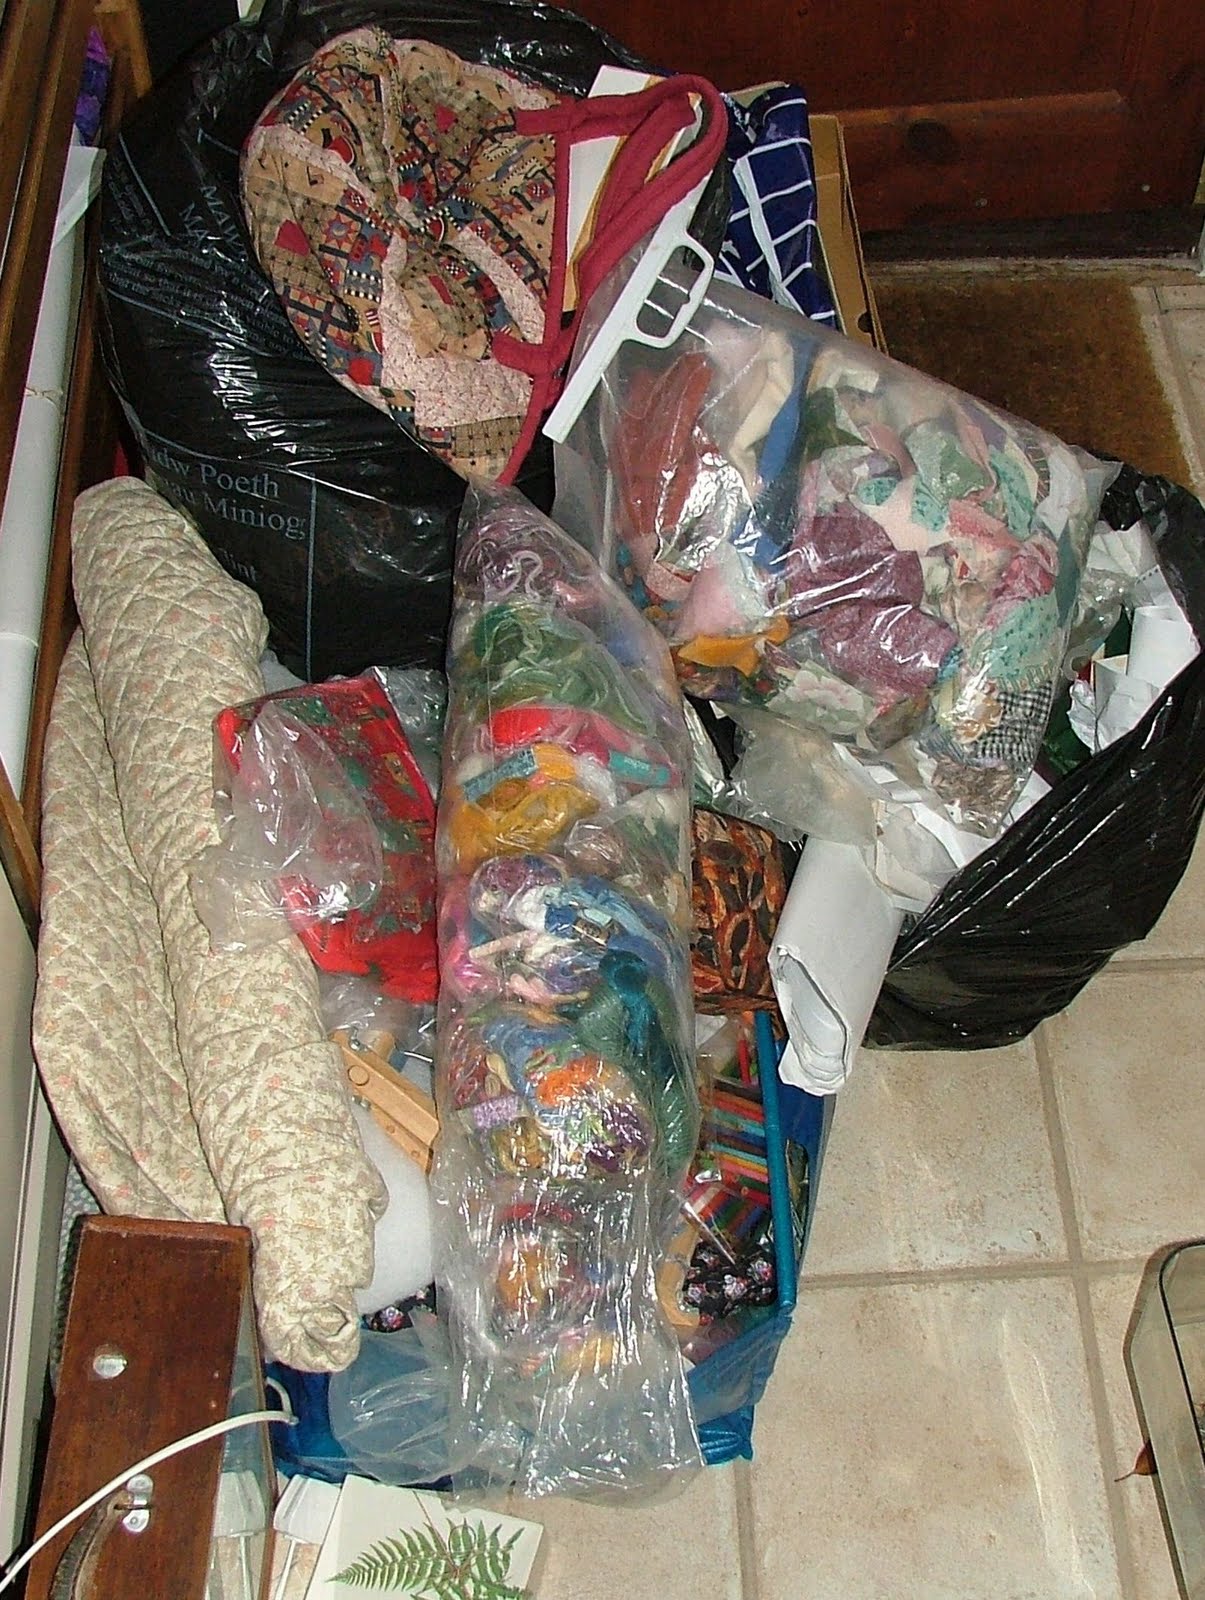
Audrey’s ‘stuff’
Whilst sorting through her ‘stuff’, it quickly became evident that there was so much of myself passing before my eyes. There were folders of my workshop notes, some of my early patterns and trial samples that Audrey had made and all I could think about was that this was what my own daughters would have to face at some (hopefully very, very distant) future date. It has been quite an experience and it has made me determined to organise and catalogue what is important to me as ‘Dilys the quilt’. And I am equally determined to discard and streamline my own quilting paraphernalia. I think it may help to concentrate my mind and energy on what I really want to create.
Liberated Appliqué: I have managed to complete the fused appliqué sample that I demonstrated last week.

Liberated appliqué
I quilted along the cut lines with a herringbone stitch and doodled a flower design overlapping the centre square with free-motion machine stitching.

Quilting design
I don’t really think that it would be a good technique for making quilts that are used and laundered. But for spontaneous and speedy wall quilt construction, it is liberating as the title implies. The only downside is that the wadding can sometimes be seen between the cut edges where the fit isn’t precise enough. In this instance a layer of dark batting or a false layer of fabric could be used to solve that problem.
Floral wall hanging: The floral wall hanging has been developing very slowly indeed but here are the latest pics.

Floral wall hanging 1

Floral wall hanging 2

Floral wall hanging 3
All in all, this has been quite a thought provoking experience, highlighting just how reliant we are on technology these days. We have been using our mobile phones for necessary contact but, as we don’t get a good signal in our rural environment, those contacts are hit and miss. So, on the whole, it has been quiet and tranquil here and what you don’t know, you don’t worry about!
I’d like to say that I have been sewing furiously but I haven’t. I visited my mother and stayed for a couple of nights to see how she is getting and to keep her company. Although she is frail and her mobility very poor, she fights on!
Liberated Appliqué
Here is an interesting exercise that we tried at the last Chester Ps&Qs meeting. We were asked to bring along a cutter, board and ruler, as well as batting and a backing. We prepared squares of fabric (e.g. 4”) by ironing a fusible web onto the back. I just happened to choose a colourful, stripped Batik fabric.

Fused squares
From each square, we were then instructed to cut out a smaller square to leave a border (e.g. 1”). We repeated this on the smaller square and ended up with 3 (or 4) shapes separate units.

Cut out squares
When we had cut out 16 squares in the same way, we shuffled the shapes about and put them back together again.

Repositioned squares
And that’s all there is to the preparation! The squares were then place side by side onto cotton batting (it must be cotton) and they were ironed to fuse them in place.

Fused squares
Now isn’t that just cool!! Obviously there are raw edges that need securing but a bit of decorating stitching or free motion machining helps to secure them onto the batting. I fuse straight onto the batting with my painterly method so this was an extension on that technique. I loved it.

