Sunday 27 January 2019

BLOG 430

Blog 430
Another week; another blog! I can’t understand where the time goes. We are three weeks into January already and there are still bits of tinsel being hoovered up with the dust around the edges of the room! The plus side of this swift progress through January is that the days are drawing out very slowly. There are lambs in the local fields, daffodils about to flower and occasional bursts of warmth in the garden. That said, we had a couple of inches of snow last week and, while it looked pretty, it had the effect of preventing me from moving far from the fire. Therefore, I needed something to do on my lap so I used a beanbag tray covered with an ironing cloth and I set up my small clover iron on a little table beside me. With a traced pattern on parchment paper and some prepared fabric scraps close to hand, I was able to make modest progress with some foliage. Each leaf is done separately and then they are attached to form the finished plant. So far so good!
 

             Foliage In progress


When I eventually got into my studio again, I tried to make progress on the design wall and audition fabrics for a potential background/foreground. At that stage, I had to step back and ask myself what I was trying to achieve. That’s the trouble with trying to work free-style; it is very hit and miss as to whether the individual parts of the pattern are going to come together to make a pleasing ‘whole’. I wasn’t convinced.  


             Auditioning a background


                   Composition


               Preferred foreground
 
I decided that I needed to draft a master pattern that would give me a better idea of my end product but which would give me space for flexibility within it. This meant moving to the kitchen table, the only surface large enough for this pattern. The flower pots were the starting point for this wall hanging so they were drawn around and the brick pillar was added.


               Master pattern
 
 
I decided that I would draw a stone wall behind the flower pots and drape a colourful shrub over the top of it. A foxglove was added alongside the pillar and a cat was drawn on top of the wall.  I feel as though I am making progress now and the design wall and a phone camera are both crucial to this creative process. Photographing at regular intervals allows me to see the whole design building up from a distance and I can appraise my work as I go; it’s a great design tool for me!


             Foxglove


               Cat on the wall
 
 
To make progress on the stone wall, I numbered some shapes and traced them onto parchment paper. I am now ready to build a wall!


             Stone wall


               Development


Saturday 19 January 2019

BLOG 429

Blog 429
 
When I go swimming every Saturday, I go into the changing room and I take off my shoes. I put both my socks in the left shoe and my glasses and watch in the right shoe. When I undress, I systematically place my clothes in a neat pile ready to be stored in the locker. The order I take things off is the order in which I re-dress. It’s a simple and practiced routine that I have been following for years and I can do it without thinking.  (At this point you’ll be wondering rightly what this has to do with anything but bear with me!) ‘Simple and practiced routine’ could also apply to the Linus quilts which I have made recently and now handed over to the ‘sharer of the grandchildren’ (who also happens to be the Linus rep). Routine is safe, you know where you are and it makes life easy and uncomplicated.
 

Being creative is the polar opposite to routine; it’s the process of causing something new to exist.  It’s a step into the unknown and it can be terrifying! All that you have once habitually practiced is put on hold, and risks have to be taken and new outcomes have to be found. I will do anything to delay getting started on a new piece of work from thoroughly tidying my studio to meticulously organising my sewing threads. I’ll make all sorts of excuses to myself to avoid the inevitable and it is inevitable; it is something that I need to do to satisfy something within. And once I start to play with my fabric, I relax and start to enjoy the process. It is very early days with this piece of work but I am getting my teeth into it now and you will see the progress over the next few blogs.

         Brick pillar


              Pillar and pot


            Pillar and pots


               Repositioning


             Auditioning a foreground fabric


            Auditioning a background fabric


            Extending the wall


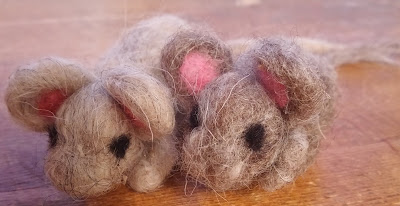
Obviously I need to be at my design wall for this major piece of work but I still like to do something on my lap in front of the fire. My chosen activity this week was inspired by a small book of ‘Little Felted Animals’. I have been making mice and here are a couple of little characters; not perfect or as per illustrations in the book, but they satisfy something in me!


          Inspiration


          First attempts


And have you ever wondered what happens to snails in the winter? I was tidying the borders on one of those really warm January days and I found this family cluster buried deep in the ivy. Large, medium and tiny snails were all fused together and the shells were rigidly sealed off against the environment. Clever little things eh!


           Snail family
 

Sunday 13 January 2019

BLOG 428

Blog 428

Last week, ‘The nearest and dearest’ went away for 4 days to the family farm on the Pludds in the Forest of Dean. The prospect of delicious space stretched out in front of me as he drove away from the house and I waved him a fond goodbye. And at that very moment the phone rang. It was the ‘Down Belows’  (so called because they live in the farm down below us!) informing me that the hedge trimmer was in the area and if I wanted some willow from their wood, now was the time to be cutting it. Ever since I fashioned a willow hare on a course last year, I have wanted to have another go, to reinforce the techniques and to see what I could make on my own.  This phone call forced my hand and focused my mind and so I went down straight away to cut some bundles. I didn’t even know if it was the right sort of willow (is there a right sort?) but, as it was freshly cut, I thought it would be pliable enough without soaking.


              Willow bundles


A few hours later, after much wrangling and wrestling, I had created the body of a goose … to my mind … but it really looks like a sphere with attitude! My thumbs were sore after all the manipulation and I have yet to go back to it. Perhaps I have got willow weaving out of my system!!!


            Willow ball


              Can you see what it is yet?!
 

And so back down to earth again and to what I know and love. The Linus quilts have been bound this week. Three of the bindings I sewed on in the traditional way with a 2” folded strip, machine sewing it to the front and hand sewing it onto the back. The hand sewing took ages and so I decided to try another way. Four of the quilts have a black backing and the binding is black also so I reckoned that it would be possible to machine sew the binding onto the back and turn it onto the front to machine sew it down. It is really just the reverse of the traditional method but requires more precise sewing on the front; happily I found it easier than I had anticipated. I will show these quilts at Gresford next week and then hand them over to the Linus project. My conscience is clear now and I can indulge my own creative juices as I return to my painterly work.

            Quilted Linus quilts and binding


            Hand sewn binding


          Binding on the back


           Binding onto the front


               Approaching a corner


             Start and finish
                 Progress
 
 
A job that I habitually do at this time of the year is to reclaim my window sills from the rampant plants (tradescantia zerbena) that thrive on them. This particular plant developed from a sickly cutting which I liberated from my mother’s house many years ago so it has sentimental connotations. It has truly thrived on the wide sills here and engulfs everything in its way. So this process is about taming the beast by taking cuttings to start again and also about finding my buried treasures to enjoy once again!


               Window sills


             Before


             After


And here are my treasures on just one of the four window sills. They are very evocative of places and people and go a long way to illustrate the person I am……A Dean Crouser painted plate (USA), a dragonfly pottery vase (from a dear quilting friend who has had a stroke), a carved wooden turtle from Hawaii (a wedding anniversary trip), a painted pottery monster from a granddaughter (the future), a Mini Fijian kava bowl (Pacific experience), a Grecian urn, Murano glass paper weight, an onyx eternity ornament, a Milton Abbas cottage (home for 9 years), a wooden Japanese Kokeshi doll (a student from my teaching days), an old fireplace tile and a pottery keepsake from the village of Osmotherley (my maiden name).

                                  Treasures
 

Sunday 6 January 2019

BLOG 427

Blog 427 Jan 2019
 
In my ‘creative round-up’ for 2018, I included the Linus quilts tops that I had made and I described them as ‘in progress’. In this first week of the New Year, it just seems like a good idea to quilt and bind them first and effectively clear my sewing decks. A new year gives a sense of new beginnings but I feel as though I need to finish these before I move forward. I believe I did the same in January last year and it felt good to make for and give to others before immersing myself in my own work again.


               Linus 1
              Linus 2
 

And so began a marathon of cutting backing and wadding to size, layering them up and pushing them under the sewing machine. Generally, my fabric stocks are much depleted now but I did find enough to back all 7 quilts, even resorting to cutting chunks off my beloved batiks (and that hurt a bit!!) Some I quilted with lines running across the surface but I was much happier when I decided to free-motion quilt. I tried to quilt 1 a day and now all I have to do is bind them. Once the binding is machine sewn in place, the mindless hand sewing of the turned seam is a job that I can do and I can talk at the same time! It will be perfect for in front of the TV, for taking to the Gresford craft group and our village craft group!
             Batik backing
 

           Free motion quilting


I used the temporary adhesive 505 to hold the layers together. It isn’t something I have used before but I do recommend it for saving time. All I had to do was to pin around the outside edge of each quilt and the adhesive held the layers together even through the rough manoeuvring of the quilt under the machine. This product has its uses.
         Temporary adhesive
 

           Pinned edges
 

            Linus 3


And so the rhythms of the year begin again. The snow drops have made an appearance, there are early lambs in a local field and the days are lengthening, what’s not to like? I look forward to recounting my sewing adventures over the months ahead so please visit often.