Sunday 30 September 2018

BLOG 413

Blog 413
 
I store all our group quilts in a bedroom loft space so they always come back to me at some stage or other throughout the year.  I have just taken charge of our latest group quilt called ‘Mere Men’ so I have been able to photo graph each panel and I am sharing them with you this week.
 

This year we chose a man from all the significant eras of our island history and stood him in front of a quilt of his time to record his comments. The size and shape of the man was consistent throughout the panels, as were the lines of patchwork squares along the bottom. It was actually designed to hang in a long horizontal row but the dimensions of the entries was altered for this year’s FOQ and we had to hang it 3 by 3 by 3 instead. Each group member was given scope to research their era and design a costume and a quilt for that time. Here they are in chronological order.
         Jennifer’s Cave man
 
 
“I’ve been out all day chasing mammoth. What’s for dinner?”

         Jackie’s Egyptian
 
 
“I met this Giza who told me that the pyramids were tumbling blocks”

               
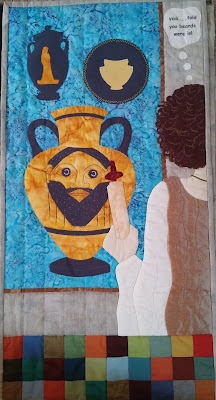
         Liz’s Greek
 
“YEIA … told you beards were in”

        Barbara’s Roman
 
 
“I came, I saw, I admired”

             Janice’s Viking
 
 
“She’s been trading - I should have seen it in the runes”


           Dilys’s Norman
 
 
“I see we won BOTH the battle and the quilt show in Hastings”

           Panel detail


           Jenny’s Elizabethan


“Is it the design for our garden or our second-best bed cover?”
            Sue’s Industrialist
 
“O dear, this letter means there’s trouble at t’mill”

            Marion’s Modern man
 
 
“Cool man, the first interactive gaming quilt”


There is no doubt we have great fun doing these group quilts although there is always a lot of pressure to do our individual piece well and on time. This year has been exceptional technique-wise with so much detail for all to enjoy. We meet next Friday for the first time to discuss any ideas for next year and who knows where they will take us! Love it love it love it!

Sunday 23 September 2018

BLOG 412

Blog 412
 I have been sewing at Suzette’s this week so I used it as a golden opportunity to catch up on my textile luggage labels. When I first thought of this long term project, the idea was to make a label a week: I felt the small size was do-able!  How wrong was I?! To work in small scale is quite difficult and intense and often requires more time and effort than working full scale. So the idea got shelved and I stopped doing them for a while.

Then it occurred to me that I might be approaching this project from the wrong angle. I was going through a collection of half-finished projects I had in storage: experimental pieces, trial techniques and the like. They were never good enough to use for anything or even worth completing, but they were a vital part of my textile journey. So rather than make a specific label in a specific way, I decided to make labels from these existing pieces. I completed 16 in the time I was at Suzette’s! Result! Here they are with information about the techniques used. (NB they still need the final edging of a larger, closer zig zag in variegated thread to complete them)


             1 Free motion stitching on a prepared synthetic background with soldering iron mark making


            2 Painted background with infill surface stitching done on the WS


            3 Painted Lutrador with machine and free motion stitches


         4 Stitch on sheer fabrics with soldering


            5 Fused Angelina fibre surface placed on a floral rubbing with fabric crayons


          6 Stitched sampler on a dyed background


          7 Fabric swatch given to me by an American folk singer/quilter touring the UK
 
 
            8 Stitch and texture on felt surface


          9 Sample section taken from a piece created at an experimental textile workshop


           10 Metallic threads and sheers on wadding


          11Thread detail on cut-out sheers inspired by pebble pavements


           12 Stylised tree in free motion stitch
 
           13 Sample section cut out from a larger ‘thread painted’ picture


           14 Felt wool background over-laid with a layer of cut-out sheer


         15 Selection of yarns under stitch
 
 
             16 Traditional stained glass panel drawn and coloured in thread


Sunday 16 September 2018

BLOG 411

Blog 411
 
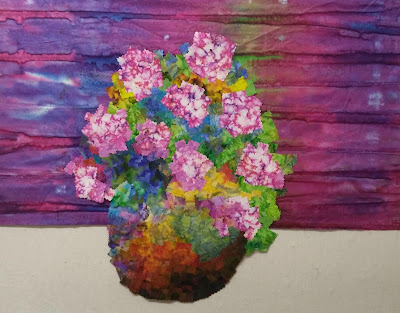
Another week has passed and much work has been done in the garden! We have lots of borders that need attention and there is nothing I like better than savagely cutting everything back, in the sure and certain knowledge that they will bear me no malice and come back as fresh as ever next spring! Such are the rewards of gardening. So if it is fine I am outside, if not I am in my studio enjoying colour and making steady progress. This sequence of pictures shows the steps towards the completion of the flowers and pot. .
             Palette


               Detail


              Flower


            Complete
 
 
At this stage I can peel my creation off the release paper in one piece and place it on my design wall for reviewing from a distance. I like what I see so far! The next stage is to make some decisions about the background so I started by trialling various large pieces of fabric to assess their effect. The first had the vague look of a paving slab; the second gave the effect of a shrub in the background. The next fabric, placed vertically, was overwhelming but looked better on the horizontal. Decisions decisions!


Background 1
           Background 2


           Background 3 vertical


               Background 3 horizontal


That said, on the wall of my studio there is another picture that I finished a couple of years ago; another vase, another bunch of flowers. On close inspection the background is composed of fused horizontal strips of fabric, like the strokes of a brush and I particularly like that painterly effect.
               Sunflowers in a vase 1


           Constructed background


And on the wall of my kitchen, there is yet another picture made ages ago of sunflowers in a vase; this time with the background made up of sewn directional squares. Seeing all three pictures together tells me that something creative is trying to get out and I am not quite sure what it is at this stage!
             Sunflowers in a vase 2


             Directional squares


Sunday 9 September 2018

BLOG 410

Blog 410
 
And so the creative meandering continues. I kept cutting up fabrics that were already prepared and I tried to fit them into the picture. The fabrics I generally prefer to use are ones with movement and depth in them, and light and dark values, because they are easier to integrate. This colourful fabric below was a bit too solid for my liking. I tried to include it but found the yellow/green section didn’t flow the way I like it to. So it was a case of ‘now you see it’, ‘now you don’t’! And this is what this method is basically all about: squinting through half-closed eyes as you work and then stepping as far away as you can to assess it from a distance. If there is something you don’t like, don’t tolerate it, remove it!
            Colourful fabric


           Now you see it


            Now you don’t
 
I continued to create pink geranium-like flowers separately on the release paper (baking parchment performs the same function).


             Flowers


           More flowers


I decided to prepare more fabrics, ones that were specific to what I was trying to create. I used 18” wide Bondaweb and cut pieces of fabric to cover the surface. Occasionally I have to fill in awkward spaces but, as long as the fabrics overlap one another, my iron is safe!! I ironed from the RS first and then turned it over and really worked the whole surface of the release paper, remembering to concentrate well on the edges and corners. If I had any trouble taking the paper off the back of the fabric, I made a small cut with a pin and it is easy to lift off after that.
             Filling in spaces


            Press RS


                Press WS


             Score with a pin


Once the paper had been removed, the fabrics were still joined by the Bondaweb and all I needed to do was give a small tug to separate the individual pieces. From the WS you can see the edges that didn’t have any fusible on them and these needed to be removed before using a rotary cutter to cut the fabrics in rough lines and then into smaller squares and rectangles.
             Fusible on WS


              Remove the edges


             Lines


             Rectangles


         Progress 1


           Progress 2