Saturday 27 April 2019

BLOG 443

Blog 443
 
This is just a quick blog today because tomorrow we will be on our way to China! We will be away for 2 ½ weeks, experiencing all the sights, sounds, smells and delights of the Far East. I have wanted to see the Terracotta Army for years and finally, my opportunity has arrived. I just want to be over-whelmed by the scale of the site, by the vast numbers of warriors, and by their intricate detail. We will also see the Great Wall, Tiananmen Square, Giant Pandas and Beijing and we will cruise the Yangtze River for 3 days. I am so excited!
On the sewing front, I managed to complete the negative image this week and I have made it into a small wall hanging. I used a zigzag stitch around the perimeter black shapes to discourage fraying. Then I added interesting detail with free-motion stitching and black thread.
            Before free-machining


             After free-machining


            Detail


         Reverse
 
 
When I put the black backing fabric on, I cut it so that it as 2 ½” longer than the front. This allowed me to just fold the fabric over at the top to create a sleeve. I had to cut about 1” into the fold so that I could tidy the edges of the sleeve with a small seam allowance. The fold was trapped into the binding and I hand sewed the lower edge to finish it off.


          Hanging sleeve


          Folded side edge
 
I bound it with a double-folded binding, cut at 1 ¾” and sewn with a very neat ¼” seam allowance. As usual I mitred the corners by making a tuck in the binding which was level with the raw edges. I used a grip to hold the tuck flat when I resumed sewing.


           Corner tuck


           Holding the tuck


            Mitred corner


            Sleeve and rod


Finished, done and dusted! Now I am off for a rejuvenating break for a couple of blogs. See you soon!

Sunday 21 April 2019

BLOG 442

Blog 442

 At Gresford, a couple of weeks ago, I was given two samples from a furnishing fabric book and asked to make a bag from them. Here’s how I did it.


  Furnishing samples


First, I took a 4” strip off the top of the two samples for the handles.


        Handles

For each handle, I made 1” fold along the length of the fabric and pressed it towards the middle. I pressed a ½” seam allowance along the other raw edge. I then folded this edge over to lie slightly off centre and to cover the other raw edge. I secured it with pins and used a matching thread to sew a central line along the length to complete the handle. 


       First fold


      Second fold


      Third fold


Central seam
I placed the remaining large pieces RS together and sewed ½” seam around 3 sides, leaving one edge open for the top of the bag. Because the fabric was fraying, I sewed a small zigzag around the edge.


      Bag side seams


       Zigzagged edges

 
Around the top edge of the bag, I pressed a 1” double seam (fold over 1” and fold over the same again). I measured and pinned the centre point. I then measured 4” on either side of this pin and put in more pins to mark the spot.


     Top edge


       Position of handles
 
 I placed the handles RS down onto the top edge of the bag so that the raw edges were level with the fold. (The edge of the handle was level with the outer pin.) The first line of stitching around the bag top followed the line of the fold underneath and trapped the handles in place.


 Sewing the top edge
 
The second line of stitching was along the top edge of the bag and it secured the handles in their position.  


       Securing the handles


        Secured


With the bag WS outwards, the lower seam was flattened and a line drawn 3” from the point at each end. Sewing on this line shaped the base of the bag. The points were then folded towards the seam and sewn in place to tidy the base.


     Shaping the base


Securing the points


And, Ta Dah, you have a bag to replace the plastic ones dished out at the supermarket!


    One bag

Sunday 14 April 2019

BLOG 441

Blog 441
I continued to make progress with the dual image silhouette this week. The ‘holes’ needed to be carefully and accurately cut out so I used a rotary cutter to make a small cut on the line to enable me to get my scissors in. I used the pattern to store the bits so that I knew where they had been cut from; it saves all the guess work!


             Holes
 
The silhouette was what I wanted to place on the colourful background as a positive image and I found another ready-quilted square to take the cut-out ‘holes’ to make a negative image.


           Silhouette
 
I placed the silhouette on top of the second background and used it as a stencil to help me replace all the ‘holes’ accurately. I used the tip of a small iron to apply enough heat to keep all the ‘holes’ in position, but avoided touching any of the stencil. (NB For this project, I used a fabric that already had a layer of glue sprayed onto the back. Usually I use Bondaweb, in which case I can leave the release paper on the back of the stencil to stop it from sticking, whilst removing the paper from the ‘holes’ to allow them to stick.)


              Using the silhouette
 
          Replacing the holes 1


              Replacing the holes 2


             Replacing the holes 3


Once all the ‘holes’ had been replaced inside the silhouette, all that remained was for the silhouette to be lifted to reveal the negative image.


          Removing the silhouette
 
I stuck the silhouette onto the other background and gave them both a good press. I had produced two images from the same piece of black fabric; positive and negative. All I need to do now add some thread work.


            Negative image
 

            Positive image


           Comparison


BTW: I have been on jury service over the last fortnight … again … and enjoyed the process and formality of it all whilst being slightly daunted over what we were asked to listen to and what we were expected to do as a member of the jury. The first case went according to plan and was pretty much ‘text-book’ in its character. We were all sworn in for our second case and had made a start on listening to the rather gruelling police interview tapes when we broke off for lunch. During lunch our youngest (22) and most glamourous jury member checked her phone only to notice that she had been ‘Facebooked’ by one of the young men in the public gallery (Our names are read out once and only once as we are chosen to serve so he was quick off the mark!) . She reported it right away and there were official comings and goings whilst we had our lunch. When we returned to court we learned that the young man in question had been detained, we were dismissed as a jury and the case would have to be rescheduled months down the line. What a waste of peoples’ time (judge barristers, witnesses, public servants, jury) and public money but doesn’t it just reflect the immediacy and the power of social media.
 
And this is a cryptic message to make an old school friend laugh:  Matches at Jonkoping!
 

Sunday 7 April 2019

BLOG 440

Blog 440
As I said last week I have an idea! I have a wonderful selection of colourful sheers and a soldering iron and I wondered what I could do to decorate the colourful background. I drafted the pattern last week and worked on it this week in two very different ways. One was successful and one was not!
 

            Sheers
 

The first way was to cover the pattern with release paper to protect it. I then selected sheers, placed them on top and cut out shapes with the soldering iron.
           Pattern and release paper
 
I put the pattern underneath some release paper thinking that I could work on the release paper with the soldering iron without spoiling the pattern. That worked fine although it was difficult to be tidy or accurate.


                Burning shapes


            Building up the pattern


            Flowers
 
So far so good, if a little scrappy! I then wondered what would happen to the colours if they were covered by another sheer. It certainly warmed them up but did nothing to help the process.
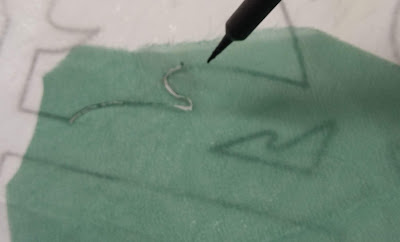

               Overlay


Then it occurred to me that I must assess what I was doing in relation to the background that I had prepared earlier! That confirmed straight away that this process was not contributing anything to this particular project! You could barely see the shapes; they were lost against the colour. That said, I have learned one or two things about cutting shapes with a soldering iron and will have another go.
             Ghosted shapes


So it was back to the drawing board to do what I know and love, namely preparing a silhouette. I found some black fabric in stock with adhesive on the back, something I have never used before because it seemed too stiff and heavy, ideal for a wall hanging though. I was able to trace the pattern through the fabric using a light box and a white marking pencil.
              Black fabric


             White marker


              Transferred pattern
 
All I needed to do now was cut it out and remove the ‘holes’ and, because I can’t bear waste, I ended up keeping all the ‘holes’ also. More next week.