Sunday 29 November 2020

BLOG 524


Blog 524


I have made progress in all sorts of directions this week. There are no completed pieces of work to speak of, but they have all been advanced in one way or another!! Firstly I have completed the painterly background, trimmed it and ironed it one to the wadding for the next decorative stage … which could be anything; I just haven’t decided! It’s a very strong visual piece in its own right and I am asking myself the following questions: Does it need more? Would a silhouette enhance the look of it? Would appliqued flowers be a help or a hindrance? What I do know is that I can now add free motion decorative stitches across the surface which helps to add depth and hold the individual pieces down.


Painterly background


Because I had to bring my roll of wadding down from the loft room, it seemed like a good idea to layer up some other pieces of work which are awaiting quilting. I am certainly anxious to get the silk hanging onto wadding and a backing as it seems to be fraying before my very eyes! Someone had given me a temporary adhesive spray a while back so I thought I would try this because I didn’t want pin holes to be visible across the quilt. It seemed to hold the layers together well so I only put pins along the seam around the 
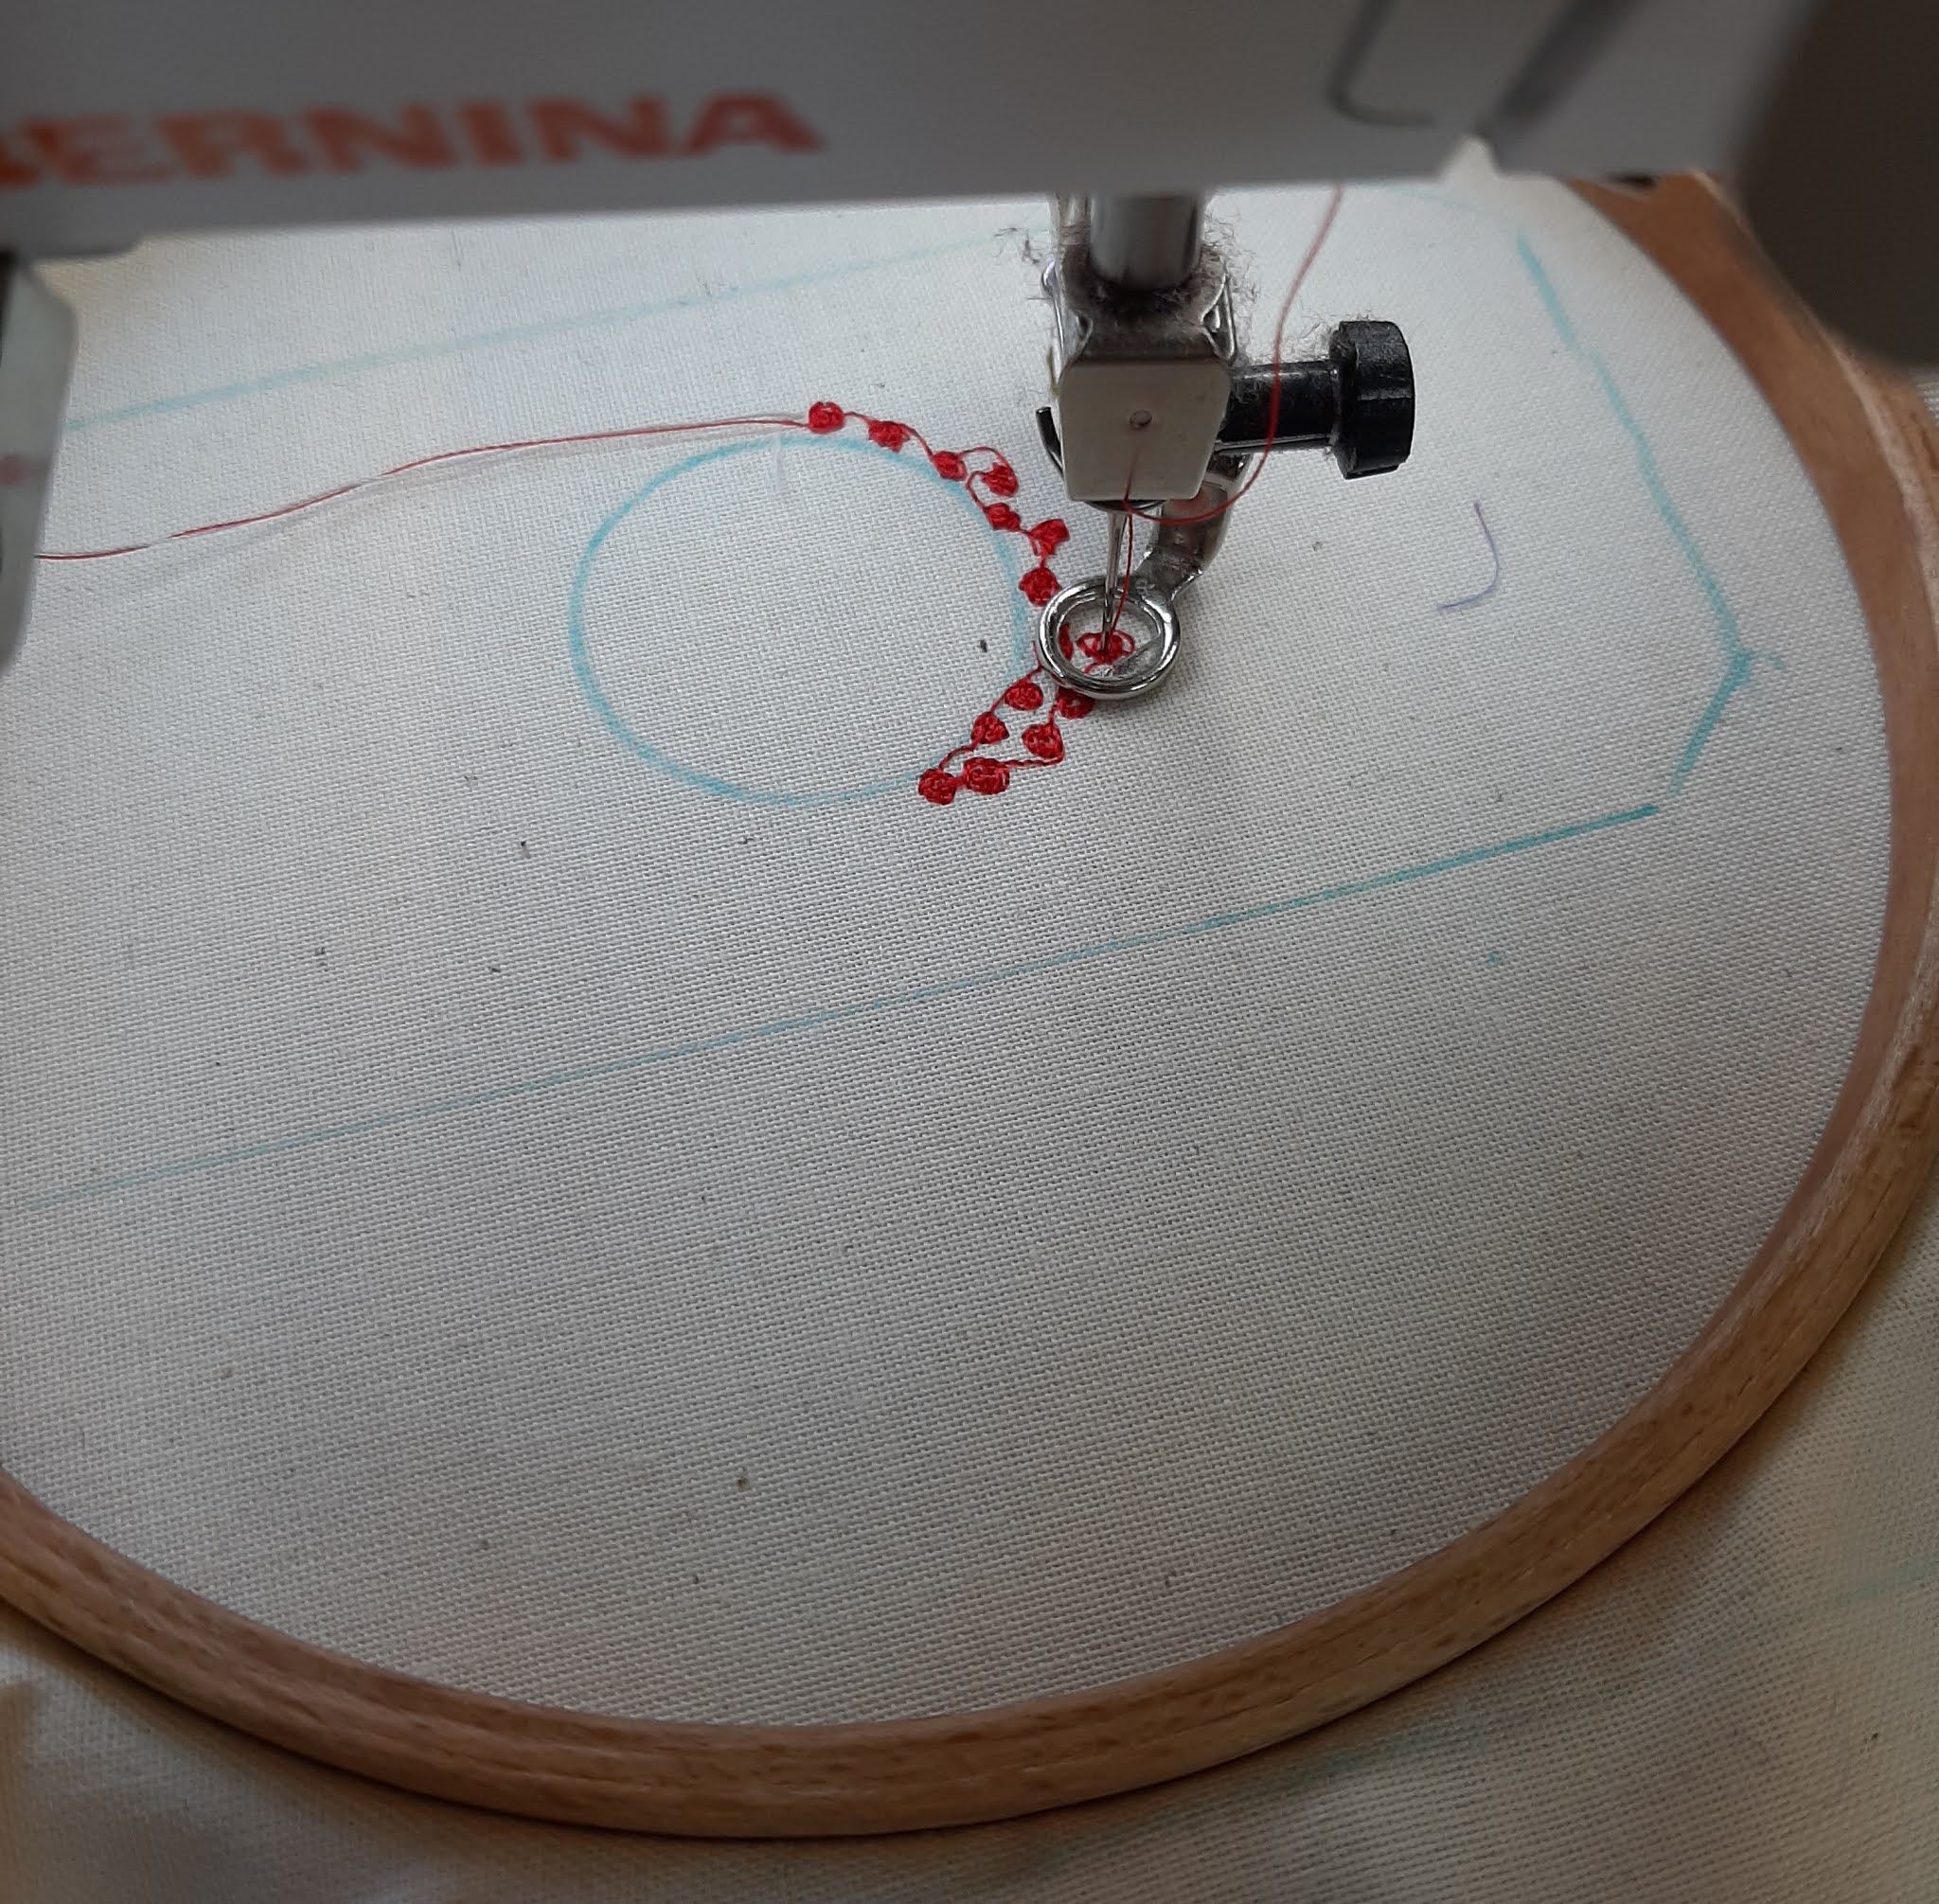
outer edge. I tried some free-motion quilting over the surface but when I checked the stitches on the back, the tension was all wrong! I tried all sorts of remedies (re-threading top and bottom, changing the needle, altering the tension knobs, balancing the threads etc…) but nothing seemed to make a difference which is why I decided in the end to sew a straight stitch in the ditch with a walking foot. And as I was doing this, I was processing the idea that what I had created was rather like a crazy quilt. And then I wondered what it would be like if I added some decorative stitches across the surface. This is far more work than I ever wanted to do on this wall hanging but, if the idea is in my mind, it usually means that what I have created so far isn’t satisfying me!!! Watch this space!


Layering

 
Layered

 
Straight line quilting

 
In progress


There are 2 other scarp quilts in stock that need quilting too and they are double bed size and are almost out-facing me as a project. I am a real advocate of the quilt-as-you-go method and I have been doing it since I made ‘My First Quilt’ back in 1984. I could have easily done these in that way but for some reason I chose to create a whole quilt top and put it to one side. Do I dismantle or do I quilt by cheque book?? Decisions, decisions!


Scrap 1

 
Scrap 2


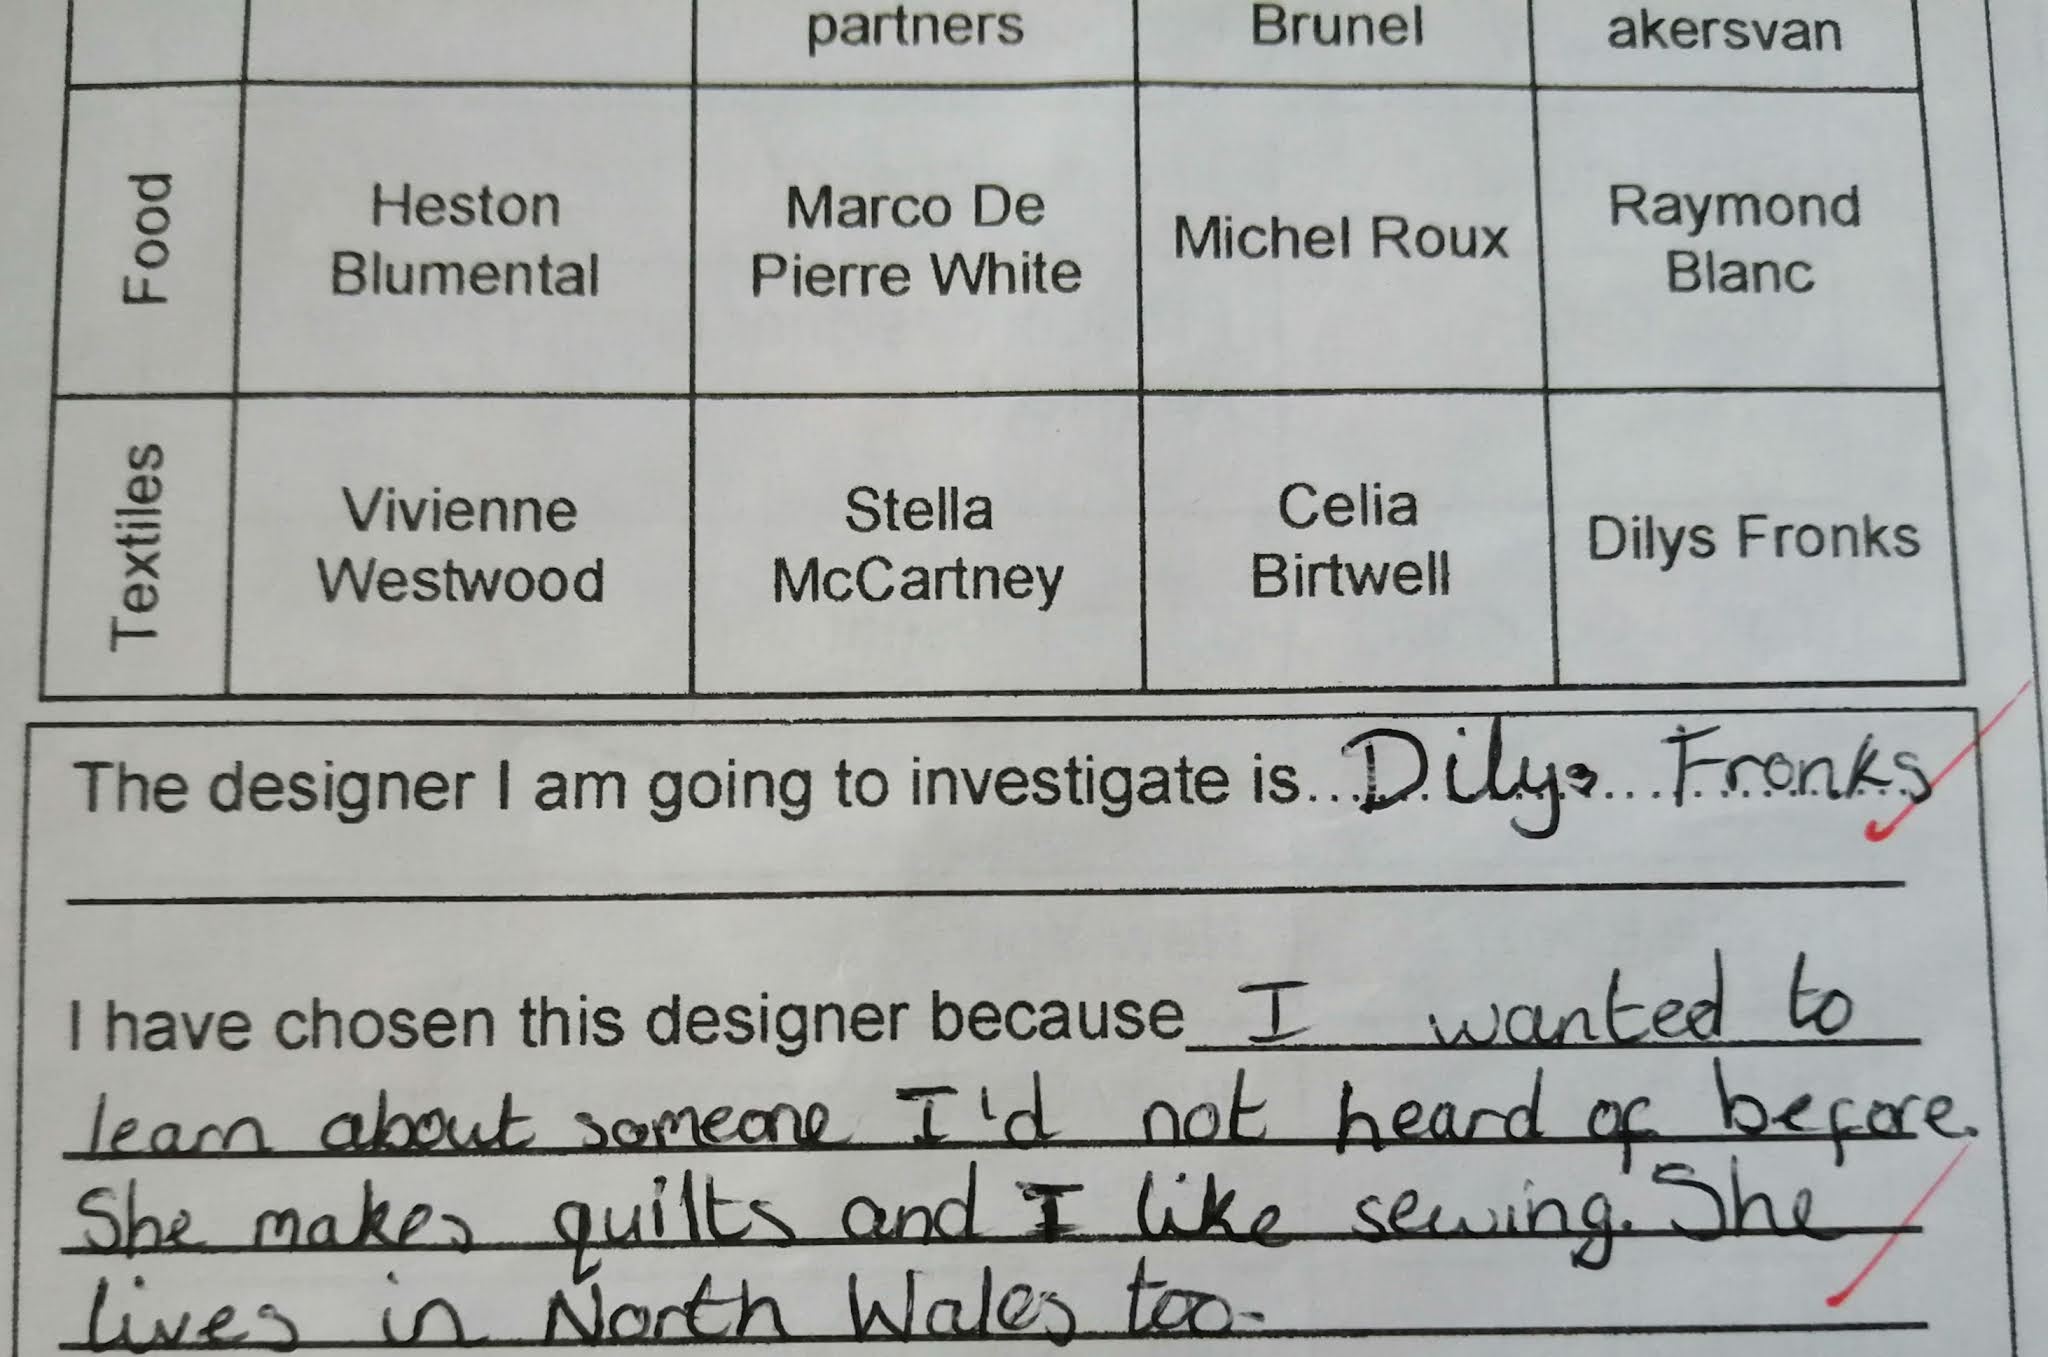
Last week I mentioned that I had 2 blasts from the past and I wrote about the first. Now I am going to mention the second. It was about 8 years ago that I was chosen as one of the designers for a secondary school craft/design/technology CDT project. The girl was called Rosie and she is now in her final year of training to be a primary school teacher. Her mum got in touched recently when she came across Rosie’s paperwork for that project and she sent me photos. I remembered being flattered to be asked and I also remembered being generous with my visual aids and information.  Now I have seen the paperwork I realise how exalted she has made me; I am alongside such huge names in the food and textile industry and I am humbled. Thank you so much Rosie and good luck in your chosen profession!!

 
Course work

 
Assessment

 
Design wall


Sunday 22 November 2020

BLOG 523


Blog 523


And so the project continues! Lots of dogged determination and wet afternoons in my playroom with Radio 4 have gone into this. More fabric needed to be backed with a fusible, more strips were then cut and many more squares were prepared. Overall, it’s an enjoyable process and, as it is my very own method which I have fine-tuned over the years, what’s not to like!

 
Palette

 
Strips

 
Progress 1

 
Progress 2

 
Progress 3


It’s certainly beneficial to take pictures as I progress and I cannot emphasise how essential it is in my work. The image is condensed through the camera lens and things that need changing become very obvious.


Progress 4

 
Trialling an idea


At this stage I am pondering whether to do some extra rows of dark squares along the bottom edge to give extra grounding to the image. And I keep trialling the hollyhocks flowers which were left over from a previous project, but I’m not sure that this background is right for them.


I have had a couple of blasts from the past over the last month and I was delighted to hear from the people concerned. One blast came from Elaine Holland and it concerned a group quilt which my students had made during my early teaching days. I started to teach in 1985 and each year I encouraged my classes to put time into a charity project; it was an opportunity to use their newly learned skills for the benefit of others. One of the earliest quilts was made in 1987 and we did it for Children In Need. It showed Pudsey Bear as a farmer with all his animals and showcased many different techniques on the quilt surface. I offered this quilt to the studios in Manchester to use as a backdrop for the programme so that people could see it and bid on it, the quilt going to the highest bidder. It didn’t quite happen that way but a raffle was organised and it was won by Elaine. I didn’t have a clue where this quilt had gone until she thoughtfully contacted me recently. She is now 81 years old and says that she has always loved the quilt and treasured it over the years. It will be passed on eventually to a niece who also adores it and will look after it. I should also add that this quilt was responsible for me being invited to the studio with some of my students on THE night and I was interviewed about the quilt for all of 34 seconds; my moment of fame!!)

 
Pudsey quilt

 
Pudsey block


Sunday 15 November 2020

BLOG 522


Blog 522


I have boxes of ready fused Batiks and Bali’s and occasionally I decide that I need to use them, usually when I am between projects. In this example, they have been cut into circles with pinking shears to produce a shaded wash (pointillism). Once trimmed it measured 10½” square and will eventually be used to make the centre for a cushion. Here is the sequence.

 
Stage 1

 
Stage 2

 
Stage 3

 
Stage 4 Rotated

 
Stage 5 Trimmed


And once I had started to play with colour I couldn’t help but continue. It did mean preparing lots more fabric with Bondaweb but that preparation stage just saturates me in colour and gets me salivating to start! As I have demonstrated many times in the past on this blog, I prepare squares made from diagonally-placed strips and then stagger them on the design wall. The pics that follow show the sequence so far and reflect a week’s long work of preparing fabric, making and trimming squares (3½”) and then shuffling them on the design wall. At this stage I’m not sure where I am going with this creative endeavour but you should get some idea of scale. As I have been playing with hollyhocks, sunflowers and foxgloves recently, perhaps they may find a place on this back ground. Who knows because I certainly don’t and that for me is the uncertain fun of creativity.  

 
Background 1

 
Background 2 Scale

 
Background 3

Background 4

 
Detail

 
Background 5


Sunday 8 November 2020

BLOG 521


Blog 521


This week I felt I ought to make progress on my collection of luggage labels. I decided to do these many moons ago as a doable weekly project. They were small in size and they gave me the opportunity to try different techniques. The ‘weekly’ part fell by the wayside quite quickly so I felt as if I was always playing catch-up. Now I do them in batches when the mood takes me (often between projects when I am pondering what to do next). I have a book called ‘Inspired to Stitch’ and the idea of working with complementary colours and line came from there.

 
Machine embroidery

 
Progress

Red green label

 
Orange blue label

 
Yellow purple label

 
Colour transfer label

 
Line drawing label

 
Labels


And then I homed in on the third of the 3 panels which needed completing and I decided to use the glorious hollyhocks for this. So armed with fabric off-cuts and some inspirational pictures I set about doing it in my usual free and painterly style.


Panel

Fabric off-cuts

 
Inspirational pictures

 
Flower

 
In situ

 
Machine detail

 
Completed panel

 
Floral trio


I am really pleased with these and think that they would look decoratively stunning in the right place in an alcove or beside a door. I am willing to sell them as a triptych or as individual panels so, if you are interested and want more details, get in touch at dilys.fronks@btinternet.com


Sunday 1 November 2020

BLOG 520


Blog 520


It was construction time for the silk wall hanging this week. My first task was to decide if I wanted to match the seams or stagger them. In the past, whenever I have made garden backgrounds with squares for my wrought iron gates, I always chose to stagger the seams. The reason behind this was to minimise the movement between individual squares and to give a more harmonious background. The only way to answer this question was to pin the strips onto my design wall and look at them from a distance.

 
Matching seams

 
Staggered seams


I preferred the orderliness of the matching seams so that was how I chose to proceed. I worked systematically pinning, sewing and pressing 2 adjacent rows at a time. Then I sewed 2 seamed sections into 4 seamed sections etc.

 
Pinning

 
Constant seam allowance

 
Progress

 
Right side

 
More progress

 
Press as you go

Final seam


I eventually got it together and pinned it on my design wall to enjoy the final effect. I could see straight away that there was a darker strip just right of centre; I must have reversed a set of 4 strips during the final construction! Damn!!

 
Completed ??


So with a bit of reverse sewing and a final double check I got there in the end!

 
Correct layout

 
Completed top 50” x 68”


The silk frayed terribly whenever I touched it and the back of the quilt and my floor mat bore witness to that fact. My clothes were always covered with threads whenever I sewed which drove me mad until I remembered all the effort that went into making just one silk thread. We visited a silk factory in China last year where I learned that a moth laid 500+ eggs and when they hatched, the worms were fed mulberry leaves for 1 month. These worms then spun cocoons which were eventually steamed to kill the worms and then rinsed in hot water to loosen the threads. Individual threads were then joined together into larger bundles to be woven into fabric. It’s an amazing procedure and I now have a greater respect for this particular wall hanging. It just needs quilting now!!

 
Fraying seams

 
Playroom mat


And I decided that I quite liked it once it was all together but I started to think what I could do to make it more pleasing to me, as suggested by my husband last week!  What if I cut out small circles and placed them on the surface, reversing the shading so that they were dark in the centre and moved to light round the outside edge! The only way to find out was to try it and after doing that I decided it was a step to far and the quilt became much too busy. The quilt was fine enough as it was!

 
What if 1

 
What if 2


As I was playing one early afternoon, I was amazed to see fairy lights shining at my window! Well that’s the way I chose to look at them. The setting sun was shining through a partition hedge to create that effect. It made me happy!

 
Fairy lights