Sunday 30 July 2017

BLOG 356


BLOG 356

You only have to look at my bin to see what I have been working on this week. I have made a final push on the log cabin sampler blocks; I really do need to get this out of my system! The bin is full and the workstation very messy but that is the nature of progress.

               Bin

            Workstation

             Reference book


I used this Maggie Malone book as a reference and chose a 9-patch pattern called Saw tooth. I made the 9 sections but somehow it looked wrong. I found that I had put a light block in the top left hand corner instead of a dark one so that was easy (if not time consuming) to rectify. But this block also highlighted one of the problems of working with Liberty fabrics on such a small scale. As they are all heavily floral, a light flower on a dark fabric can dominate the narrow strip and affect the clarity of the pattern. I hope that whatever quilting I decide to do will help to define the patterns more clearly. If you blur your eyes when you look at the blocks they are better! I also sewed another 9-patch called Birds in the air to complete the 20 blocks.

             Incorrect Saw tooth

                Corrected version

               Birds in the air

 Twenty blocks have been sewn; here they are pinned together and hanging from a rafter in the loft room where I do most of my sewing.

               20 blocks

I sewed a dark 1” strip of fabric around each block to add definition and to contain the busy little patterns. This is a vast improvement! Here they are on my design wall and beginning to look like the quilt they are meant to be.

               Bordered blocks

In between the blocks I will probably place light strips of Liberty fabric with a dark square as the corner stone. I breathe a big sigh of relief as the hard work on this quilt is all but finished! The Liberty basket is still over-flowingly full which means I have to make a large quilt to shift a lot more of it!

We had a fiendishly wet day last Thursday so I used the opportunity to layer, quilt and bind another Linus quilt.

             Linus quilt


Sunday 23 July 2017

BLOG 355


Blog 355
I have had several things under my machine this week, but mainly during the latter part of the week. I inadvertently left my sewing machine attachments at Suzette’s on Monday and they weren’t delivered until Friday. I was bereft! It was my fault entirely but how maddening! Firstly, I added a border to ‘The Blues’ Linus quilt.

             The Blues

             Bordered

I made a start at quilting another Linus quilt, ‘Bubbles’, using a free-motion foot and an open swirl design. This didn’t take long at all; in fact it would have been much quicker if the ‘Quality Controller’ hadn’t come to sample the loft of the wadding! She even left a few fibres of her own as a gift!

              Start

                   Finish

          Quality Controller

               Additional fibres

The ‘At Liberty’ Linus quilt was next and it took no longer than 30 mins to run vertical and horizontal wavy lines across the seams of this quilt.

                At Liberty

             Quilted

Both of these quilted quilts will be bound ready to hand sew at Gresford on Tuesday. In the meantime, I am halfway through constructing another memorabilia box for a special occasion. I have yet to decide what will go onto the lid but I am thinking perhaps of synthetics and soldering. Watch this space!

                Memorabilia box


Sunday 16 July 2017

BLOG 354


BLOG 354

I have never had a go at making fabric baskets and so I thought I would learn how and give the method a whirl. There are plenty of tutorials to view on the internet (isn’t that a marvellous tool?) and it all seemed very straight forward. I’m sure you know the expression ‘Just do it’, so I did it! I found some chunky rope in a hardware store and I pulled out some long 2 ½” fabric strips left over from a distant quilt project. I cut the strips down to 1 ¼” and I started to bind the rope, tidying and covering the raw ends with the help of a bit of glue. When I came to the end of a strip, I used glue to start the next strip and held it in place with a peg till it had stuck.

           Rope

            Covered rope

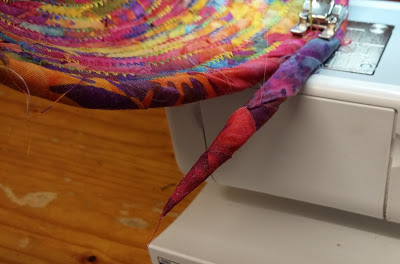
To start, I curled the end round and held it tight with a pin. I threaded my machine with a multi-coloured thread and set it on a wide zigzag with an open foot. I struggled to get the rope under the foot of my machine but, once it was in position, it sewed as normal. I continued until it was wide enough for a base, about 6”.

               Starting curl

             Machine zigzag

             Progress

And then came the shaping which was done simply by angling the base whilst continuing to sew. The only problem I encountered was when my machine foot disappeared into the wrapped fabric but it was easy just to stop sewing and swivel it out.

              Shaping

               Problem

When the basket was the size I wanted it to be (ie I had run out of the colourful fabric strips), I reduced the bulk of the rope by trimming back some of the fibres it in and I bound and stuck it to taper the end.

            Tapered end

             Completed basket above

               Completed basket side

For me, this project was a satisfying introduction to making fabric baskets and I shall make more. (I will have to as I have half of the rope left!). Next time I will use narrower fabric strips for a tighter wrap on the rope.

The ease of constructing the fabric basket project has been a stark contrast to the intricate small scale sewing of the Liberty sampler blocks. That said, I did manage to complete another 16-patch block this week; Road to Oklahoma. Bravo!

           Road to Oklahoma


Sunday 9 July 2017


BLOG 353
The garden has had a lot of attention this week as a result of the lovely weather. The heat encourages weeds to burgeon and that in turn spurs me into action. The cooler evenings take me to my studio where I relax into the repeated and comfortable rhythms of sewing. First I decided to deal with the Liberty blocks that I showed last week and using 2 ½” strips of calico, I joined them together to make a decent sized Linus quilt. Another one for the ‘to be quilted’ pile which I will do when I get more wadding in stock.  


                Liberty blocks


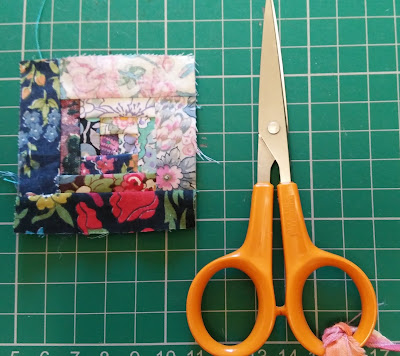
When I was in the mood for fiddling this week, I continued to make the tiny blocks for my log cabin sampler quilt. They are so very small and to give you the impression of size, I have taken pictures of the different size blocks alongside my small embroidery scissors. Be very impressed!!

               4-patch
                   9-patch

               16-patch

              Sampler block


In a bid to keep using up my stock of fabrics, some of which go back many years, I pulled out my drawer of blue fabrics. Another Linus quilt was planned after looking through quick and easy techniques on the internet. I cut rectangles at 4 ½” x 6 ½” and placed them on my design wall; the dark fabrics are around the edge and the lighter ones in the centre. I chose a dark fabric to border the light rectangles and light fabric to border the dark rectangles and cut 1 ½” x 6 ½” strips from them. Adding these along 2 opposite sides created 6 ½” squares which were ironed to establish the direction of the seam allowances. (I can’t tell you how important the iron and ironing board is to us quilters. I seem to spend a lot of time there at the expense of my laundry so it must be a good thing!) This quilt may need a border but I will decide on that when I start to quilt all the tops I have accumulated. I need 6 quilts to fulfil a promise I made to the Linus project in Wales having already completed 6 for the Cheshire region.

               Blue fabrics
              Cut rectangles
               Border fabrics

              Ready to sew

               String piecing
              Ironing board
               Completed centre
             The quality controller

Sunday 2 July 2017

BLOG 352


BLOG 352

And what do I do now? I have spent so long, hours, days, weeks and months, working my way towards the Gresford show that everything seems a bit flat now. This just goes to confirm what I have always suspected: that I am happier if I am working on a project. So, what do you do when you are at a loose end? You start to rummage in your fabrics to see what you can find.

It is a while since I pulled out my basket of Liberty fabrics and it proved to be a rich source of UFOs.

              Liberty fabrics

 I found several mini log cabin sampler blocks. These are 6 ½” finished squares and consist of 4-patch, 9-patch, 12-patch and 16-patch blocks. Seeing them laid out on the floor has renewed my enthusiasm for this project once again.

              Mini sampler

                Close up


I also found many 3 ½” squares made up of stripped triangles which were the start of some project long forgotten. Perhaps a Linus quilt will come from these.

            Squares

            Dark and light

I also found 4 larger squares made of stripes for who knows what project. So my first task will be to make sense of the Liberty fabrics and get them out of my system.

                 Strips


The Gresford Show made £6,941. 64p this year, our best total yet. But we still haven’t broken that £7000 barrier, perhaps next time. The kitchen took £2927:50 and entrance payments £2598: 00. The money will be distributed amongst our chosen charities for the year. Well done all!!