Wednesday 22 December 2010

BLOG 32

We have more or less finished the Christmas preparations, which we don’t think about it until December 1st. Then we write and send out all the cards, hoping for news updates and answers to the questions we ask. This year has been more difficult with the weather conditions but as long as we can get to the main road, we are fine. Just the turkey and Stilton to pick up from the farm shop now and we are ready for guests. I do wonder what all the fuss is about sometimes, after all it’s just one big roast dinner with trimmings and a fancy dessert when all’s said and done.

Final touches are still being added to the presents I like to make for friends. Here’s a picture of one of my gifts for a special dog-loving friend! It’s a garden ornament dressed up like a dog’s dinner in her gown and evening bag. I hope it causes a laugh on Christmas Day!! The daft things you do eh!

l

Dog’s dinner

I love every tinselly-thing about Christmas, from the nativity to the brussel sprouts, from the awful cracker jokes to the silly games. Over the years, I have made loads of fabric quilts and decorations as teaching samples. So all I have to do is get them out of the loft and dress the rooms; they’ll certainly last my lifetime! Here are some pictures of our home dressed and ready for Christmas.

Our festive fireplace

Xmas stocking

Kitchen quilt

Patchwork tree

Manic Christmas fairy

My friend Gwenda made this fairy for me. It has unruly hair, a toothy grin, tassels, a squeaky middle and it even sports a thong! Makes me smile every year.

Star quilt

Table centre

Robin and cards

Now that the Robin is on the wall, and the cards are hanging, all that remains is for me to wish you love, peace and friendship at Christmas time.

Sunday 12 December 2010

BLOG 31

We are in the grip of an early winter, with snow and severe overnight frosts causing havoc in the region. Situated on the side of an exposed hill, we are ¼ mile from the main road along a farm lane. Thawing snow gets re-frozen overnight to create a skating rink by the morning. But this doesn’t bother me because if I can’t get out, I have the leisure to concentrate my mind on my creative endeavours. So…

The Positive and Negative Jacobean quilt is more or less designed, with the top section needing just a few tweaks for the practicality of cutting and sewing. This is always something to remember when designing for quilts – whatever you draw on paper has to be stitched eventually, so keep the lines simple.

Top panel of positive/negative Jacobean

The vertical panels are all cut out with the negative shapes or fillers sewn onto the coloured fabric with a tiny zigzag stitch. The positive frame has yet to be started and this is what they look like on the design wall, awaiting attention.

It’s worth recalling the chocolate elephant approach to my work from blog 29!

If someone put a huge chocolate elephant in front of me, much as I would like to eat it, it would completely outface me. However, if that same chocolate elephant were smashed into hundreds of small pieces, I would willingly make a start, as each piece would be a manageable size to eat. In the same way, I reduce my quilt design into smaller manageable sections.

I try not to think of all the shapes that I have to sew, but deal with them one at a time, whilst thinking ‘that’s one less to do’. With music on in the background, the time goes and the shapes gradually get done. I also give myself realistic deadlines …. ‘by the end of this week, I will design this panel or complete this section’ … etc. It what works for me.

Positive frames

Another piece of work, on hold for 3 years, has surfaced and needs finishing because of its seasonal appeal. It is a Christmas flower arrangement on a windowsill, complete apart from the necessary machine quilting and texture. Such quilting has a two-fold effect: it keeps the individual bits of fabric in place and adds decorative detail to bring the picture to life. Fingers crossed that it gets done for THIS Christmas.

Christmas flower arrangement

At the machine embroidery class I attended 2 months ago, our brief was to take inspiration from a painting. I decided to try sewing on a canvas base, hoping that it was stiff enough to prevent distortion from all the over-stitching. We painted a layer of fusible first and ironed it, when dry, onto our fabric to create background colour. This was an excellent way to start as it defined the picture before we started to build it up with layers of fabric, sheers and stitch. This is the picture so far.

I took my inspiration from ‘Flowers in Oils’ by Noel Gregory, published by Search Press. This is what it looks like after the day’s workshop.

Still life embroidery

Friday 26 November 2010

BLOG 30

What a lovely surprise I had on Wednesday. After an unusually long and often frustrating journey my new book ‘Dual Image Appliqué’ has been delivered. These first, hot off the press, copies have all been posted or delivered to the contributors, with grateful thanks for their help and their patience. AQS have done a lovely job! The front cover is eye catching, the layout is clear and colourful and the over-all appearance of the book is glossy and bright. I am delighted!
The book is available now from AQS www.AmericanQuilter.com or from me at www.dilysfronks.com. It will be generally available in books shops soon.


Method in a nutshell using my simple terminology of frame, fillers and foundations.

All you need is 1 light square for frames and fillers and 2 foundation squares

Trace the pattern onto a fusible web and cut it out


Iron the pattern centrally on the WS of the fabric

Cut out the shape or filler to leave an in tact frame

Place the frame, with its paper still on, onto a foundation square. Take the paper off the filler and put it back in place. Use the tip of the iron to stick it down.

Remove the frame and iron the filler thoroughly.

Take the paper off the frame and iron it onto another foundation square.

That’s all there is to the basic method but just look at the exciting ways I have developed it in the book. There are 10 projects to inspire you.
.


Sunday 21 November 2010

BLOG 29

Designing is the hardest part of quilt making. I have always strived to be different and innovative in my work and so each of my quilts has to be designed and needs to start with a full size pattern. This is what takes the time and the patience. I dream up some ‘what if’ ideas, do trial samples to test the method, search for resource material, and then draft a pattern. That’s the hardest part behind me but, somehow, the thought of embarking on a complex pattern, such as seen on my latest quilt, is quite overwhelming.

Part of pattern

This is when I adopt the Chocolate Elephant approach to my work!

If someone put a huge chocolate elephant in front of me, much as I would like to eat it, it would completely outface me. However, if that same chocolate elephant were smashed into hundreds of small pieces, I would willingly make a start, as each piece would be a manageable size to eat. In the same way, I reduce my quilt design into smaller manageable sections.

As seen below, I have made a start on one of the smaller sections using the cut-out shapes.

Jacobean 2-4-1 method

Now I need to make a decision on the fabric to go behind the in tact frame. It is at this stage that I start to audition fabrics and this is the beauty of the 2-4-1 method.

Auditioning fabric 1

Auditioning fabric 2

Fabric 1 is a possibility, but I have a limited amount of it. I prefer to have in stock much more than I am ever likely to use, just in case problems arise.

Fabric 2 is too stark and lacks any warmth.

I particularly like Fabric 3 and need to go to the shop to see if there is more available. Any excuse to get amongst those bolts of fabric eh!

Auditioning fabric 3

Another project that needs to be done is a baby quilt for my great niece. I have made one for each of my great nephews and nieces and Sophia, at 2 months old, is the latest. I have used a pre-printed alphabet for speed and this is how it looks after a few hours work on the sewing machine. It’s quick, its bright and colourful and it needs quilting now, that’s what takes the time!.

Sophia’s quilt

Sophia’s quilt detail

Friday 12 November 2010

BLOG 28


Since settling back in at home after Malvern, I have started a wall hanging for competition next year. It is an idea I have had in my mind for a long time and indeed, the pattern has been drawn for months. All I needed was the time.

And, somehow, my attitude towards time changes when the clocks go back in October. The wood-burning stove is lit early afternoon, the curtains are drawn to shut out the dark and the lounge is warm and cosy. To me, this is an invitation to sit down a bit earlier without feeling guilty! And if I am sitting down, I need a project on my lap. (I don’t have my husband’s gift of sleeping; any time, any place, anywhere, at the drop of a hat!)

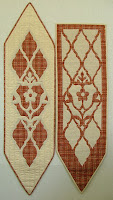
The wall hangings below are influenced by Jacobean or Crewelwork embroidery. It is a style I love and which I have worked on many times. I keep going back to my vast file on the subject and developing ideas.

Jacobean Fantasy

These wall hangings were made many years ago and are executed in positive and negative appliqué or Dual Image Appliqué, the subject of my next book. They were a trial run for the quilt I am working on now, to see whether the 2-4-1 method would work. I think it does, very dramatically, so I am committed now to seeing the quilt through.

Jacobean 2-4-1 method

This is the first panel. Hopefully you can see the how I have used the cutout or negative shapes to create the panel on the left. I have yet to find the right fabric to put behind the in-tact frame on the right.

Thursday 4 November 2010

BLOG 27

Another manic Monday! I checked my emails this morning only to see that my manuscript had been sent last Thursday for me to do the final design check over the WE. I had been away so I had to knuckled down to it straight away and get my comments back within a couple of hours. Fortunately there wasn’t too much to do and it all went very smoothly. Now there is a huge sense of relief that it is all over for my part as an author and the publishers will send it off to the printers today.

The book is being published by AQS in the USA. Things haven’t run smoothly and we are probably going to be 3 months behind schedule by the time it's on the market. For those who are awaiting its arrival, please be patient a bit longer. It will really be worth having when the time comes: concise step-by-step instructions, lots of illustrations and lovely projects.

This past weekend, I attended the Autumn Quilt Fair at the Three Counties Showground in Malvern. I had assumed that the book would be ready for signing and selling but alas, through no fault on my part, it wasn’t ready. I was able to demonstrate the 2-4-1 method that I use to produce Dual Image Appliqué and I also sold some Christmas patterns that are available on my website if you are interested.

Christmas Patterns at Malvern

There was another reason for being at the quilt show; I had a collection of quilts on show under the title ‘I feel a quilt coming on’. I selected mainly gate and window quilts to go on display and was thrilled to see my quilts en masse, well displayed by the organisers. Here are some of my quilts, not easy to photograph because they were at an angle.

Tiffany in the Attic, Positive and Negative Swallows

Tell Mother I’m ok, Still Life on the Tiles

Spring Gate, Summer Gate

Autumn Gate, Hydrangea Fence

Winter Gate, Hoffman Gate

Wednesday 27 October 2010

BLOG 26

The 2 quilts that I have made for my twin beds must be quilted now and I have come up with a cunning plan! I would like to have a go on one of those big long arm quilting machines, on a frame with huge rollers. This would enable me to quilt both of them in a day …perhaps! To that end, I have asked a local shop owner to let me have a go on hers and, as she knows me well and has faith in my abilities, she has agreed! I am so excited!

In return, I am making her a quilt top using her latest fabric range. She will have to quilt it naturally but once complete, she can use it for display to draw attention to the fabric and show people how they can use it. I have chosen to do a French Braid quilt from a book by Jane Hardy Miller, published by C&T. Here are the first 2 strips:

French Braid

Once all the preparatory cutting of the centre squares, strips and end triangles has been done, this is a super quilt to sew. The book has good instructions and a series of logical steps to follow. It’s a joy to use and so quick.

Auditioning fabrics

I need to finish off each strip with a triangle and for this I need to audition a suitable fabric. Green runs through the centre of the strips and is in every fabric so that seems to be the best choice to me.

This is what it looks like when the vertical joining strips and the surrounding borders have been added. I really like the colours and will find it hard to hand over the quilt.

Completed quilt top

I did hand it over after taking this pic; the under exposure doesn’t do the quilt justice at all!

I have also been diverted onto machine embroidery again, this time making boxes using sheers, threads and pelmet vylene.

Box before folding

The centre of this box was created using threads only, sewn as a sample onto a vanishing layer. It seemed like a good idea to use the sample and so the sides of the box were sewn to match the colours.

Detail of embroidery

The box below was sewn on the one day course with Suzette Smart at Castle Court Quilters. I know that if I am at home, I will always choose to work with fabric so I enjoy the discipline of just playing with threads and sheers at someone else’s workshop. These boxes will make good Xmas presents, filled with coasters or special chocolates.

Completed box lid

A close up