Sunday 26 July 2015

BLOG 258


Blog 258

Dilys’s Multi-coloured Dream Quilt Part 7

I made the decision last week to make another 7 blocks to balance the squares in the quilt. Those were the hardest ones to make having already cleared away the mess from piecing the last 65 blocks. Again, I had to iron bits of fabric, cut 1 ½” strips and join them together, resize and sew. What a chore!! BUT all the squares are done and many of them are layered and ready for quilting. I have selected 2 variegated threads so that the top one will blend with all the fabric colours and the one on the back will look colourful against the dyed fabric squares I am using. I have had to reorder these threads as I have quilted lots of blocks and run out.

BTW: I forgot to mention last week that I have chosen to use squares of dyed fabric for the back of the quilt. Each time I visit the NEC for the Festival of Quilts, I usually treat myself to a piece of fabric dyed by Heidi Stoll-Weber.  It’s colourful, it’s expensive but it’s fabulous. I have just stock-piled it over the years because I haven’t been able to cut into it because I love it so much. So I asked myself what is the point in having this fabric if I am not going to enjoy using it? I mentally jumped over that hurdle and started to cut into it with enthusiasm! (Though in the back of my mind I know that I am going to the NEC in 11 sleeps time and I will be able to buy some more!!!)

                              Fab fabric


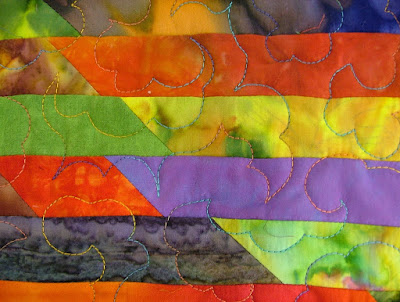
The layered blocks are all going to be machine quilted with a meandering ‘fluffy cloud’ pattern which fills in the space in no time at all without being too intense. (I did toy with the idea of doing them all differently for all of 3 seconds, but then decided that it was too much like hard work!)

TIP: I usually practice whatever pattern I am going to do with pencil and paper first, just to get the rhythm of the design into my head and onto my fingertips.

                                                          Quilted block

Here are my thoughts on machine quilting: When you write, you pull the pencil across the paper which is of course not moving. When you do machine quilting, the needle (pencil) is forming the stitch on the spot and you move the fabric (paper) in relation to the needle. Successful machine quilting is a delicate balance of the speed of the stitch (made by the pressure of the foot on the pedal) and the speed of moving the fabric. Practice makes perfect and you don’t get good at something by not doing it!

                                                    Secret weapon

 These gardening gloves are wonderful … for machine quilting with rubber dots that grip the fabric. I only use the left hand glove and I lay it on the fabric to keep it flat.

                                                              Left hand

 With the right hand I want a good grip on the fabric so that I can guide it under the needle with confidence. I stop often with the needle down in the fabric for security and I adjust my grip often.

                                                          Right hand

                                                               Detail

                                                            Reverse


Here’s the pile of blocks waiting to be sandwiched and quilted. There’s still a long way to go.

                                                            In Progress

The next stage is to join the blocks together like the ones below.

                                                                  Front join

                                                                      Back join


Because I am placing the blocks on point, I have to make triangles for the ends of the rows and corners. More next week.

                                                       Placement

It’s a good thing to be quilting on a rainy day like today. After all,  I could be a squirrel.

                            Rainy days activity

Sunday 19 July 2015

BLOG 257


BLOG 257

Scrap quilt continued. 

I have decided to call this quilt the ‘Dilys’s Technicoloured Dream Quilt’. Technicoloured it certainly is, ‘dream’ might be open to question; it might be the stuff of nightmares!! I won’t know until it has been made and is on the bed, you could call it a leap of faith. All I do know at this stage is that I am enjoying making it immensely and it is very therapeutic to be getting rid of drawers full of discarded scraps.

 Part 6 continued.
All 65 blocks have been sewn now and that required application and hard work! Shading in the finished blocks on the master plan helped to keep a running total. Here is the process for making the quilt sandwiches ready for quilting.

                                                        65 blocks

                                      Prepared batting and backing

                                                             3 layers

 Pin well, all around the outside edges, to stabilise the block.

                                                   Pinned edges

With a walking foot on the machine and a long running stitch, sew all around the block, 1/8” in from the edge. Remove the pins as you sew. Place ab 4 pins in the centre of the block.

                                                         Walking foot

I have divided the procedures in this quilt into easy do-able section. I tend to repeat the same procedure over and over again so I don’t have to change the feet or thread so often. I now need to prepare all the blocks in this way; more application!

                                                        Repeated procedure

 Quilting is the next stage so I remove the walking foot and load a free motion foot ready for Part 7 next week.

                                                            Free motion foot

BTW: At our last family gathering, I bagged some of my tiny off-cuts from the diagonal seam and gave them to my granddaughter, with a Pritt stick; I was curious to see what she would do with them. But it wasn’t my granddaughter who applied herself but my eldest daughter. And these are her rapidly created endeavours with a little help from her niece. I think they are just naively charming! Makes me wonder whether I should be discarding these bits after all!

                                                                 Cat

                                                                  Caterpillar

                                                    Butterfly

                                                                 Fish

Sunday 12 July 2015

BLOG 256


BLOG 256

Scrap Quilt continued.

Part 4: The long strips are pressed so that the seam allowances are all going in the same direction (I rarely open the seams when piecing) and then I need to cut them into 10 ½” lengths (my finished squares of 10 rows after quilting will be 10”).

ASIDE: I have the option of sewing all the long strips together before cutting them into squares but I feel that that would produce large pieces of fabric which are cumbersome to handle. I also feel that I wouldn’t have the same control over the placement of the colours; I am trying to avoid having two like fabrics side by side.

TIP: If you are constantly cutting the same strip length, put a piece of masking tape along the line (in this case the 10 ½” line). Line up the masking tape with the edge of the strip and cut at the edge of the ruler. It saves you having to look for the measurement each time you replace the ruler.


                                                    Cutting the strips

 Part 5: I string-piece the strips together in pairs and then join the pairs together until I have a square made up of 10 strips. These are pressed on the ironing board, from the back first to settle the seams and then on the front to make sure there are no tucks in the seams.

TIP: Let the iron do the work and don’t be tempted to stretch the fabrics.

                                                               Blocks of 10


Part 6: Each block is placed onto a square of low loft batting and backing; these should be about 1” larger all round. Pin the layers together ready for machine quilting. (I tacked mine 1/8” in from the edge of the block to hold the layers together firmly because I didn’t want any movement at all during quilting.) At this stage I felt as though I needed a plan of action. This will be a large quilt as I have loads of scraps but I now need to know where I am going with it and, more importantly, how many blocks I will need. To that end I tried some different placements on my design wall.

                                                   Regular blocks

                                                    Alternating blocks

                                                                                                                                                        
                                                             On point

 This is the setting I really like! It requires more work as there will be inset triangles all around the edge. I used graph paper to draft a pattern of a decent sized quilt and I worked out how many squares I am likely to need. The numbered squares are the ones I have already completed: there is still a long way to go!!

                                        Plan of action
 

When I was in Liberty Bell in Chester last week, I came across this delicious fabric; it contains all the colours I will be using in my quilt. Perhaps I could use this for my joining strips? Who knows because I don’t at this stage? It will evolve as it goes along.

 
                                                        Possible joining fabric


Monday 6 July 2015

BLOG 255


BLOG 255

I will be away at Wimbledon this weekend; it is my very first visit and Roger and I will be seated in the upper reaches of the centre court on Saturday to watch Andy Murray play, amongst others. I am very excited about the whole experience and, as we will be late back on Sunday night, I thought I’d better get my blog underway. This week I have been getting on with the quilt-as-you-go multi-coloured scrap quilt (I must find a better name for it!), first mentioned in Blog 246. I have loads of scrap fabrics left over from numerous other projects and it has proved a cathartic experience making something for nothing.

                                                        Scraps

 Part 1: Most of the preparation is done on the ironing board and this is the tedious part. All these scraps have to be sorted and ironed.

                                                 Ironing

 Part 2: Then it’s over to the cutting board to cut 1 ½” strips. The off-cuts will be discarded; I certainly have no intention of working with these itty bitty bits! I did a lot of my cutting at the Gresford craft group this week whilst chatting to my chums on the same table. It makes a tedious job go pleasantly and quickly.


                                             Strips

 These strips are piled by my machine ready for off, and you can see that there is a huge variety of colourful fabrics. I have discarded any very light ones.

                                Work station

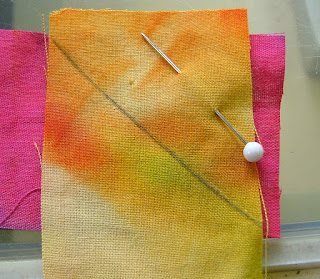
 Part 3: I over-lap 2 fabrics with RS together and it is my intention to sew on the marked diagonal. I have long since grown out of pining and marking; this is just for the picture! Here’s the sewing sequence.

                                                      Stage 1

                                                Stage 2

                                                     Stage 3

                                                 String piecing

I drop the long strands of joined fabric onto the floor, ready to be taken to the ironing board where all the seams will be ironed in the same direction. They will then be ready then for the next round of cutting.

                                              Long strands

 The waste bin where all the corners have been discarded is full of colour; it is delightful! But there is no way I am going to use them, I am probably going to put some in a bag for the grandchildren to use with glue. That will keep them quiet for a while!!

                                       Waste bin