Sunday, 20 March 2011

BLOG 44

There are two time-related focuses for my week at the moment. One is Sunday morning when I need to sit down and start my blog for the week, just assuming that there are people out there interested in what I have to say. The other is the Friday night gin! When my husband was at work, we always used to have a gin and tonic on a Friday night to celebrate the end of the working week and the start of the weekend; very civilised, eagerly anticipated and greatly enjoyed!! In retirement, this quaint habit has become a necessity as one day just trickles into the next. We usually know what month it is but the only way to distinguish the weeks from the weekends is to continue our gin habit. We switch off from retiring on Fridays and resume on a Monday mornings when my husband digs me in the ribs to get up because there is some hard retiring to do!! Isn’t life great?

This week I have continued to prepare for my classes at the AQS quilt show in Paducah next month. Time marches on and the preparation is on schedule. This week I have been concentrating on Dual Image Appliqué, my one-day workshop and the subject of my latest book.

The method is outlined as follows:

Mark the centres on the WS of the foreground fabric.

Foreground

Transfer the pattern clearly onto the paper side of the fusible web.

Pattern and fusible

Remove the excess fusible and iron the pattern centrally onto the WS of the foreground fabric.

Fusible on WS

Use a rotary cutter to cut right on the line of each shape. Cut out all the shapes or fillers from the intact frame.

Frame and fillers

Use the frame to audition potential fabrics. The one seen here has been constructed from 2” squares.

Audition fabrics

From the selected fabric, cut a large square to use with the fillers and a smaller square to go behind the frame.

Foundations

Use the frame, with its backing paper still on, to position the fillers with their paper off, onto the large foundation. Press to stick securely.

Remove the backing paper from the frame and press to stick it onto the small foundation securely.

Add batting and backing and then zigzag round the cut edged to appliqué and quilt at the same time.

Sewn samples

Quilt the surround to your satisfaction and use in to make cushions, bags, hangings etc. On the navy foreground I have sewn a wandering vine quilting stitch using a free motion method. On the coloured background, I have sewn a decorative stitch along regular marked lines with a walking foot.

Details of quilting

Use your samples to make cushions, wall hangings, bags etc. Here is a bag project from my book ‘Dual Image Appliqué’ published by AQS.
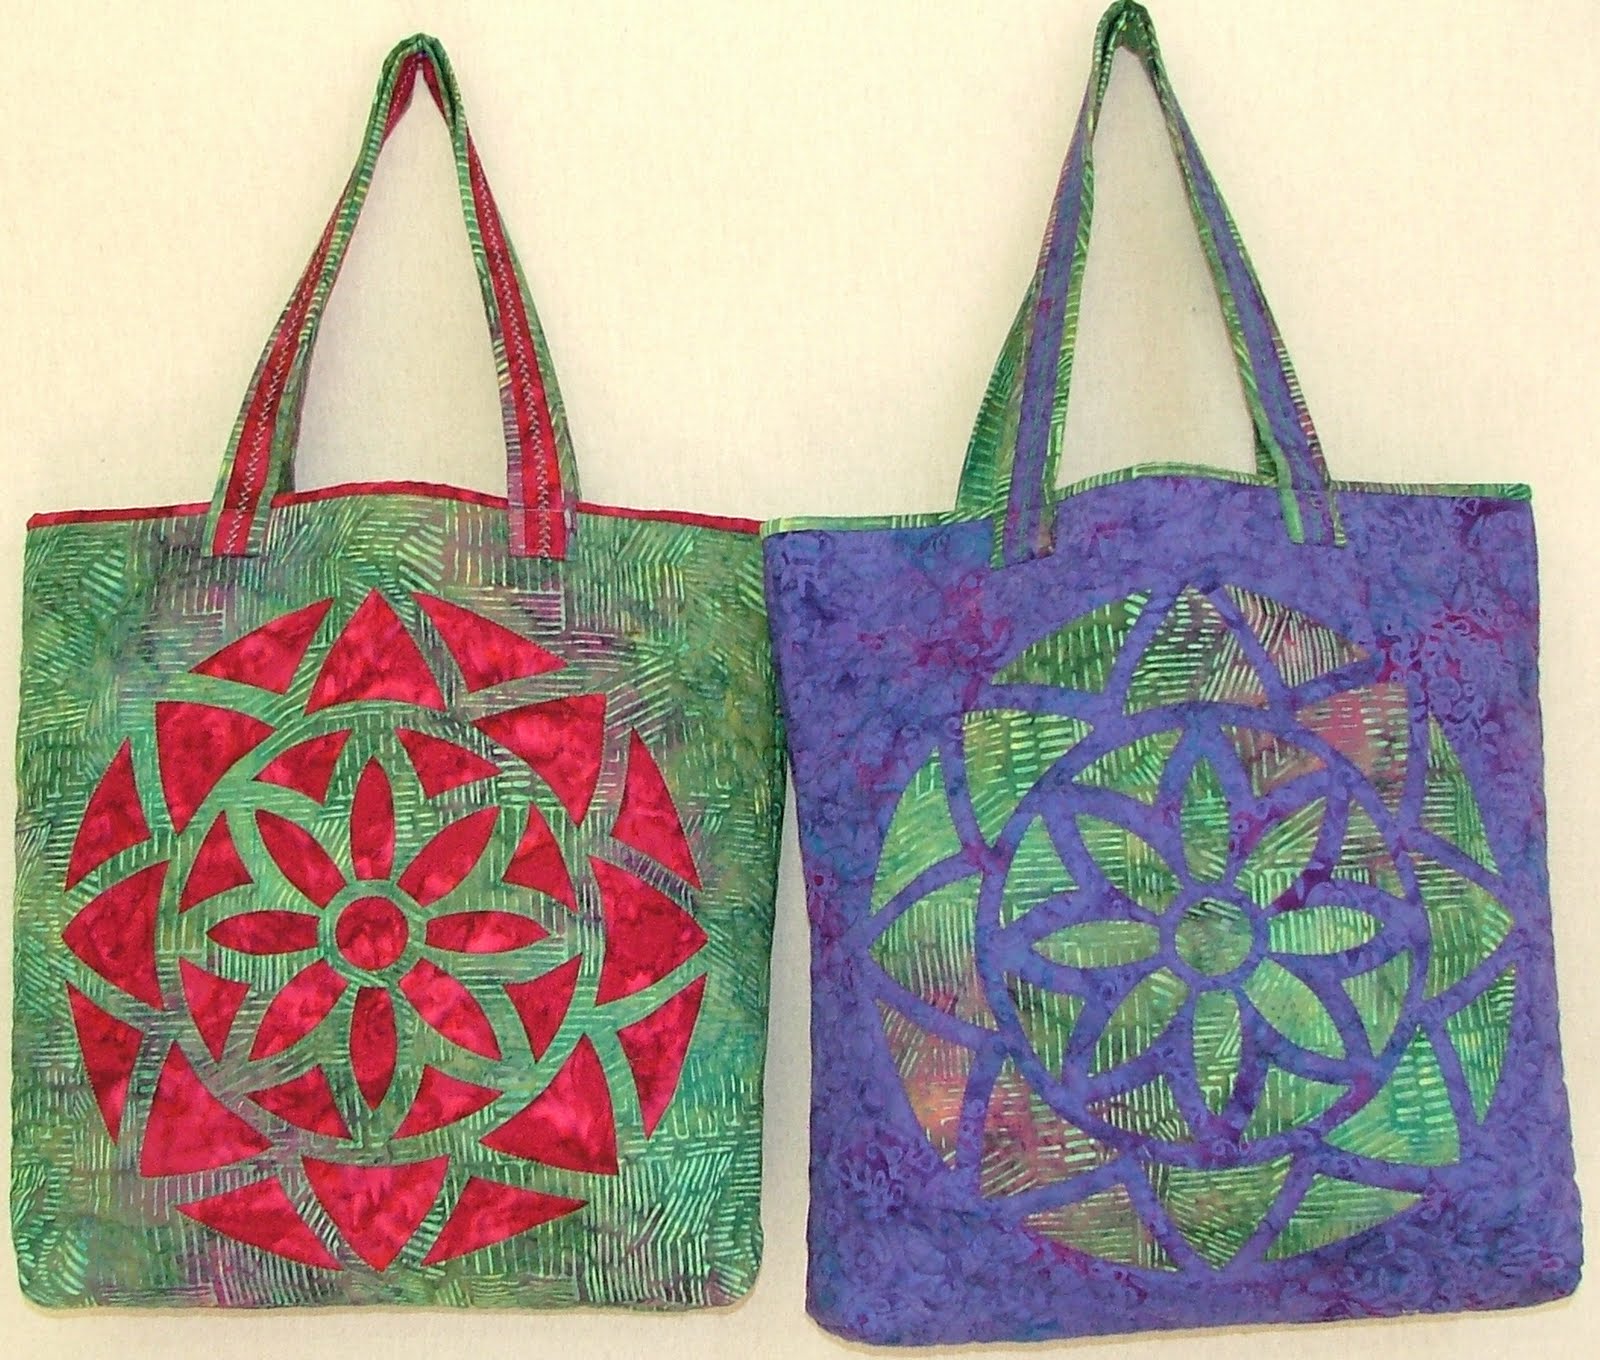
Bag project


Sunday, 13 March 2011

BLOG 43

On previous blogs, I have mentioned that I attend a machine embroidery class at Castle Court Quilters in Shropshire, taught by Suzette Smart. She arrives each month with exciting and inspiring ideas and we pretty much have a free choice over what we choose to sew during the day. This is my humble effort in progress, a sorry attempt at Suzette’s unique style of working! In a nutshell, the method is a bit like drawing shapes in a dark thread and then colouring them in, much more complex than it sounds! I have used the same pale thread on the bobbin so that flecks of it appear on the surface and give an over-all uniformity across all the colours. There is much more to do.

Stitching in progress

My preparations continue for Paducah, and this week I have been refreshing my samples for an exercise in comparing Positive and Negative Appliqué. This workshops is sewn by hand and the samples are sewn side-by-side so that the comparisons are reinforced at each of the 4 steps.

Method 1: NEGATIVE APPLIQUE

Foreground refers to the fabric onto which the pattern is transferred and from which the pattern shapes are cut.

Background refers to the fabric(s) placed underneath to become visible through the cut shapes in the foreground fabric.

PREPARATION

NB The pattern must look like a stencil for this comparison to work.

Transfer the pattern onto the RS of the foreground fabric. Trace onto a light fabric or use transfer paper on a dark fabric.

Pattern

Transfer pattern

Step one PLACE: Place the WS of the marked foreground fabric onto the RS of the background fabric. Pin to secure the layers.

TIP: Pin from behind so that the thread doesn’t get caught around them during basting.

Step one: Place

Step two BASTE: On the RS, baste with small stitches, right on the line. Sew all round the shapes with a contrasting thread to secure the foreground fabric to the background.

Step two: Baste

Step three TURN: On the RS, cut on the inside of the marked line on the foreground fabric only, to leave a scant 3/16" seam. Clip into corners and into the concave curves only (see marked clips above). Remove the basting stitches and needle-turn the seam with small, concealed stitches and a thread to match the foreground fabric.

Step three: Turn

Step four TRIM: On the WS, trim away the excess background fabric to leave a scant 1/4" seam outside the line of stitches. Note the tiny stitches defining the shape on the back.

Step four: Trim

The completed sample:


Sunday, 6 March 2011

BLOG 42

Now that we have somehow arrived in the month of March (where have the 2 months gone since Christmas?), most of my energies will be concentrated on my preparations for the quilting show in Paducah, Kentucky. I am part of the teaching faculty this year and will be kept very busy with workshops, a lecture and the all-star reviews. I am excited about being there again as I used to go regularly with friends many years ago. Paducah becomes ‘Quilt City’ when the American Quilters Society holds its annual show, this year during 27th -30th April.

This week I am preparing samples for template-free hand appliqué, a technique I have been teaching for years. Once the pattern is transferred onto the fabric, it can be translated as a 4-step method. Here is the method in a nutshell.

(Featured in ‘At Play with Appliqué’ published in the USA by C&T)

Template-free Hand Appliqué

NB: Background refers to the fabric onto which all the shapes are appliquéd.

Foreground refers to the shapes that are appliquéd onto the background fabric.

Preparation Transfer the pattern onto the WS of the background fabric. Trace onto a light fabric or use transfer paper on a dark fabric.

Place on the RS

Place from the WS

Step one PLACE: Place the WS of the foreground fabric onto the RS of the background fabric. Pin to secure the layers.

Step two BASTE: On the WS, baste with small stitches, right on the line. Sew all round the shapes to secure the fabric. Work in sequence if appropriate.

Step three TRIM: On the RS, trim away the excess fabrics on the outside of the stitches to leave a 3/16” seam. Mark the edges to be turned (optional).

Step four TURN: On the RS, remove the basting stitches, one by one, and needle-turn the seam with small, concealed stitches and a matching thread.

The method is a accurate as the drawn line and it eliminates the need for templates.

Jacobean silhouette

The work has slowed down on the Jacobean panels but I have managed to mark a background grid on the positive panels. This grid goes over the black too but misses all the flowers/leaves etc so I can add decorative free-motion detail.. eventually!!

Sunday, 27 February 2011

BLOG 41

I never really know what I am going to write about until I actually sit at the computer and start to look at the keyboard. Today is no exception so let’s see what bubbles up to the surface!

I have given myself until the end of February to complete the appliqué on the Jacobean panels and I am on course to do just that. I had intended to enter it into Quilts UK in May, the first of our annual UK competitions. As there is still so much decorative stitching, quilting and finishing to do, I have decided to bide my time and enjoy the sewing journey. What’s the point of rushing and putting myself under a lot of pressure? I have spent a quilting career of manically sewing and writing to deadlines, and now the time has arrived to chill. I can’t believe how good that makes me feel!

Much of my quilting time this week has been devoted to making a project for a magazine article. My new book, Dual Image Appliqué, needs to be promoted. A good way to do this is to send a copy to each of the magazines for review. I usually go one extra step and design an exclusive pattern for a project to accompany the review. This project draws attention to the book and introduces the basic method therein and those interested in developing the method just may purchase the book (fingers crossed!)

Here is the pair of cushions soon to be featured in Patchwork and Quilting magazine.

Patchwork and Quilting project

The technique is simple and the step-by-step method is logical. For these cushions I have used plain squares for the fusing, cutting and sewing and the results are sharp and dramatic. This pattern is a variation of a similar block used in my book and you only have to see what exciting results can be produced with the same method when the starting square is made up of 4 triangles.

Quilt blocks using a constructed square

I loved it so much that I went onto make a full sized quilt. Willow did the snuggle test and approved! I have to say that the palette used for this quilt is one of my favourites. I have always loved strong colour and have learned over the years as a homeowner, that if your walls are soft and neutral, you can use vivid quilts to create interest.

Snuggle test by Willow

Sunday, 20 February 2011

BLOG 40

We have just had one of our Sunday family meals and it is so lovely getting everyone together round the kitchen table. However immediate texting and emailing is, there is no substitute for cosy face-to-face chats over food. I am happy to spend all morning preparing a special meal for us all so that we can catch up with workdays and holidays, local news and views, weekly happenings and shared reminiscences. Family is so important.

I mentioned Quiltfest at Llangollen in my last Blog. This is relatively local to me and I usually help with the stewarding. Occasionally though I am invited to display my work, or fill in a gap in one of the displays. This year I exhibited with a group called the ‘Roll-ons’. This group was inadvertently formed at the Festival of Quilts, 2010, where there were many jellyroll quilts. So many, in fact, that we started to get weary of them. Eight of us pledged to make an alternative quilt ‘Beyond the Jellyroll’ and here it is.

From left to right, we have Forward Roll, Spring Roll, Electoral Roll, Fig Roll, Bog Roll, Swiss Roll, Sausage Roll and Jewellery Roll.

Beyond the Jellyroll

I am hand quilting the Kansas Troubles throw and enjoying the hands-on process. It is a while since I have quilted by hand and I had forgotten how relaxing and satisfying it can be. The block is very angular so I decided to ignore that and quilt concentric circles in each block. This has the effect of unifying the complete quilt without losing the precision and drama of the sharp points. I work in a 14” hoop and use a thimble and a rocking motion.

Kansas Troubles: quilting

Whilst trying to hand quilt, there is usually too much interest from our rescue cat, Pussy Willow (or Wussy Pillow as we like to call her!). I have a theory that wadding (batting) is magnetic to cats! Whether it is in a bag, on the floor, in a cupboard or sandwiched between the fabrics of a quilt, the cat always seem to find it. This is her special chair in the kitchen, with wadding on the seat and a quilt as a backdrop.

Willow’s chair

Willow was removed by the RSPCA from a cat breeder in the Lake District, along with several others. Totally neglected, she was in an awful state when we first brought her home. But with time, care and attention she has become one of the loveliest cats we have had.

The tedious and repetitive sewing on the Jacobean panels continues. The edges of each black shape have to be sewn with a zigzag stitch to prevent them from fraying. It’s hard sometimes to keep the impetus and enthusiasm going!

Jacobean panel

Jacobean panel: detail

Sunday, 13 February 2011

BLOG 39

Today Roger and I have been for a walk in the grounds of Chirk Castle, a property owned by the National Trust. It was the weekend of the annual snowdrop walk, and after the high winds and lashing gales at the beginning of the week, it was just lovely to be outside in the gentle sunshine and calming countryside today.

Roger Mortimer, Justice of North Wales for Edward 1 built the castle over 700 years ago, as a fortress. The castle is impressive, and the grounds extensive, accessed by topiary lined pathways. Snowdrops, commonly regarded as the harbingers of spring, are everywhere and here, a carpet of them surrounds me.

Snowdrops at Chirk castle

Chirk Castle has some magnificent wrought iron gates which are dated 1719 and bear the coat-of-arms of the Myddelton family. They were made by the Davies Brothers, Robert and John of Croesfoel Forge, near Bersham, Wrexham and were erected between 1719 and 1721.

The coat-of-arms of the Myddelton family is the crowning point of the overthrow of the gates. This incorporates the red “bloody” hand of the Myddelton family, a feature that has been the source of many myths and legends. One story tells of a dispute over inheritance of the castle many years ago between two youths of the family. To settle the dispute, the two youths agreed to run a race, the winner being the first to touch the Castle gates. Legend has it that the first youth to reach out to the gate at the finishing line was deprived of victory by a supporter of his adversary. The supporter drew his sword and cut off the youth’s outstretched hand: thus the “bloody” hand.
A further legend tells of a battle led by one of the early Myddeltons, dressed in a white tunic, during which he was badly injured. He placed his blood-covered hand on his tunic and left the imprint of the bloody hand, which then became his heraldic symbol.

Chirk Castle Gates


Chirk Castle Gates detail

I have been stewarding at Quiltfest in Llangollen this week. The featured quilter this year is Deanne Hartwell-Jones who does all her sewing by hand. Amazingly, she doesn’t own a sewing machine and everything, from patchwork to appliqué to quilting to binding, is done by hand. She constructs all her patchwork with minute precision, using the English paper piecing method. I think I would lose the will to live, working over papers but it suits Deanne and here are some of her quilts.


Quilt to commemorate the Queens Golden Jubilee


Quilt made from fabrics used in the Welsh National costume


Quilt influenced by Snowdonia


Sunday, 6 February 2011

BLOG 38

The weather has been really awful this week, with lashing rain and howling gales. But do I care? Not one bit because it gives me the excuse to stay indoors to sew!! I have concentrated my time and efforts this week on the construction and sewing of the quilt that I wanted to make as a throw for the settee (see selection of fabrics in Blog 37). I love the colour palette I have chosen and I just knew that once I had selected my fabrics, I wouldn’t be able to resist making a start. I have chosen a traditional patchwork block called ‘Kansas troubles’.

Kansas Troubles block

It is not too complex but does demand careful preparation, accurate cutting and precise sewing. The finished block size is 8” and I want to do 5 rows of 5, with added borders. Where possible, I opt for quick construction methods and here’s an example.

How to produce 8 half square triangles (2 ½”) from 2 large squares:

Cut out two 6 ½” squares from a light and a dark fabric.

On the light fabric, draw the vertical and horizontal centre lines to define 4 squares.

Divide each square across the middle with a diagonal line as shown.

Place the fabrics RS together, with the marked side uppermost.

Sew an accurate ¼” seam on both sides of each diagonal line and press.

Half square triangle preparation

On a cutting board, use a rotary cutter and ruler to cut on all the marked lines to divide the square into 8 pieces. Each piece is made up of a light and dark triangle, joined by a seam.

Cutting

On the ironing board, pile the triangles with the dark fabric on top.

Lift the point of the dark fabric to reveal the light triangle and press into a square. (Doing it this way irons both the seams in the same direction, from light to dark.)

On the cutting board, trim the squares to an accurate 2 ½”.

Pressing

The large squares are cut at 8 7/8” and the small squares at 4 7/8”. They are then cut on the diagonal to give 2 large and 2 small triangles.

Large and small triangles

Some smaller dark triangles are needed to complete the block. Cut some 2 7/8” squares and divide on the diagonal. The 2 ½” corner squares are cut from the light fabric.

Corner blocks

Here’s my completed quilt top, safety-pinned onto the batting and backing layers ready for quilting. Love it!

Kansas Trouble quilt 50” x 50”

This coming week I am stewarding in Llangollen at Quiltfest, an annual event organised by Val Shields, who also heads our Gresford sewing group. All the members are expected to give time for stewarding so I am in Plas Newydd on Monday all day and the museum on Wednesday. This is going to give me time to hand quilt my work; I can’t wait to start!