This week I
have concentrating on completing the wall hanging of Ella’s drawings, mentioned
in Blog 164. In that blog, I showed the method used to make several
blocks of what is basically crazy log cabin. I was not able to control the size
of her drawings, even by giving her constant 8” squares of fabric to draw on
(you can’t put a damper on spontaneity!) so I took the best of the drawings
and, with borders, produced squares measuring 3”, 4” 6” and 8”. On paper I also
drafted a crude gird of what size blocks I needed to make a balanced wall
hanging, 16” wide.
Joining the squares
Place the blocks
RS together and join them to make a line, and join line to line to create the
wall hanging. You will see that I have sewn onto cotton batting with no backing
fabric thus enabling me to iron open the ¼” seam to make it flat. (These seam
allowances could be hand basted to hold them down if you prefer.)

Once all the
blocks are joined together, I use a long ruler and rotary cutter to straighten
the raw edges.

I have
decided to add a length of folded patchwork to the lower edge of the wall
hanging, and this is one of those super techniques that you just NEED to know. (ASIDE: When I first started to teach, 30 years ago, I would have been cutting
individual squares and trying to fold and iron them individually without
burning my fingers! This method is much easier and you have my apologies for
being unable to recall the name of the person I saw demonstrating it over 20
years ago.)
Folded patchwork border
Cut a 5”
strip by the length you require from your selected fabric (mine was 5” x 15”).
On the WS, draw a central line along the length, to divide each half into 2 ½”.
Mark the top half into 2 ½” sections (creating a line of 2 ½” squares). Cut
away half a 2 ½” square from the lower line (2 ½” x 1 ¼”) and mark the lower
section into 2 ½” squares also. The sides of the lower squares should be exactly
halfway along the sides of the upper squares.

Cut along
each of the vertical marked lines up to the centre line.

Working one
row at a time on an ironing board, fold and press each square on the diagonal
as shown.

Repeat for
the other row, pressing in the same direction.

On both lines, fold the top point of the triangle down
to meet the other end of the diagonal and press as shown.

Fold and
press along the central line marked along the length. Pin to hold the triangles
in place.

Take out the
pins, inter-weave the triangles and re-pin.

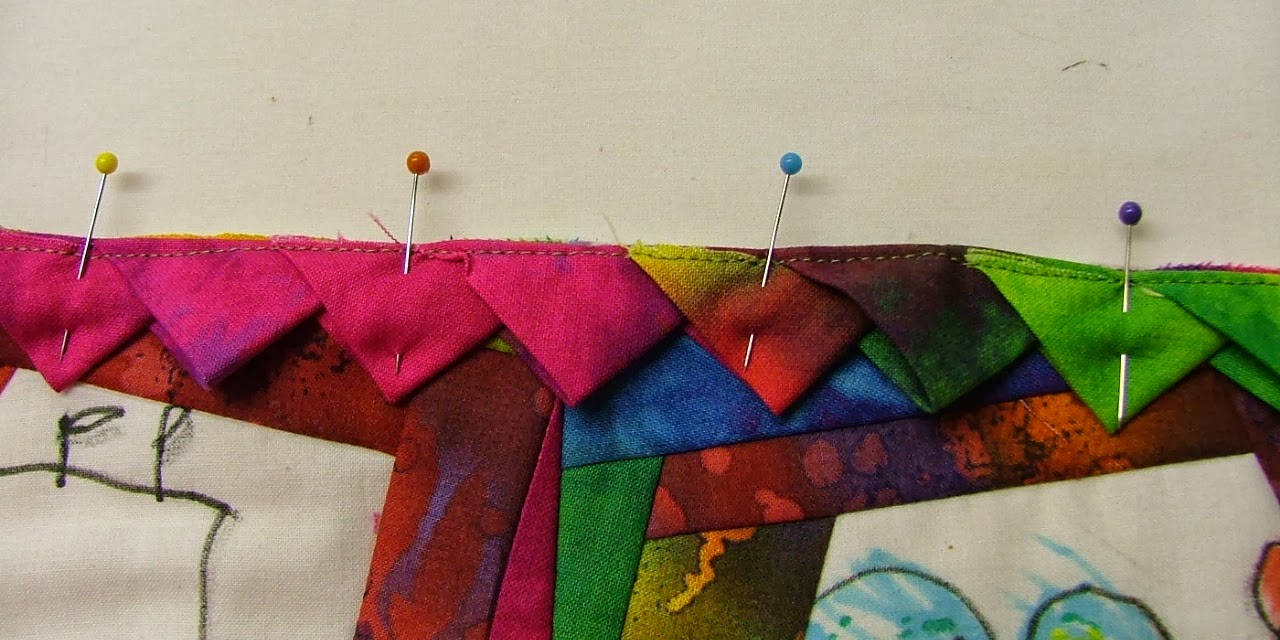
Sew a
machine line 1/8” in from the fold to hold the triangles in place.

Pin the
strip to the edge where it is to be featured.
Prepare a piece of backing fabric that is about 1”
larger all around than the size of the front. Iron a 1” strip of fusible to the
WS, about 2” below the top edge (mine measured 1” x 13”). Use a rotary cutter
to cut a clean line, leaving 1” either side of the cut.

Cut the
fusible
Pin well to
hold the prepared top and the backing RS together, placing the pins at right
angles to the seam.

With the
batting side uppermost, sew all the way round with ¼” seam making sure that you
don’t remove the pins until you are almost sewing over them to prevent
slippage. Trim away the excess fabric and trim across the corners (ASIDE: you will see that I have
exaggerated the corner by sewing 3 diagonal stitches across it. This helps to
give a softer corner and it is easier to turn through.)

Remove the
paper from the fusible and turn the quilt RS out carefully through the remaining
hole.

Remove the fusible
paper
Use a blunt
point to help to get a pleasing corner and iron only the edge of the quilt so
that the backing is not visible on the front.

On the back,
hold the edges of the hole together and iron to stick them onto the batting.

Iron to
close the hole
Make a thin hanging
sleeve to go onto the back to cover the hole.

Add a sleeve
I have added
Ella’s name and my signature to complete.
(Darn it!! I
forgot to take a picture of the completed hanging in my enthusiasm to hand it
over to Ella so you’ll have to wait until next week to view it! Sorry about
that.)


No comments:
Post a Comment