Saturday, 27 July 2013

BLOG 159


I was asked yesterday what I was going to write in my blog this week and I rightly replied that I hadn’t a clue! I have pondered in past blogs as to whether my blog keeps me sewing or my sewing keeps me blogging. All I know is that when it gets to the weekend, I start to panic and scout around for something that might be of interest to my many readers, particularly when I am between projects.

This was the week of the Quilters’ Guild Region 13 exhibition in Bangor Cathedral and here is the quilt that I exhibited. I must say that it was in a lovely position, at the top of the stairs on the way out …. I actually missed it on the way in!

                                                 Park Gate


The quilts were hung along the sides of the cathedral so as not to impede with the main body and function of the church. Identical telescopic stands were used which made the exhibition look very professional I thought. Well done to those concerned!

                                     Bangor Cathedral

                                         Quilts at Bangor


There was also a quilt exhibition at Llanfairfechan in aid of Cancer research. I was talking so much to one of the organisers that I forgot to take any pictures!! Can’t believe it!

Back at Planet Fronks, I got himself to hang my Delectable Mountain quilt. We live in converted farm buildings with 20” thick walls and small windows so not a lot of light gets into the room. I have to coax him to drill holes in these walls but he does as he’s told … mostly! We can now enjoy this quilt when we wake up in the mornings. Good job I don’t suffer from migraines!

                           Wall hanging


TIP: He usually hangs my wall quilts this way: A thin baton is screwed into the wall as a permanent fixture. Another such baton is put through the sleeve on the back of the quilt and then screwed onto the permanent baton.

                                  Baton through sleeve

 When the corner of the quilt is folded back, the fixture becomes invisible. I usually cut my sleeve to the width of the quilt but by the time I have tidied the seams, there is about 1” clear on either side. Any further wall hangings will have to be made to these same dimensions to fit the baton!

                         Invisible baton

 
There are more of my home-made features in the room. Curtain tie-backs were made from garden twine, fabric hearts and tin hearts (cheap at Hobbycraft!).

                                 Tie backs

                                         Felt picture

                                    Lined baskets

       Mixed media paintings


My next project for this room will be to make a cover for a tissue box from fabric and card. Join me next week to find out how to do it.

                                                                                                  Tissue box

Sunday, 21 July 2013

BLOG 158


Another week, another blog! And this week it is the quilting of the Delectable Mountain wall quilt.


QUILTING: As I have shown in past projects, I like to think long and hard about the all quilting patterns that I can possibly try. I usually do this mentally during the construction of the quilt top when I am familiar with the twist and turns of the design that I am sewing. I even go to the effort of doing a rough pattern on paper and trying out different ideas.


                                           Quilting ideas


The first lines of sewing are the stabilising lines which go in the ditch across the quilt and around the outside edges. These are done with a walking foot so that all the layers of fabric are fed through evenly (hence the alternative name of even feed foot!).

                               Sewing in the ditch


I always wear a gardening glove on my left hand when I am machine quilting, to get the maximum control with the flat of my hand on top of the fabric. I grip the folds of fabric firmly with my right hand.

                                   Maximum grip


Once stabilised, I then change to an embroidery foot for free-motion sewing. As the Delectable Mountain pattern is very angular and linear, I chose to make all my quilting designs fluid and organic. From my original ideas and doodles on paper, I chose to do a continuous leaf and circle motif across the light areas of the design. The horizontal safety pins that are removed from the light fabrics during sewing are repositioned into the red fabric on the vertical.

                           Quilting design light fabric

                                                 Detail


After completing all the bands of light fabric I chose to do a contrasting undulating line across the red fabrics.

                               Quilting design red fabric

 
Around the border I to drew leaves, with the occasional flower. I used this darker border thread to spill into the light fabrics near the top and bottom borders, drawing a branch and leaf motif (which happens to be a favourite at the moment!)

                                           Border quilting

                                          Branch and leaf

 A double binding was sewn around the outside edge, enclosing a sleeve for hanging. I think a signature is all that’s required and it will be ready to be hung in situ as a soft furnishing.

                   Delectable Mountain


PS I hope this technique may have inspired you to have a go. I am always interested to see quilts that have been made as a result of my blog.  It’s good to share!


PPS In the August issue of the British Patchwork and Quilting magazine, my husband has written a funny article on our quilt about Sun Bonnet at the Olympics quilt. It’s brilliant!!

Sunday, 14 July 2013

BLOG 157


DELECTABLE MOUNTAINS continued.


This is the layout I chose in the end so the next step is to join the individual shapes together to make the rows and then sew row to row to make the quilt centre.


                                      Chosen layout

 
9 Place a pair of the pattern building blocks RS together and pin to stabilise the raw edges and to hold the exact point where the angled seams are going to meet. Create the rows first, sewing an accurate ¼” seam allowance.


                                         Pin to secure

 
10 Press on the WS of Row 1 to establish the directions of the seam allowances. Place Row 2 on the ironing board underneath it. Press the seam allowances on Row 2 to go in the opposite direction to Row 1 so the seams can be butted up. Place the rows RS together and pin every 3 or 4 seams to hold them in place. Accuracy is imperative when sewing these rows together with a ¼” seam. Check the points after sewing and re-do any that are not sharp.


                       Press and pin the rows


TIP: Don’t remove the pins until you are about to sew over the top of them.


                            Remove the pins


11 Always press the seams before sewing to establish their direction, with reference to the previous row.


                           Press to fit the row above

 Complete the quilt centre and press ready for adding the borders.


                          Quilt centre


                          Border fabrics


12 Choose the border strips. My inner border was cut at 1 ½”.


                                Inner border strips

 
13 Measure through the vertical centre of the quilt and cut the vertical borders to that measurement. Join them to the raw edges of the quilt centre by making the quilt edges fit the length of the strips.
14 Measure through the horizontal centre of the quilt and cut strips to that measurement. Sew them in place to complete the inner borders.


                    Inner borders

15 Repeat the process for the outer borders. My outer border was cut at 2 ½”.


                          Outer borders


16 The quilt is ready for putting onto the wadding and backing fabric. I had to join together two smaller wadding pieces to make a piece large enough for the whole quilt. I did this by cutting straight edges and butting them together (not over-lapping them). I sewed them with the widest zigzag stitch on my sewing machine.


                             Joining the wadding

 17 Lay the backing and wadding onto a flat surface. I pin the edges of the backing fabric into the carpet and lay the wadding on top. Pin to secure the layers for the quilting process.


                              Wadding and backing

And as sure as eggs is eggs, Willow appears to ‘help’!


                             A helping paw

 The next step is the quilting, so this project will be continued next week.

 PS And how’s this for a neat storage idea? It came from Ikea and it allows you to remove the clutter from your work service. I like it a lot!


                                         Storage idea

Sunday, 7 July 2013

BLOG 156


DELECTABLE MOUNTAIN continued

 5 Use a ruler and rotary cutter to cut across the diagonal line. This will produce 2 half-square triangles.


                                   Cut on the diagonal


                        Two half square triangles


5 Prepare and cut several of these and place them in a pile beside the iron with the dark (red) fabric on top.


                                              Dark on top


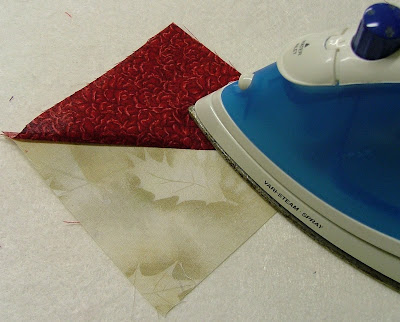
6 Lift the dark triangle away from the light triangle and press to produce a square. Having the dark fabric on top ensures that the seam allowances automatically go towards the dark fabric. 1 light square + 1 dark square = 2 two-coloured squares.


                               Press to make a square


                                                    2 squares

 
7 Use a rotary cutter and a suitable ruler to reduce the size of the square. Place the diagonal line of the ruler along the seam line and trim away the excess fabric. The finished size must be divisible by 4. I am working on a 4 ½” square.


                                                Trim

 
8 The half-square triangles are now going to be cut into 4 equal strips to produce mirror image building blocks.


TIP: I found it useful to have this prompt beside my cutting mat after cutting 36 squares all the same way!!


                                   Aide memoire

 
Here, in pictures, is the cutting, re-arranging and sewing sequence. I cut my strips at 1 -1/8 "


                    Cut equal strips (dark lower left)


                                        Re-arrange


                                Sew together


                      Cut equal strips (dark lower right)


                                               Re-arrange


                                      Sew together

 
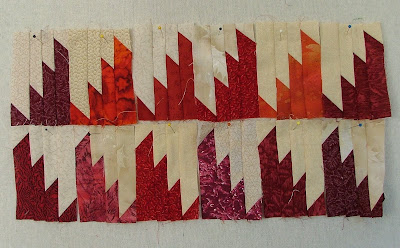
These are the building blocks for Delectable Mountain. Build up a quantity of blocks and play around with them to see what you can come up. Below are some of my attempts.


                                         Building blocks


                                    Traditional


                                          Reflection


                                                Wavy


                                 Positive/negative


                              Coming and going


                                       Birds


Decisions, decisions! More of this next time.


PS Just had a thrilling afternoon watching Andy Murray win Wimbledon. Sometimes we can say of a match that the winner didn’t really win, it was just that his opponent lost. But in this instance Andy won a remarkable game; it was a huge victory and all down to his great talent and unflagging tenacity. Feel very proud to have witnessed it!