BLOG 325
My commissioned table runners were very well
received; it made me very proud to know that someone sees the real value in my
work (thanks Chris!) Now however, I need to get on with the things I like to
make for Xmas presents. I only make for people who I know will appreciate them
and the process of deciding what to make and how to go about it always gives me
great pleasure.
The first project is for the parents of a family
who have everything, including a second home by the sea. A small wall hanging
of boats seems the right thing to hang on the wall ….. even if it does end up hanging
in the loo! I won’t know, will I? So, the shelf unit I bought from a charity
shop for the bargain price of £6 has now been converted to an ironing table
placed beside the sewing machine.

The fabrics have been chosen to represent an
atmospheric sky, neutral sails, an inky sea and colourful hull.

The 2 boat patterns are taken from a Carol Doak
book on ‘foundation piecing’ and this is the method I am going to use for these
small 4” blocks. The last thing I want is to spend hours preparing tiny templates
and so I strongly recommend this technique for small scale sewing. You can see
that the pattern is numbered and this shows the sewing sequence. The marked side is where the sewing is done
along the lines; the unmarked side is where the fabric is placed.

I rough-cut some generous triangles for the sails (1
and 2) and placed them RS together on the unmarked
side of the paper, over the place where #1 sail is going to be.

Using a neutral thread top and bottom and a tiny
stitch (to perforate the paper and make it easier to remove later) I sewed on
the marked side, along the line between #1 and #2. I sewed from one end to the
other and not beyond to make it easier to fold the paper
pattern for trimming.


Cutting board

F olded pattern

Pressed open
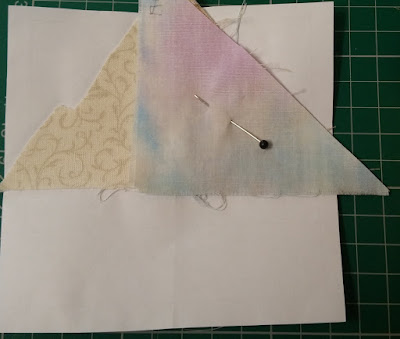
Pinned corner

Trimmed edge

Completed blocks

2 designs

Sew
This is now ready for trimming on the cutting board
using a rotary cutter and ruler.

It is very important to fold the paper pattern out
of the way so that you only trim the seam allowance from the edge you have just
sewn.

Once trimmed, it can be pressed open to produce 2
sails. And that’s the method: place, sew, trim and press. I usually rough-cut
squares and rectangles much larger than I need so there is no unpicking but
some people like to cut to size and risk it!


I carried on working through the number sequence
until it had all been sewn and then trimmed the edge to a ¼” seam allowance.


I intend to make this as a long strip so I need to
do one more to complete it. And so folks I have started my Christmas
preparations, it’s official!

No comments:
Post a Comment